
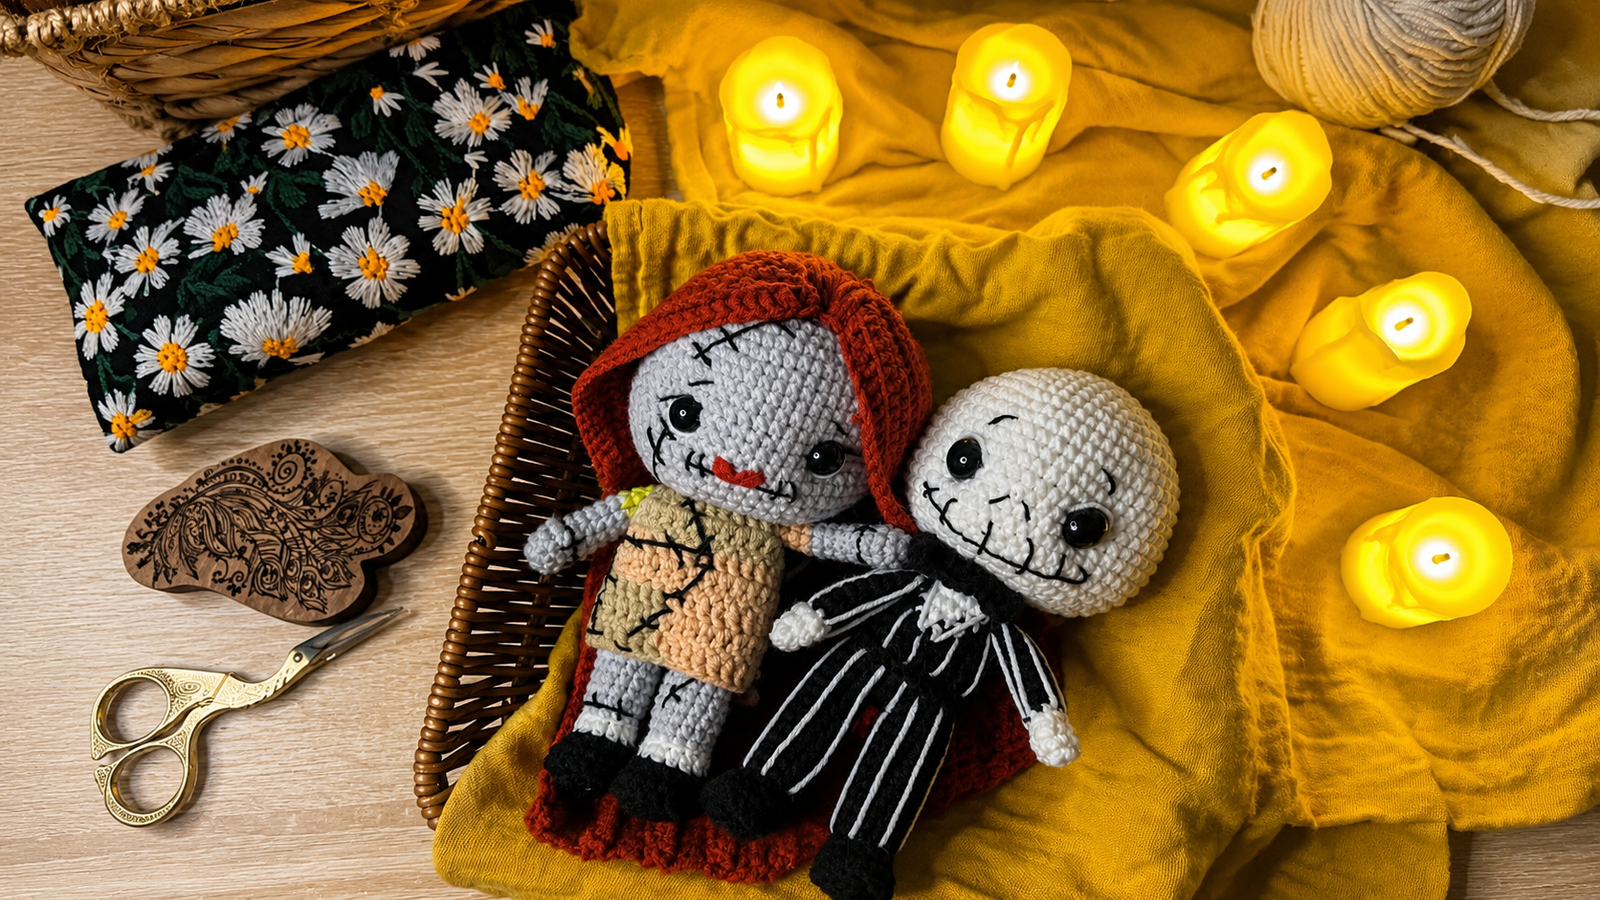
Jack amigurumi crochet: free step-by-step pattern
If you love crocheted dolls with personality, this Jack amigurumi is one of those pieces you enjoy from the very first round. His striped suit, embroidered smile, and black-and-white details make him a perfect amigurumi toy for anyone who loves crochet with a Halloween-inspired look.
In this free pattern, you will find the complete step-by-step instructions to crochet the doll, including the legs, body, arms, head, bow tie, and embroidered details. It is a project with several small finishing details, ideal for practicing color changes, embroidery on amigurumi, and piece assembly.
This design is inspired by a gothic-style character, easily recognized by his dark suit, white face, and expressive smile. The charm of the pattern lies in keeping the crochet work neat and making the facial embroidery express that distinctive mix of sweetness and mystery.
Reviewed and organized by Patterns Amigurumis. This pattern was edited to improve readability, preserve the complete rounds, and make the step-by-step crochet process easier to follow.
Amigurumi technical details
- Difficulty level: intermediate, mainly because of the color changes, arm joining, and final embroidery.
- Estimated crochet time: several hours of work, depending on your pace, tension, and experience with small amigurumis.
- Approximate finished size: not indicated in the original pattern; it may vary depending on the yarn, hook, and tension.
- Type of project: crocheted amigurumi doll of a decorative character.
- Ideal for: Halloween decoration, crocheted character collections, handmade gifts, and crochet projects with embroidered details.
- Main technique: spiral crochet, single crochet, increases, decreases, color changes, BLO, embroidery, and sewing pieces together.
Materials
- YarnArt Jeans or Alize Cotton Gold yarn in black.
- YarnArt Jeans or Alize Cotton Gold yarn in white.
- 2 mmcrochet hook.
Advertisement / affiliate link. As an Amazon Associate, I earn from qualifying purchases.
- 14 mm safety eyes.
- Amigurumi stuffing.
- Large-eye needle for sewing and weaving in ends.
- Scissors.
Optional or recommended: stitch marker so you do not lose the beginning of each round, especially on the legs, body, and head.
If you have questions about yarns or tools, check our: complete guide to amigurumi materials
If you need help with color changes, you can see our step-by-step guide on how to change color in amigurumi.
Abbreviations
- ROUND: round.
- ch: chain.
- MR: magic ring.
- sc: single crochet.
- hdc: half double crochet.
- dc: double crochet.
- tr: treble crochet.
- inc: increase.
- dec: decrease.
- sl st: slip stitch.
- BLO: crochet through the back loop only.
- FLO: crochet through the front loop only.
- Deep sc: single crochet worked deeper into the stitch, indicated in the original pattern as ВСБН.
- BLK: black color.
- W: white color.
You can review all the techniques in our guide to crochet abbreviations for amigurumi
Before you start
- Read the entire pattern before starting, because the arms are joined to the body during a specific round.
- Clearly mark the beginning of each round so the decreases and color changes of the suit stay aligned.
- In the body round worked in BLO, keep the front loops available because a decorative round will be crocheted over them later.
- Stuff the body before closing it, but do not overstuff so the stripes do not deform and the stitches do not open.
- The embroidery on the face and suit is key in this doll: take your time and check the symmetry before weaving in the ends.
Complete step-by-step pattern
Legs and body
Start with black yarn.
ROUND 1: 6 ch. Starting from the second chain from the hook: 4 sc, 3 sc in the same stitch, 3 sc, 1 inc. Total: 12 stitches.
ROUND 2: 1 inc, 3 sc, 3 inc, 3 sc, 2 inc. Total: 18 stitches.
ROUND 3: 18 deep sc.
ROUND 4: 18 sc.
ROUND 5: 3 sc, 6 dec, 3 sc. Total: 12 stitches.
ROUND 6: Work in BLO: 12 sc.
ROUND 7: 12 sc.
ROUND 8: 12 sc.
ROUND 9: 12 sc.
ROUND 10: 12 sc.
ROUND 11: 12 sc.
ROUND 12: 12 sc.
ROUND 13: 12 sc.
ROUND 14: 12 sc.
ROUND 15: 12 sc.
ROUND 16: 12 sc.
Stuff. If this is the first leg, cut and secure the yarn. The second leg is joined to the first one.
ROUND 17: On the second leg, crochet 3 sc, 1 ch, and insert the yarn into stitch 11 of the first leg.
ROUND 18: 26 sc.
ROUND 19: 26 sc.
ROUND 20: (6 sc, 1 dec) repeat 3 times, 2 sc. Total: 23 stitches.
ROUND 21: Work in BLO: 23 sc.
ROUND 22: 23 sc.
ROUND 23: (5 sc, 1 dec) repeat 3 times, 2 sc. Total: 20 stitches.
Next, work with yarn changes to form the collar. You may also skip the color change and embroider the collar later with white yarn. BLK stands for black and W stands for white.
ROUND 24: 13 sc in BLK, 2 sc in W, 5 sc in BLK. Total: 20 stitches.
ROUND 25: 12 sc in BLK, 4 sc in W, 4 sc in BLK. Total: 20 stitches.
ROUND 26: 11 sc in BLK, 6 sc in W, 3 sc in BLK. Total: 20 stitches.
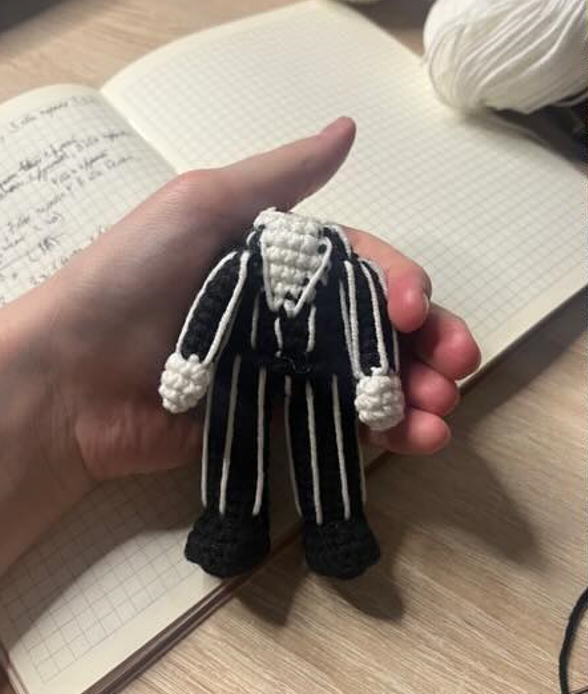
ROUND 27: Join the arms: 1 sc in BLK through the arm, 7 sc in BLK, 4 sc in BLK through the arm, 6 sc in W, 3 sc in BLK through the arm. Indicated total: 20 stitches.
ROUND 28: (3 sc, 1 dec) repeat 2 times in BLK, 2 sc in BLK, 1 sc in W, 1 dec in W, 3 sc in W, 1 dec in BLK, 2 sc in BLK. Total: 18 stitches. Stuff the body.
ROUND 29: All in white: (1 sc, 1 dec). Secure the yarn, cut, and hide the end.
Make one round of sc on round 21, working into the front loops. Embroider the suit stripes with white yarn and outline the collar. Sew the head to the body.
Head
Work with white yarn.
ROUND 1: 6 sc in MR.
ROUND 2: 6 inc. Total: 12 stitches.
ROUND 3: (1 sc, 1 inc) repeat 6 times. Total: 18 stitches.
ROUND 4: (2 sc, 1 inc) repeat 6 times. Total: 24 stitches.
ROUND 5: (3 sc, 1 inc) repeat 6 times. Total: 30 stitches.
ROUND 6: (4 sc, 1 inc) repeat 6 times. Total: 36 stitches.
ROUND 7: (5 sc, 1 inc) repeat 6 times. Total: 42 stitches.
ROUND 8: (6 sc, 1 inc) repeat 6 times. Total: 48 stitches.
ROUND 9: (7 sc, 1 inc) repeat 6 times. Total: 54 stitches.
ROUND 10: 54 sc.
ROUND 11: 54 sc.
ROUND 12: 54 sc.
ROUND 13: 54 sc.
ROUND 14: 54 sc.
ROUND 15: 54 sc.
ROUND 16: 54 sc.
ROUND 17: 54 sc.
ROUND 18: 54 sc.
ROUND 19: 54 sc.
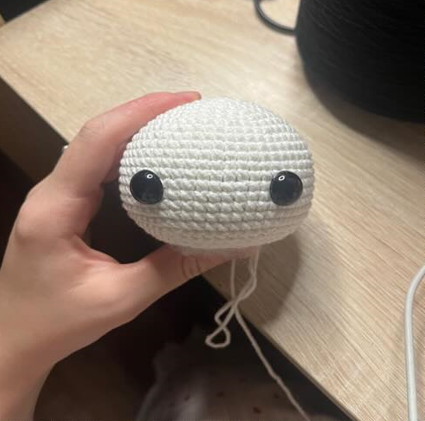
Place the eyes between rounds 15 and 16.
ROUND 20: (7 sc, 1 dec) repeat 6 times. Total: 45 stitches.
ROUND 21: (6 sc, 1 dec) repeat 6 times. Total: 42 stitches.
ROUND 22: (5 sc, 1 dec) repeat 6 times. Total: 36 stitches.
ROUND 23: (4 sc, 1 dec) repeat 6 times. Total: 30 stitches.
ROUND 24: (3 sc, 1 dec) repeat 6 times. Total: 24 stitches.
Stuff.
ROUND 25: (2 sc, 1 dec) repeat 6 times. Total: 18 stitches.
ROUND 26: (1 sc, 1 dec) repeat 6 times. Total: 12 stitches.
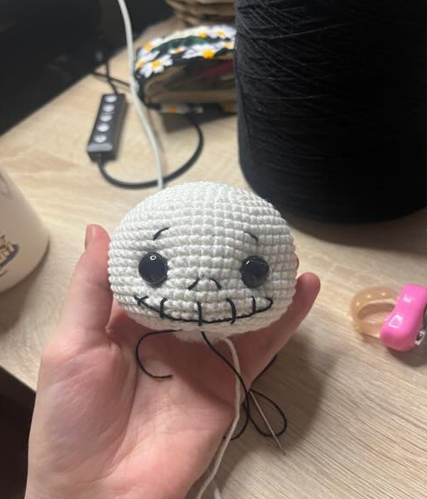
Secure the yarn and leave a long tail for sewing. Make a good indentation around the eyes. Embroider the eyelids with white yarn and, with black yarn, embroider the nose, smile, and eyebrows.
Arms
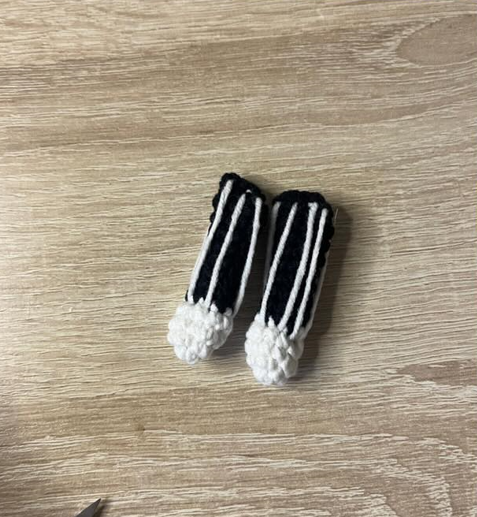
Make 2 pieces. Start with white yarn.
ROUND 1: 5 sc in MR.
ROUND 2: 5 inc. Total: 10 stitches.
ROUND 3: 10 sc.
ROUND 4: (2 sc, 1 dec) repeat 2 times, 2 sc. Total: 8 stitches. Change to black yarn.
ROUND 5: 8 sc.
ROUND 6: 8 sc.
ROUND 7: 8 sc.
ROUND 8: 8 sc.
ROUND 9: 8 sc.
ROUND 10: 8 sc.
ROUND 11: 8 sc.
ROUND 12: 8 sc.
Do not stuff. Join the sides with 4 sc. Embroider the stripes with white yarn.
Bow tie
Work with black yarn. Leave a small tail at the beginning; it will be the first little strip.
ROUND 1: 6 sc in MR.
ROUND 2: 5 ch. In the third chain from the hook: 1 dc, 1 dc, 1 hdc, 1 sl st.
ROUND 3: 4 sc around, 5 ch. In the third chain from the hook: 1 tr, 1 dc, 1 hdc, 1 sl st.
Secure the yarn and leave a little tail for the second little strip.
Assembly and finishing
- Sew the head to the body using the long tail left after closing the head.
- After round 21 of the body, work one round of sc over the front loops that were left free to form the clothing detail.
- Embroider the suit stripes with white yarn, trying to keep them even across the front of the body, arms, and legs.
- Outline the collar with white yarn if you did not make the color change while crocheting.
- Make the eye indentation before finishing the facial embroidery so the expression looks more defined.
- Carefully embroider the eyelids, nose, smile, and eyebrows.
- Sew the bow tie to the front, below the head, centered over the collar.
My experience and tips for crocheting this amigurumi
While reviewing and organizing this pattern, the most important thing I notice is that neatness depends heavily on three areas: joining the legs, changing color for the collar, and the final embroidery. They are small details, but they are what make the doll recognizable and expressive.
For the body, I recommend working with firm tension, especially on the black part of the suit, because the white lines are embroidered over it later and any loose stitch may lose its shape. It is also best to crochet the arms before reaching the round where they are joined to the body, so you do not have to interrupt your rhythm or improvise.
On the head, the eye indentation changes the result a lot. It is better to do it gradually, checking both sides before securing the yarn. If the doll is going to be for a small child, the safest option is to embroider the eyes instead of using safety eyes, even though the original pattern indicates 14 mm eyes.
For the suit embroidery, using even white strands helps the stripes look clean. There is no need to pull too tightly: if the white yarn pulls on the black crochet fabric, the piece may lose its shape. Ideally, secure each line with discreet stitches and hide the ends well inside.
Frequently asked questions
Can I use a different yarn to crochet this Jack amigurumi?
Yes, you can use another yarn of a similar thickness. Keep in mind that if you change the yarn weight or hook size, the final size of the doll may also vary.
What should I do if the white stripes on the suit look crooked?
Before weaving in each line, adjust it with a needle and check the doll from the front. It is better to correct a stripe before hiding the yarn than to try to adjust it once it is already secured.
Can the eyes be embroidered instead of using safety eyes?
Yes. If the amigurumi will be for a baby or a small child, embroidering the eyes is a safer alternative than using plastic pieces.
Pattern credits
Original pattern by @klubok_toyss.
Did you crochet it? Leave me a comment or share it on social media using #PatternsAmigurumi so I can see it.
Before you start: useful supplies for this amigurumi
Check yarn, eyes, stuffing, and accessories before crocheting so you do not get stuck halfway through the project.
- Safety eyesAdds a clean, even expression to the doll.View options
- Crochet hookThe right size keeps stitches firm and neat.View options
- Safety noseA small detail that improves the finish.View options
- amigurumi eyesA practical way to gather supplies quickly.View options
- plastic eyesA practical way to gather supplies quickly.View options
- Cotton yarnPick similar colors before you start.View options
Links open Amazon searches related to each material.
Leave a reply