
Clutch Amigurumi: the United States Eagle Crocheted in Amigurumi
If you love soccer mascots and handmade dolls full of personality, this Clutch amigurumi is a lovely project to save, share, and crochet with care. In this free pattern, you will find the complete step-by-step instructions to make a small amigurumi toy inspired by the United States eagle, with a blue body, dark boots, yellow details, and a very distinctive white head.
Clutch is the official mascot representing the United States in the FIFA World Cup 2026. Inspired by the bald eagle, the national bird of the United States, Clutch is associated with agility, courage, leadership, and determination. In the world of the tournament mascots, Clutch plays as a midfielder, wears number 10, and is part of the official trio alongside Zayu, the Mexican jaguar, and Maple, the Canadian moose.
This crochet amigurumi pattern combines color changes, BLO rounds, small pieces, and embroidered details, which makes the doll very expressive even though it is compact in size. If you are building your collection of World Cup 2026 mascots, you can also see the pattern for Zayu amigurumi, the mascot of Mexico.
Reviewed and organized by Patterns Amigurumis. This pattern was edited to improve readability, preserve all complete rounds, and make the step-by-step crochet process easier to follow.
Amigurumi technical details
- Difficulty level: basic/intermediate.
- Estimated crochet time: approximately 3 to 5 hours, depending on your pace and experience.
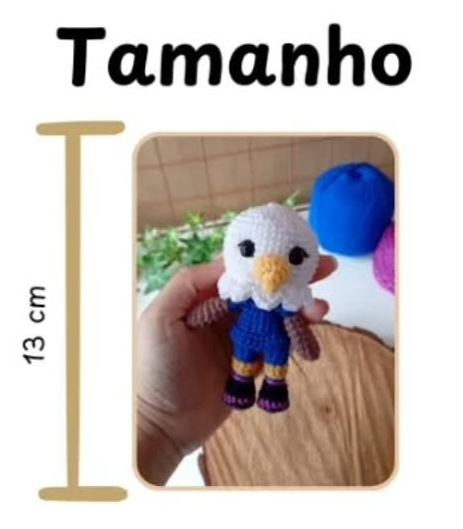
- Approximate finished size: 13 cm, may vary depending on yarn, hook, and tension.
- Type of project: crocheted doll inspired by a soccer mascot.
- Ideal for: amigurumi collections, themed decoration, gifts for soccer fans, or handmade souvenirs.
- Main technique: spiral crochet, color changes, BLO, sewing, and embroidered details.
Materials
- 2.2 mmcrochet hook.
Advertisement / affiliate link. As an Amazon Associate, I earn from qualifying purchases.
- 1 pair of safety eyes, size no. 9.
- Tapestry needle.
- Stuffing.
- A piece of white yarn to embroider the waterline of the eyes.
- Black embroidery thread for the eyelashes or eyelids.
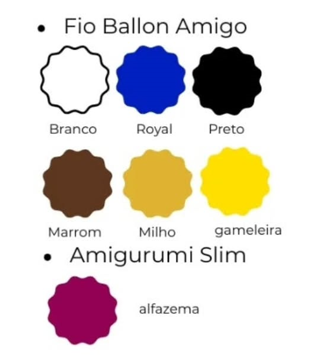
- Ballon Amigo yarn in the colors: white, royal blue, black, brown, milho, and gameleira.
- Amigurumi Slim yarn in the color alfazema.
Optional or recommended: stitch marker, pins to position the pieces before sewing, and small scissors to finish the yarn ends neatly.
If you have questions about yarns or tools, check our: complete guide to amigurumi materials
If you need help with color changes, you can see our step-by-step guide to changing colors in amigurumi.
Abbreviations
- R / ROUND: round.
- ch: chain.
- MR: magic ring.
- Invisible closure: invisible finish indicated in the original pattern.
- sc: single crochet.
- sl st: slip stitch.
- dc: double crochet.
- inc: increase.
- inc3: triple increase, 3 stitches worked into the same stitch.
- dec: decrease.
- dec3: triple decrease.
- BLO: back loop only.
- FLO: front loop only.
- Indicated loop: work into the loop specified by the pattern.
- st/sts: stitch/stitches.
You can review all the techniques in our guide to crochet abbreviations for amigurumi
Before you start
- Read the entire pattern before starting, because the legs are joined and then the crochet continues directly into the body.
- Use a stitch marker from the legs onward, especially after joining them, so you do not lose the beginning of each round.
- The legs have several small color changes; fasten off or hide the yarn ends patiently so the boots look neat.
- Stuff gradually as you crochet, especially in the legs, body, and head, avoiding visible stuffing between stitches.
- Before sewing the arms and beak, hold the pieces in place with pins to check symmetry and expression.
Complete step-by-step pattern
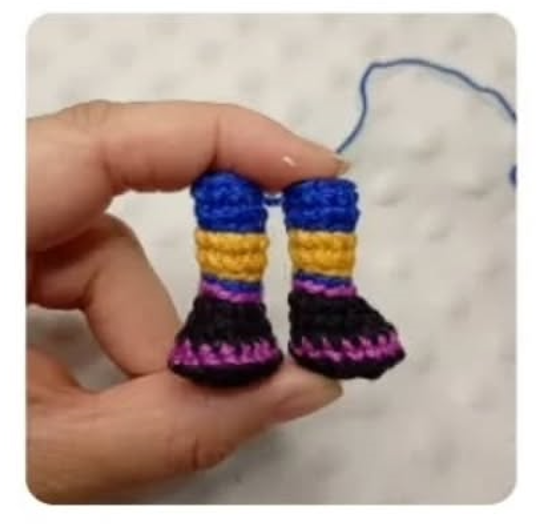
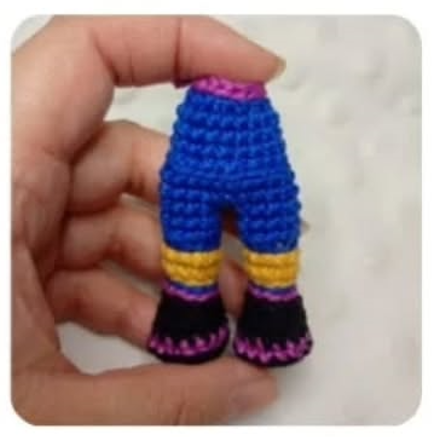
Feet and legs, make 2 pieces
With black yarn, ch 5 and work back from the second ch from the hook.
ROUND 1: 3 sc, 1 inc3, 2 sc, 1 inc. Total: 10 sts.
ROUND 2: 1 inc, 2 sc, 3 inc, 2 sc, 1 inc, 1 sc. Total: 15 sts.
Change to alfazema color.
ROUND 3: Working into the indicated loop, 15 sc.
Change to black. Add stuffing as you crochet.
ROUND 4: 15 sc.
ROUND 5: 4 sc, 3 dec, 5 sc. Total: 12 sts.
ROUND 6: 4 sc, 1 dec3, 5 sc. Total: 10 sts.
Change to alfazema color.
ROUND 7: 10 sl st. This is not BLO.
Change to royal blue.
ROUND 8: In BLO, 10 sl st.
Change to milho color.
ROUND 9: In BLO, 10 sl st.
ROUND 10: In BLO, 10 sc.
ROUND 11: 10 sc.
Change to royal blue.
ROUND 12: 10 sl st. This is not BLO.
ROUND 13: In BLO, 10 sc.
ROUND 14: 10 sc.
Fasten off with a false stitch. Make the second leg in the same way, but do not fasten off because we will join the legs.

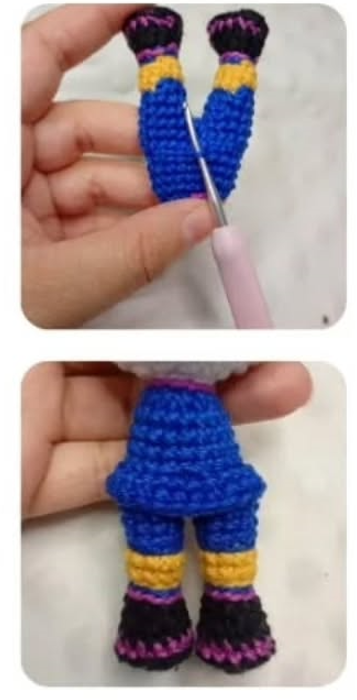
Joining the legs
Continue on the second leg.
ROUND 15: Work about 4 sc to the side, ch 2, and join to the side of the other leg with 1 sc. This stitch will be the beginning of the round from now on. Continue with 9 more sc, 2 sc in the ch, 10 sc, and 2 sc in the ch. Total: 24 sts.
Important: pay attention so the feet face forward.
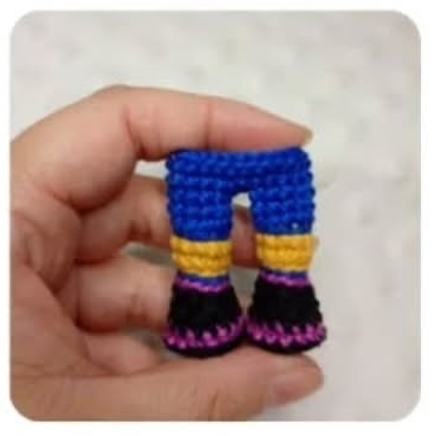
Body
Continue to form the body.
ROUND 16: 24 sc.
ROUND 17: 24 sc.
Add stuffing as you crochet.
ROUND 18: In BLO, repeat 6 times: 2 sc, 1 dec. Total: 18 sts.
ROUND 19: 18 sc.
ROUND 20: 18 sc.
ROUND 21: 18 sc.
ROUND 22: Repeat 6 times: 1 sc, 1 dec. Total: 12 sts.
Change to alfazema color.
ROUND 23: 12 sl st. This is not BLO.
Change to white.
Before starting the head, we will work into the shirt loops left from ROUND 18.
Shirt finishing
With royal blue yarn, place the body with the legs facing upward and attach to the first loop with 1 sc. Continue with 24 more sc, making 1 sc into each loop.
ROUND 1: 24 sc around the shirt loops.
ROUND 2: 24 sc.
Fasten off. Return with white yarn to start the head.
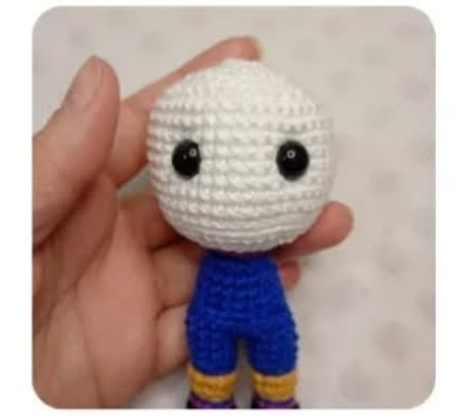
Head
ROUND 24: In BLO, 12 sl st.
ROUND 25: In BLO, 12 sc.
ROUND 26: 12 inc. Total: 24 sts.
ROUND 27: Repeat 6 times: 3 sc, 1 inc. Total: 30 sts.
ROUND 28: Repeat 6 times: 4 sc, 1 inc. Total: 36 sts.
ROUND 29: Repeat 6 times: 5 sc, 1 inc. Total: 42 sts.
ROUND 30: In BLO, 42 sc.
ROUND 31: 42 sc.
ROUND 32: 42 sc.
ROUND 33: 42 sc.
ROUND 34: 42 sc.
ROUND 35: 42 sc.
ROUND 36: 42 sc.
ROUND 37: 42 sc.
ROUND 38: 42 sc.
Place the eyes between ROUNDS 34 and 35, leaving 5 visible stitches between them. Add stuffing as you close the head.
ROUND 39: Repeat 6 times: 5 sc, 1 dec. Total: 36 sts.
ROUND 40: Repeat 6 times: 4 sc, 1 dec. Total: 30 sts.
ROUND 41: Repeat 6 times: 3 sc, 1 dec. Total: 24 sts.
ROUND 42: Repeat 6 times: 2 sc, 1 dec. Total: 18 sts.
ROUND 43: Repeat 6 times: 1 sc, 1 dec. Total: 12 sts.
ROUND 44: Repeat 4 times: 1 sc, 1 dec. Total: 8 sts.
Close with an invisible closure and fasten off.
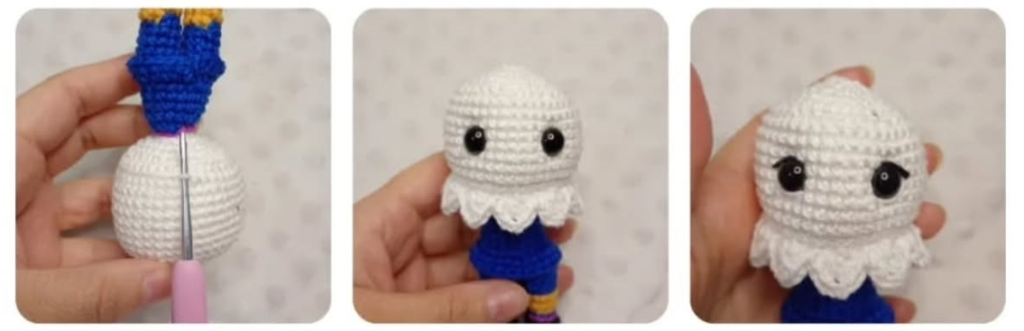
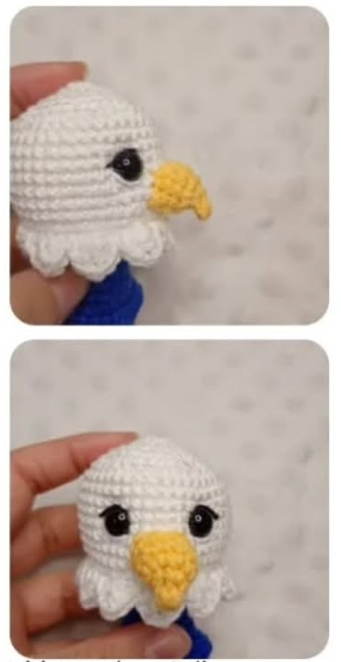
Neck feathers and head embroidery
Turn the doll upside down. With white yarn, work into the loops left from ROUND 30.
Make the following sequence: 1 sl st, skip 1 ch, in the next one make 2 dc, ch 2, and make 2 dc in the same ch, skip 1 ch and continue like this to the end. Finish with 1 sl st. You will have a total of 10 feathers. Fasten off.
With white yarn, embroider the waterline of the eyes. It may seem like a small detail, but it makes a difference in the expression.
With black embroidery thread, embroider the eyelids.
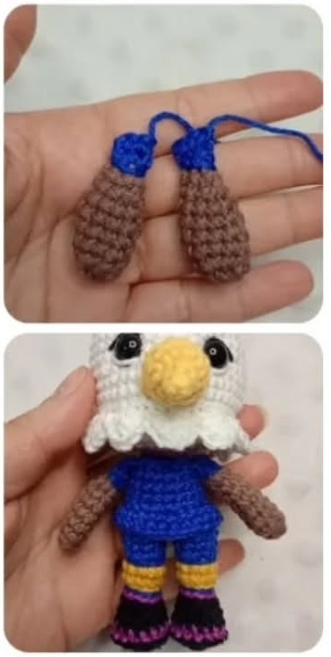
Arms, make 2 pieces
With brown yarn.
ROUND 1: 8 sc in MR.
ROUND 2: Repeat 2 times: 3 sc, 1 inc. Total: 10 sts.
ROUND 3: 10 sc.
ROUND 4: 10 sc.
ROUND 5: 10 sc.
ROUND 6: 10 sc.
Do not add stuffing.
ROUND 7: Repeat 2 times: 3 sc, 1 dec. Total: 8 sts.
ROUND 8: Repeat 2 times: 2 sc, 1 dec. Total: 6 sts.
Change to royal blue.
ROUND 9: 6 sl st. This is not BLO.
ROUND 10: In BLO, 6 sc.
Close the piece with 3 sc. Fasten off, leaving a yarn tail for sewing.
Beak
With gameleira color.
ROUND 1: 3 sc in MR.
ROUND 2: 3 inc. Total: 6 sts.
ROUND 3: 6 inc. Total: 12 sts.
ROUND 4: 12 sc.
ROUND 5: 12 sc.
Fasten off, leaving a long yarn tail for sewing.
Assembly and finishing
- Sew the arms between ROUNDS 21 and 22, placing them on the sides of the body.
- Sew the beak between ROUNDS 31 and 33, making sure it is centered with the eyes.
- Add a little stuffing to the beak as you close the seam, but do not stuff the tip, because it should fold downward.
- Check that the feet face forward before fully closing the body and finishing the seams.
- Arrange the white neck feathers carefully so they sit evenly around the head.
My experience and tips for crocheting this amigurumi
When reviewing and organizing this pattern, the detail that deserves the most attention is the neatness of the color changes. Clutch’s legs have several small stripes, and if the yarn ends are loose or not hidden properly, it becomes noticeable because the doll is compact. I recommend adjusting your tension without making it too tight, especially in the BLO rounds, so the boots and pants remain well defined.
Another important point is the leg join. Before continuing with the body, check the position of the feet carefully. In this type of amigurumi, a slight tilt can make the finished doll look crooked, so it is worth adjusting it at that round.
For the head, place the eyes only when you are sure about the height and spacing. The 5 visible stitches between them help keep the expression sweet and balanced. If the doll will be used by a small child, you can embroider the eyes instead of using safety eyes.
The beak needs very little stuffing. The instruction not to stuff the tip is important because it allows the beak to keep that characteristic downward curve of an eagle. I also recommend pinning it in place first, looking at the doll from the front, and only then securing it with final stitches.
The white neck feathers are one of Clutch’s loveliest details. Make them slowly and try to keep the same tension in each repeat so they sit evenly around the head. The final white and black embroidery details may seem small, but they make the doll’s expression much more lively.
Frequently asked questions
Can I use another yarn to crochet Clutch?
Yes, you can use another yarn with a similar thickness. Keep in mind that the finished size may change if you use a thicker or thinner yarn. Ideally, use a hook that matches your yarn so the fabric stays tight and the stuffing does not show through.
What should I do if the legs are not facing forward?
Before moving on to the body, undo the join if needed and reposition the legs. ROUND 15 defines the doll’s posture, so it is better to correct it at that moment rather than at the end.
How can I wash this amigurumi?
The safest option is to clean it by hand with a damp cloth and mild soap, without twisting it. If you used safety eyes, avoid direct heat. Let it dry well in a horizontal position so it does not lose its shape.
Pattern credits
Pattern developed by Jessiane Oliveira, from Arco-íris Crochet Ateliê.
Author’s Instagram: @arcoiriscroche.atelie
We especially thank Jessiane Oliveira for authorizing the publication and translation of this pattern on our website.
Did you crochet it? Leave me a comment or share it on social media using #PatternsAmigurumi so I can see it.
Before you start: useful supplies for this amigurumi
Check yarn, eyes, stuffing, and accessories before crocheting so you do not get stuck halfway through the project.
- Safety eyesAdds a clean, even expression to the doll.View options
- Crochet hookThe right size keeps stitches firm and neat.View options
- small scissorsA practical way to gather supplies quickly.View options
- Yarn needleEssential for sewing pieces and hiding ends.View options
- embroidery threadA practical way to gather supplies quickly.View options
- PinsUseful for positioning pieces before sewing.View options
Links open Amazon searches related to each material.
Leave a reply