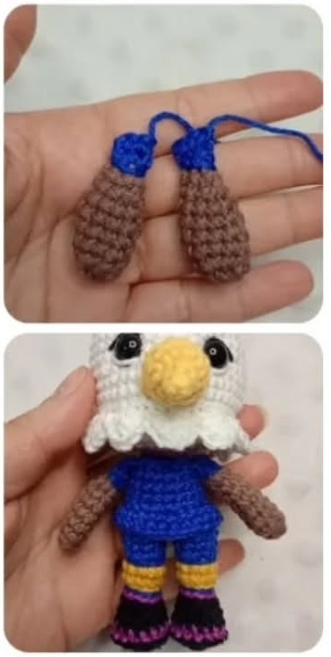
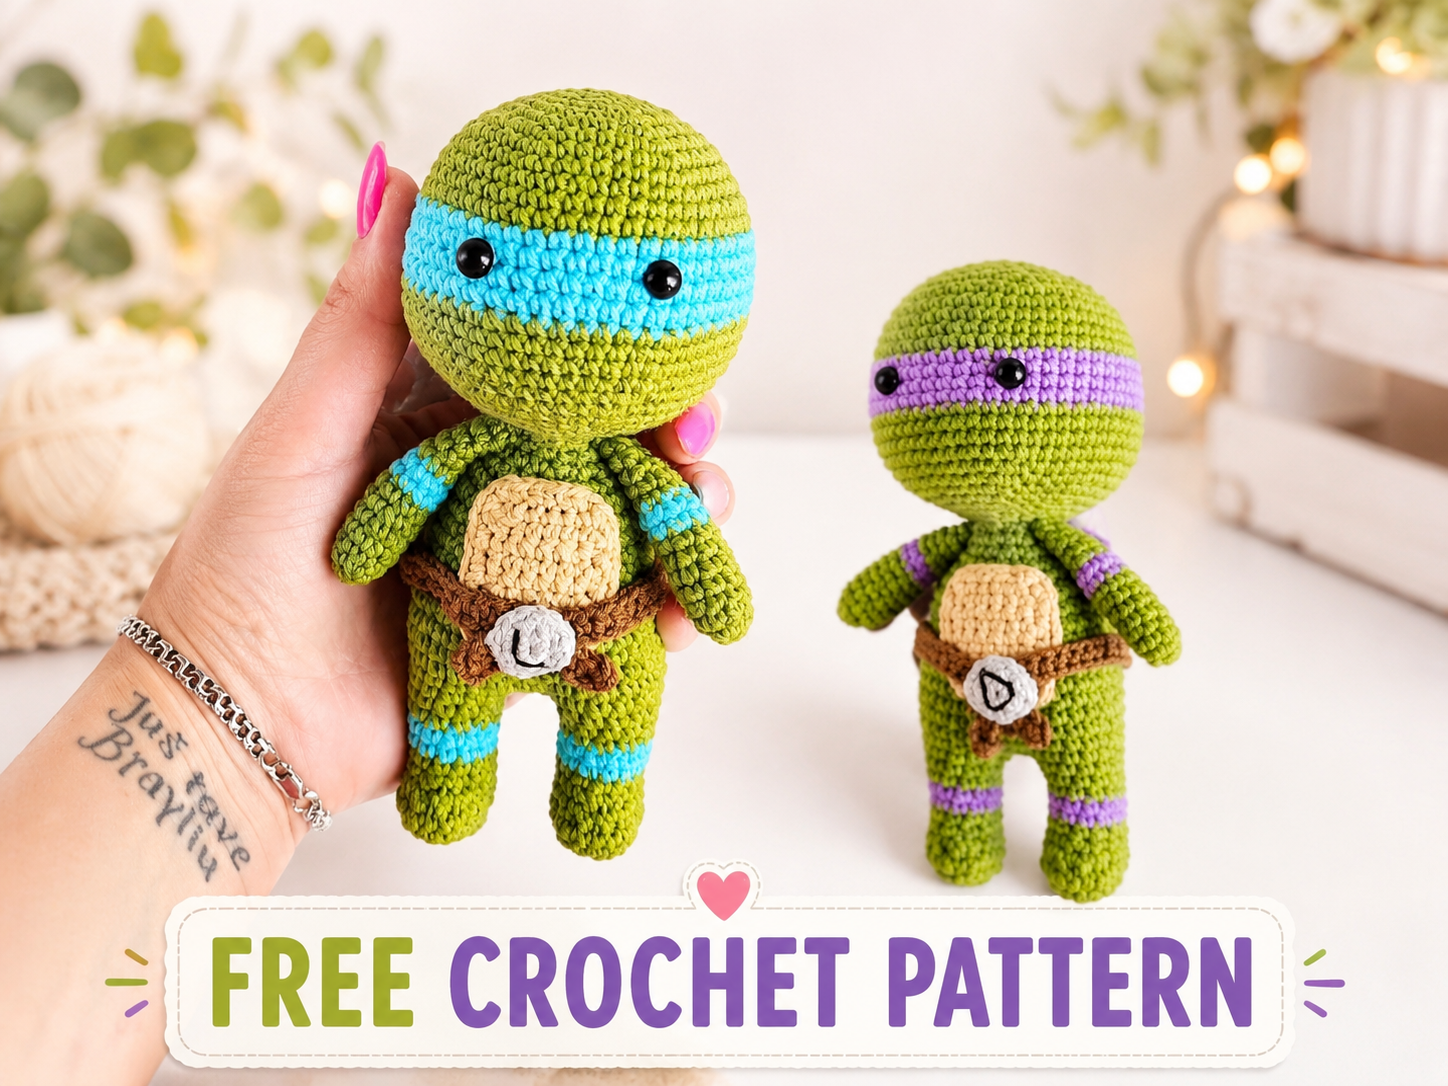
Clutch Amigurumi: the United States Eagle Crocheted in Amigurumi
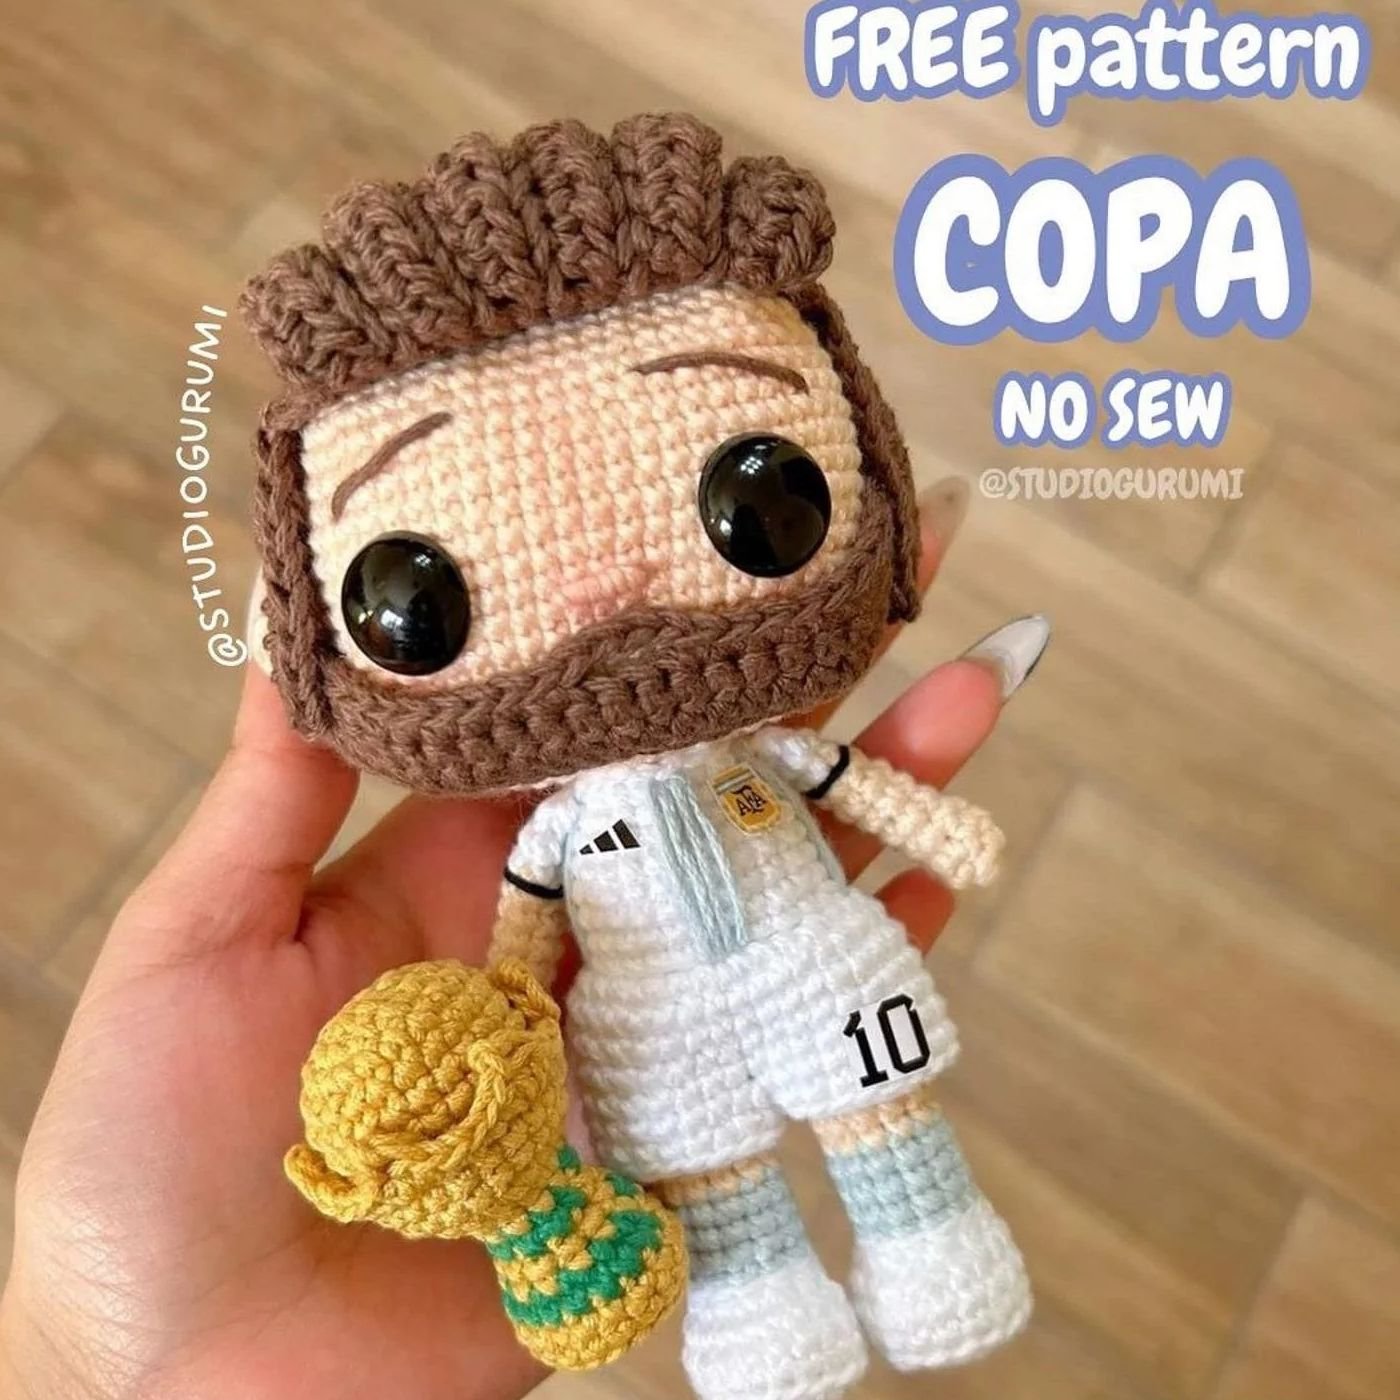
If you love soccer mascots and handmade dolls full of personality, this Clutch amigurumi is a lovely project to save, share, and crochet with care. In this free pattern, you will find the complete step-by-step instructions to make a small amigurumi toy inspired by the United States eagle, with a blue body, dark boots, yellow details, and a very distinctive white head.
Clutch is the official mascot representing the United States in the FIFA World Cup 2026. Inspired by the bald eagle, the national bird of the United States, Clutch is associated with agility, courage, leadership, and determination. In the world of the tournament mascots, Clutch plays as a midfielder, wears number 10, and is part of the official trio alongside Zayu, the Mexican jaguar, and Maple, the Canadian moose.
This crochet amigurumi pattern combines color changes, BLO rounds, small pieces, and embroidered details, which makes the doll very expressive even though it is compact in size. If you are building your collection of World Cup 2026 mascots, you can also see the pattern for Zayu amigurumi, the mascot of Mexico.
Reviewed and organized by Patterns Amigurumis. This pattern was edited to improve readability, preserve all complete rounds, and make the step-by-step crochet process easier to follow.
Amigurumi technical details
Difficulty level: basic/intermediate.
Estimated crochet time: approximately 3 to 5 hours, depending on your pace and experience.
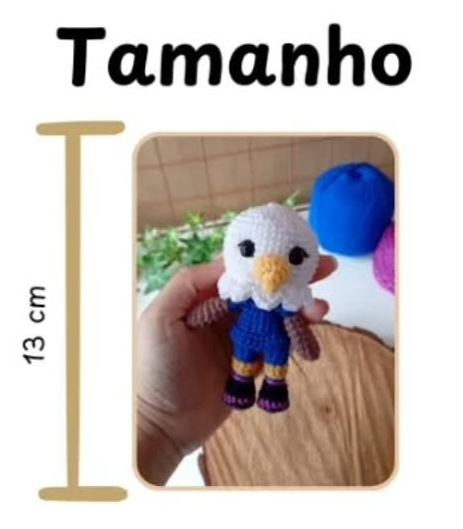
Approximate finished size: 13 cm, may vary depending on yarn, hook, and tension.
Type of project: crocheted doll inspired by a soccer mascot.
Ideal for: amigurumi collections, themed decoration, gifts for soccer fans, or handmade souvenirs.
Main technique: spiral crochet, color changes, BLO, sewing, and embroidered details.
Materials
2.2 mm crochet hook.
1 pair of safety eyes, size no. 9.
Tapestry needle.
Stuffing.
A piece of white yarn to embroider the waterline of the eyes.
Black embroidery thread for the eyelashes or eyelids.
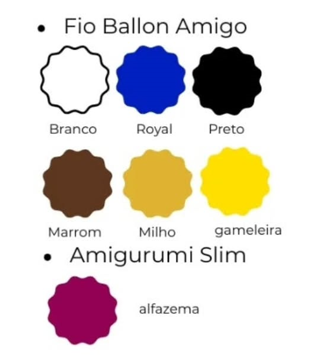
Ballon Amigo yarn in the colors: white, royal blue, black, brown, milho, and gameleira.
Amigurumi Slim yarn in the color alfazema.
Optional or recommended:stitch marker, pins to position the pieces before sewing, and small scissors to finish the yarn ends neatly.
Fasten off with a false stitch. Make the second leg in the same way, but do not fasten off because we will join the legs.
Joining the legs
Continue on the second leg.
ROUND 15: Work about 4 sc to the side, ch 2, and join to the side of the other leg with 1 sc. This stitch will be the beginning of the round from now on. Continue with 9 more sc, 2 sc in the ch, 10 sc, and 2 sc in the ch. Total: 24 sts.
Important: pay attention so the feet face forward.
Before starting the head, we will work into the shirt loops left from ROUND 18.
Shirt finishing
With royal blue yarn, place the body with the legs facing upward and attach to the first loop with 1 sc. Continue with 24 more sc, making 1 sc into each loop.
ROUND 1: 24 sc around the shirt loops.
ROUND 2: 24 sc.
Fasten off. Return with white yarn to start the head.
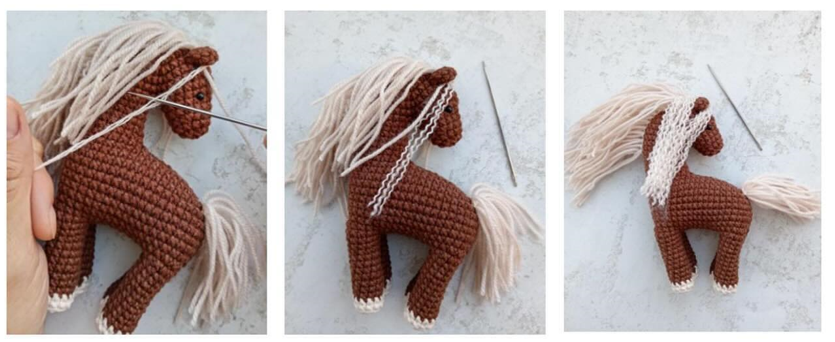
Turn the doll upside down. With white yarn, work into the loops left from ROUND 30.
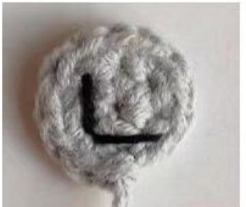
Make the following sequence: 1 sl st, skip 1 ch, in the next one make 2 dc, ch 2, and make 2 dc in the same ch, skip 1 ch and continue like this to the end. Finish with 1 sl st. You will have a total of 10 feathers. Fasten off.
With white yarn, embroider the waterline of the eyes. It may seem like a small detail, but it makes a difference in the expression.
With black embroidery thread, embroider the eyelids.
Close the piece with 3 sc. Fasten off, leaving a yarn tail for sewing.
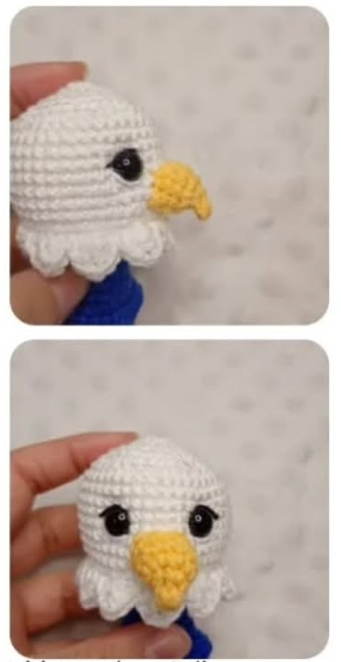
Beak
With gameleira color.
ROUND 1: 3 sc in MR.
ROUND 2: 3 inc. Total: 6 sts.
ROUND 3: 6 inc. Total: 12 sts.
ROUND 4: 12 sc.
ROUND 5: 12 sc.
Fasten off, leaving a long yarn tail for sewing.
Assembly and finishing
Sew the arms between ROUNDS 21 and 22, placing them on the sides of the body.
Sew the beak between ROUNDS 31 and 33, making sure it is centered with the eyes.
Add a little stuffing to the beak as you close the seam, but do not stuff the tip, because it should fold downward.
Check that the feet face forward before fully closing the body and finishing the seams.
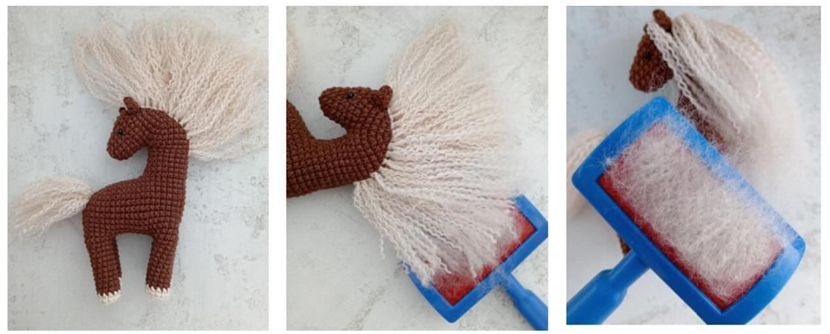
Arrange the white neck feathers carefully so they sit evenly around the head.
My experience and tips for crocheting this amigurumi
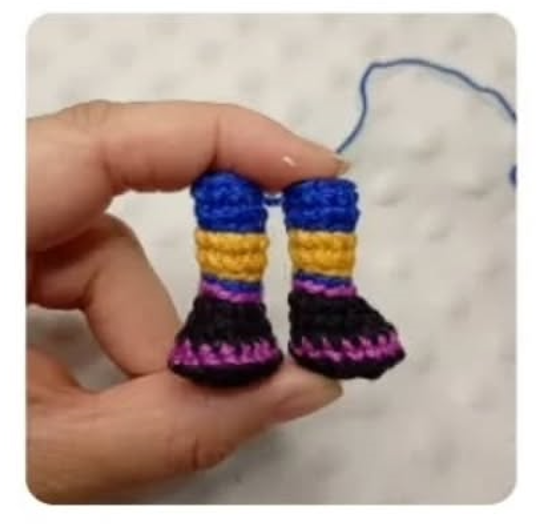
When reviewing and organizing this pattern, the detail that deserves the most attention is the neatness of the color changes. Clutch’s legs have several small stripes, and if the yarn ends are loose or not hidden properly, it becomes noticeable because the doll is compact. I recommend adjusting your tension without making it too tight, especially in the BLO rounds, so the boots and pants remain well defined.
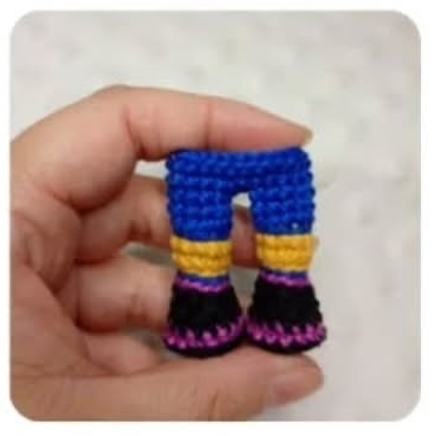
Another important point is the leg join. Before continuing with the body, check the position of the feet carefully. In this type of amigurumi, a slight tilt can make the finished doll look crooked, so it is worth adjusting it at that round.
For the head, place the eyes only when you are sure about the height and spacing. The 5 visible stitches between them help keep the expression sweet and balanced. If the doll will be used by a small child, you can embroider the eyes instead of using safety eyes.
The beak needs very little stuffing. The instruction not to stuff the tip is important because it allows the beak to keep that characteristic downward curve of an eagle. I also recommend pinning it in place first, looking at the doll from the front, and only then securing it with final stitches.
The white neck feathers are one of Clutch’s loveliest details. Make them slowly and try to keep the same tension in each repeat so they sit evenly around the head. The final white and black embroidery details may seem small, but they make the doll’s expression much more lively.
Frequently asked questions
Can I use another yarn to crochet Clutch?
Yes, you can use another yarn with a similar thickness. Keep in mind that the finished size may change if you use a thicker or thinner yarn. Ideally, use a hook that matches your yarn so the fabric stays tight and the stuffing does not show through.
What should I do if the legs are not facing forward?
Before moving on to the body, undo the join if needed and reposition the legs. ROUND 15 defines the doll’s posture, so it is better to correct it at that moment rather than at the end.
How can I wash this amigurumi?
The safest option is to clean it by hand with a damp cloth and mild soap, without twisting it. If you used safety eyes, avoid direct heat. Let it dry well in a horizontal position so it does not lose its shape.
Pattern credits
Pattern developed by Jessiane Oliveira, from Arco-íris Crochet Ateliê.
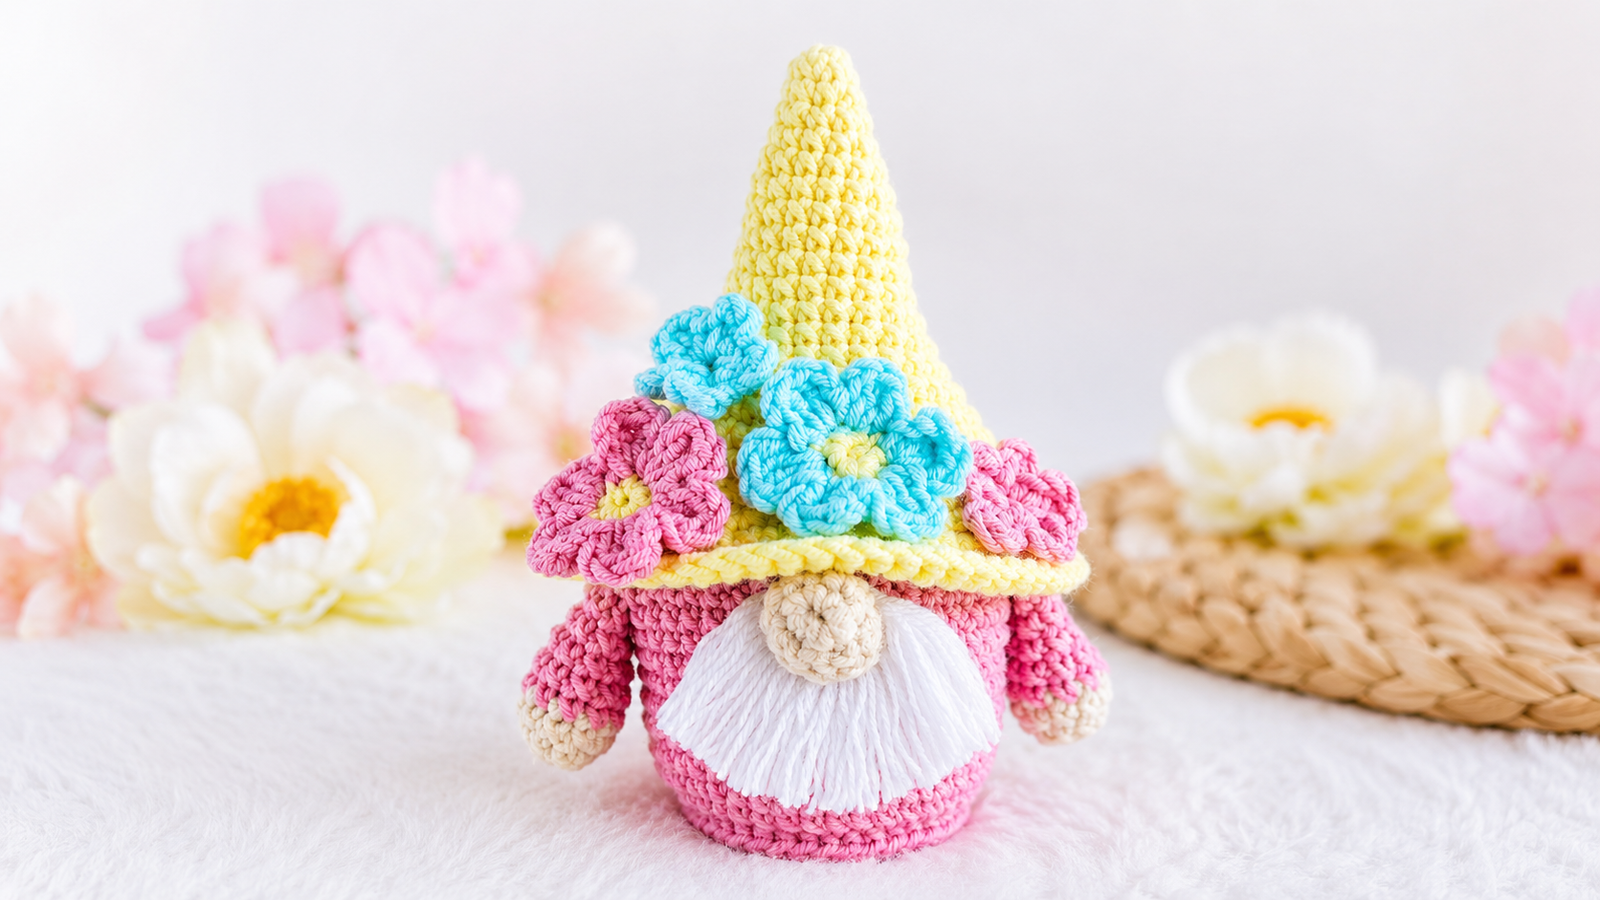
Floral Hat Amigurumi Gnome: Free Step-by-Step Pattern
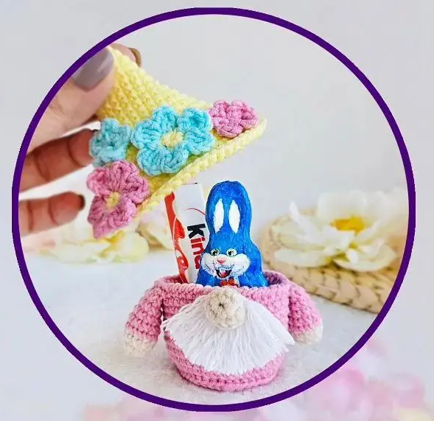
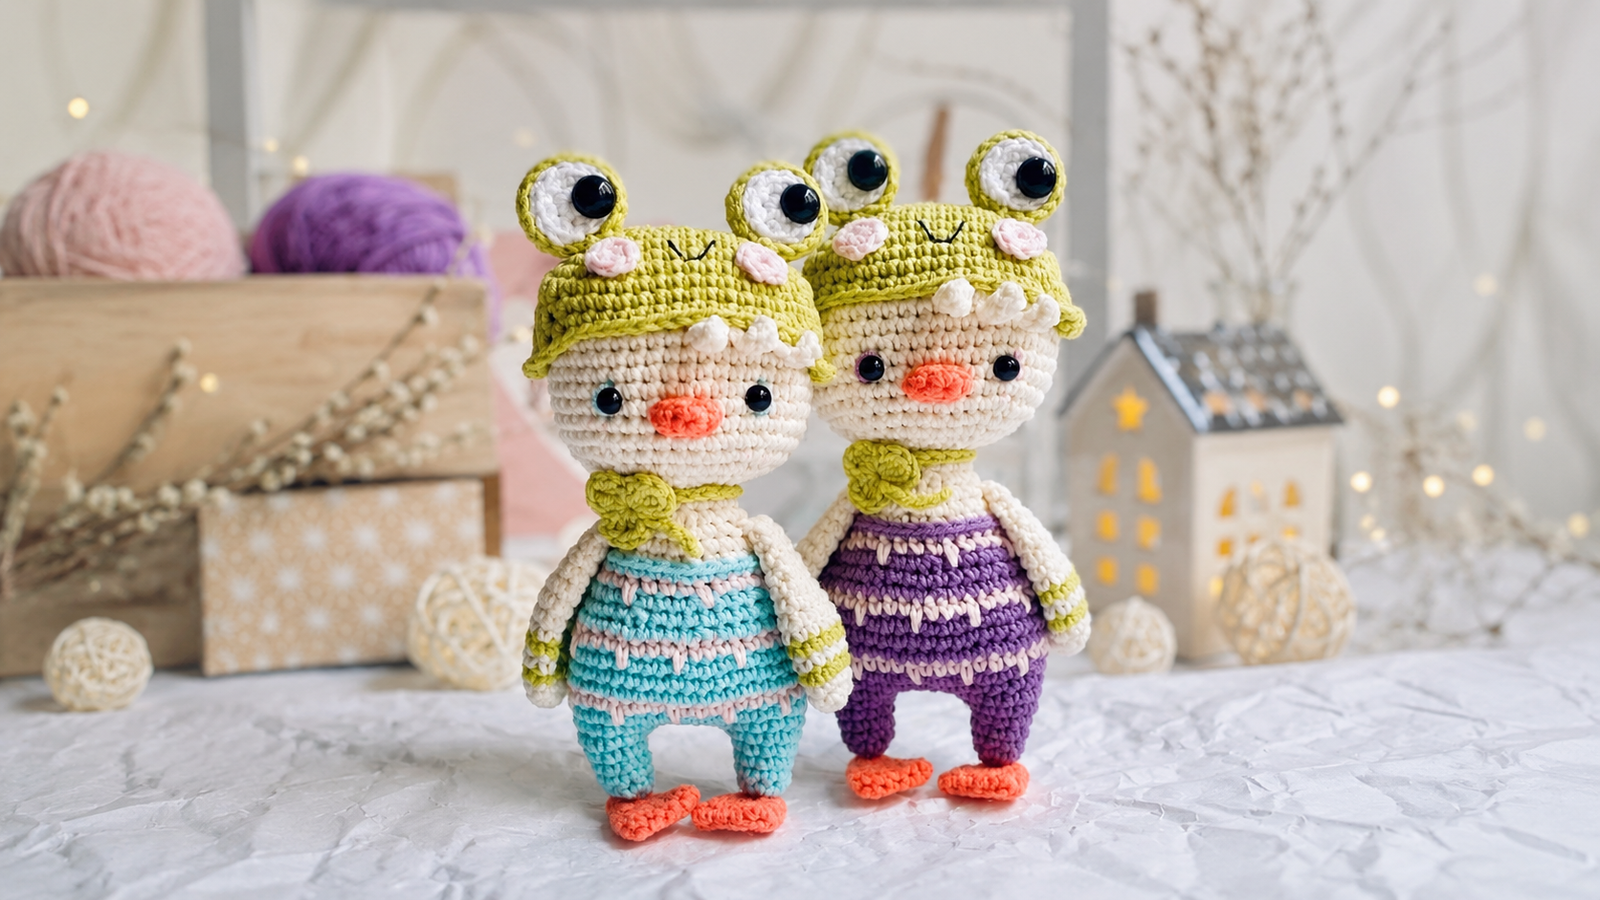
This little amigurumi gnome is one of those projects that wins you over with its sweetness: it has a rounded body, a tall crocheted hat, and an ideal shape for using it as an ornament, a small gift, or even a decorative holder. If you love crocheted dolls with sweet details and soft colors, this free pattern is a beautiful option to save and crochet calmly.
The design combines simple crochet pieces, rounds in single crochet, increases, and a few finishing details that shape the amigurumi toy. In addition, the body can be stuffed with polyester fiberfill or left empty to use as a holder, as indicated in the original pattern.
Crocheted gnomes are very popular in the amigurumi world because they bring a cozy, magical, and handmade feeling. In this case, the tall hat and the combination of pink, yellow, nude, and white make it a delicate crocheted doll, perfect for decorating, gifting, or adding to a sweet table.
Reviewed and organized by Patterns Amigurumis. This pattern was edited to improve readability, preserve the complete rounds, and make the step-by-step crochet process easier to follow.
Amigurumi Technical Details
Difficulty level: easy, according to the original pattern.
Estimated crochet time: approximately 2 to 4 hours; this may vary depending on your experience and finishing details.
Approximate finished size: 11 to 12 cm tall using the indicated materials.
Project type: decorative amigurumi gnome or small holder.
Ideal for: gifts, decoration, table details, or quick crochet projects.
Main technique: single crochet, increases, working in BLO and FLO, and sewing pieces together.
Materials
50 g / 160 m sport yarn:
Yellow: YarnArt Jeans 67.
Pink: YarnArt Jeans 20 or 36.
Nude: YarnArt Jeans 05 or 73.
White: YarnArt Jeans 62.
Crochet hook: 2.00 mm.
Stuffing: polyester fiberfill or toy stuffing, optional.
If you use these materials, the finished doll measures approximately 11 to 12 cm tall. The original pattern notes that it does not include basic crochet instructions and assumes that you already know the main stitches. It also indicates that it uses United States crochet terminology.
Use a stitch marker from the beginning, especially on the body and hat, because several sections are worked in continuous rounds.
Keep an even tension so the body stays firm and the hat keeps its tall shape.
Round 6 of the body is worked in BLO, and then the front loops are used later to make the lower finish; it is a good idea to mark that round if it makes things easier for you.
Stuffing is optional: you can stuff the body so it becomes a decorative doll or leave it empty to use it as a holder.
Read the entire pattern before starting, because some pieces are sewn to specific rounds of the body.
Make 1 sl st, fasten off, and cut the yarn. Hide the yarn tail inside the body or leave a tail for sewing.
Now join the pink yarn to the front loops that were left free in Round 6. Crochet 40 sc with the body turned upside down. Make 1 sl st, fasten off, and hide the yarn tail inside.
You can stuff the body with polyester fiberfill or leave it empty to use it as a holder.
ROUNDS 22 TO 23: 64 sc in each round for 2 rounds. Total: 64 stitches per round.
Make 1 sl st, fasten off, and cut the yarn. Hide the yarn tail inside.
If you want, you can stuff the hat with polyester fiberfill and sew it to the body around the rounds of Round 20.
Arms
Start crocheting with nude yarn.
ROUND 1: 5 sc in a magic ring. Total: 5 stitches.
ROUND 2: 5 inc. Total: 10 stitches.
ROUND 3: 10 sc. Total: 10 stitches.
Change to pink.
ROUNDS 4 TO 8: 10 sc in each round for 5 rounds. Total: 10 stitches per round.
Make 1 sl st, fasten off, and cut the yarn, leaving a tail for sewing.
You can stuff only the lower part of the arms.
Assembly and Finishing
If you decide to stuff the body, place the polyester fiberfill evenly, without packing it too tightly so the base does not become misshapen.
If you prefer to use the body as a holder, leave it empty as indicated in the original pattern.
Stuff the hat optionally and sew it to the body, using the area around Round 20 of the hat as a reference.
Sew the arms to the sides of the body, positioning them at Round 15.
Before securing the final seams, check that both arms are symmetrical and that the hat is centered.
Hide all remaining yarn tails inside the fabric for a neat finish.
My Experience and Tips for Crocheting This Amigurumi
When reviewing and organizing this pattern, the most important thing for making the gnome look neat is to control the tension from the body onward. The base is built with many single crochet stitches and increases, so even tension helps the rounded shape stay closed and prevents the stuffing from showing through.
In Round 6 of the body, it is worth paying attention to the BLO, because the front loops are later used to make the lower finish. If that round is well marked, it will be much easier to attach the pink yarn later and complete that part without losing stitches.
I also recommend trying the hat on the body before sewing it permanently. Since it is a tall piece, a small change in tension can affect how it sits on the doll. If you decide to stuff it, do it gradually so it keeps its shape without becoming stiff.
For the arms, stuffing only the lower part helps them have volume without becoming too firm. When sewing them at Round 15, hold them first with pins or a few temporary stitches to check that they are at the same height.
If the amigurumi will be for a small child, avoid poorly secured small decorative pieces and reinforce all seams. Firm finishing is just as important as the crochet itself, especially for dolls that will be handled often.
Frequently Asked Questions
Can I use another type of yarn?
Yes, you can use a similar yarn, but the final size may change. If you use thicker yarn, the gnome will be larger; if you use thinner yarn, it will be smaller. Ideally, you should also adapt the hook size so the crochet fabric stays tight.
Is it mandatory to stuff the body?
No. The original pattern indicates that you can stuff the body with polyester fiberfill or leave it empty to use it as a holder. If you want it as a decorative doll, stuffing helps give it shape; if you want it as a holder, it is best to leave it unstuffed.
How do I keep the hat from looking crooked?
Before sewing, place the hat on the body and check the position from the front and sides. You can hold it with pins or loose stitches first, and only then sew it permanently.
If you love amigurumi dolls with personality, lots of details, and a K-pop-inspired style, this Rumi Huntrix pattern is going to charm you. It is a crocheted doll with an expressive face, long braided hair, a jacket, boots, and small accessories that make the finished piece look truly special.
In this free pattern, you will find the step-by-step instructions to crochet the head, hair, arms, body, clothing, and main finishing details of this crochet doll. It is an amigurumi toy designed for makers who enjoy projects with several pieces, embroidery, color changes, and decorative details.
Rumi Huntrix has a striking look, with the feel of both an idol and a fantasy warrior. That is why this design combines the sweet features of a handmade doll with accessories, detailed hair, and a jacket with embroidered accents. If you are looking for a project to spend time on and enjoy every finishing touch, keep reading and crochet the full pattern step by step.
Reviewed and organized by Patterns Amigurumis. This pattern was edited to improve readability, preserve all complete rounds, and make the step-by-step crochet process easier to follow.
Amigurumi Quick Details
Difficulty level: intermediate to advanced, because of the number of pieces, embroidery details, hair, accessories, and color changes.
Estimated crochet time: approximately 8 to 12 hours, depending on your experience, yarn, and tension.
Approximate finished size: not specified in the original pattern; it may vary depending on yarn thickness, hook size, and tension.
Project type: amigurumi doll with body, long hair, jacket, boots, and accessories.
Ideal for: decoration, collections, handmade gifts, or fans of dolls with a K-pop-inspired style.
Main technique: crochet in spiral rounds, round-by-round construction, color changes, BLO, embroidery, assembly, and decorative finishing details.
Materials
Skin-color yarn.
Purple yarn for the hair and eyebrows.
White yarn for the eye details, body, and finishing details.
Read the full pattern before beginning, because the doll has several parts that connect to each other, especially the body, arms, hair, and jacket.
Use a stitch marker from the first stitch so you do not lose your place in the sections worked in spiral rounds.
Stuff slowly and evenly, especially in the head and body, so the shape does not become distorted.
Do not stuff the arms, because the pattern indicates placing a wire support in that area.
When changing colors, tighten the strands well and hide them inside the work so the stripes look neat.
Complete Step-by-Step Pattern
Head, Face, Ears, Hair, and Head Accessories
Original video tutorial for this section: in this first part, you will crochet Rumi Huntrix’s head, face, ears, hair, braid, and head accessories.
Head
Start with skin-color yarn.
ROUND 1: Make an MR. Ch 1 and work 8 sc inside the ring. Pull the small strand to close.
ROUND 2: Work 8 inc around. At the end, you should have 16 stitches.
ROUND 3: Work the sequence of 1 sc and 1 inc around. At the end, you should have 24 stitches.
ROUND 4: Work the sequence of 3 sc and 1 inc. Repeat 6 times. At the end, you should have 30 stitches.
ROUND 5: Start with 2 sc. In the next stitch, make 1 inc. Continue with the sequence of 4 sc and 1 inc, repeating 5 times. At the end, 2 stitches remain; work 1 sc in each. At the end, you should have 36 stitches.
ROUND 6: Work the sequence of 5 sc and 1 inc around. At the end, you should have 42 stitches.
ROUND 7: Start with 3 sc. In the next stitch, make 1 inc. Continue with the sequence of 6 sc and 1 inc, repeating 5 times. At the end, 3 stitches remain; work 1 sc in each. At the end, you should have 48 stitches.
ROUNDS 8 TO 20: Work stitch over stitch. In each round, make 48 sc. Always mark the first stitch so you do not lose the beginning of the round.
After finishing round 20, turn the piece and position the eyes. Place the eyes between rounds 14 and 15, separated by 7 single crochet stitches. Carefully widen the space and insert 12 mm safety eyes. This step to secure the eyes is optional, but it helps them stay firmer.
ROUND 21: Work the sequence of 4 sc and 1 dec. Repeat 8 times. At the end, you should have 40 stitches.
ROUND 22: Work the sequence of 3 sc and 1 dec around. At the end, you should have 32 stitches.
ROUND 23: Work the sequence of 2 sc and 1 dec. Repeat 8 times. At the end, you should have 24 stitches.
Before continuing, stuff the head.
ROUND 24: Work 1 sc and mark it. Work 2 dec. Continue with the sequence of 1 sc and 1 dec, repeating 5 times. Finish the round with 2 dec. At the end, you should have 15 stitches.
ROUND 25: Work stitch over stitch through the back loop only. Make 15 sc in BLO.
ROUNDS 26 TO 33: Work stitch over stitch. In each round, make 15 sc.
After finishing round 33, this part should not be stuffed.
ROUND 34: Start with 1 sc and continue with 7 dec. At the end, you should have 8 stitches.
Pull the strand and cut it, leaving a slightly long tail to close. With a yarn needle, pick up the front loop of each stitch. After passing through the 8 stitches, pull firmly to close. Hide and cut the remaining strand. Carefully push this part inward.
Face
With a yarn needle and skin-color yarn, embroider the nose between rounds 16 and 17, taking 2 stitches. Insert the needle from one side, come out between the indicated rounds, and make several stitches to form the nose. When finished, return to the starting point, knot the remaining strands, and hide them inside the piece.
With white yarn, add highlights to the eyes. Insert the needle from one side and come out at one point of the eye. Pass the yarn around the eye, insert the needle above the eye, and come out at the other eye. Adjust the strand neatly. Repeat the same process on the other eye and hide the remaining strands.
With black yarn separated in half so it is thinner, embroider the eyeliner. Insert the needle from one side and come out above the eye. Adjust the yarn, insert it into the indicated point, and come out beside the eye. Return to the previous point and come out at the point next to it. Insert again into the previous point and come out at the other eye. Adjust the yarn neatly. Repeat the same on the other side.
With purple yarn, embroider the eyebrows. Insert the needle between rounds 9 and 10, at eye level. Count 5 stitches to the right, go down 1 stitch, insert the needle, and come out counting 4 stitches of separation from the previous point. Pull the strand and adjust. Then count 5 stitches to the left, go down 1 stitch, insert the needle, and come out at the starting point. Pull the strand, adjust, and hide the remaining strands.
Ears
Crochet two identical ears with skin-color yarn.
ROUND 1: Make an MR. Ch 1 and work 6 sc inside the ring. Pull the small strand to close.
Pull the yarn and cut it, leaving a long tail for sewing. Knot the two remaining strands and cut the smaller strand. Sew the ears on the side, 5 stitches away from the eye.
Glue the false eyelashes over the embroidered eyeliner using liquid silicone glue and position them carefully. Apply a little blush to the cheeks and nose.
Hair
With purple yarn, start the hair.
ROUND 1: Make an MR. Ch 1 and work 8 sc inside the ring. Pull the small strand to close.
ROUND 2: Work 8 inc. At the end, you should have 16 stitches.
ROUND 3: Work the sequence of 1 sc and 1 inc around. At the end, you should have 24 stitches.
ROUND 4: Start with 1 sc and mark it. In the next stitch, make 1 inc. Work the sequence of 2 sc and 1 inc, repeating 7 times. At the end, 1 stitch remains; work 1 sc. At the end, you should have 32 stitches.
ROUND 5: Work the sequence of 3 sc and 1 inc. Repeat 8 times. At the end, you should have 40 stitches.
ROUND 6: Start with 2 sc. In the next stitch, make 1 inc. Work the sequence of 4 sc and 1 inc, repeating 7 times. At the end, 2 stitches remain; work 1 sc in each. At the end, you should have 48 stitches.
ROUND 7: Work the sequence of 11 sc and 1 inc. Repeat 4 times. At the end, you should have 52 stitches.
ROUNDS 8 TO 16: Work stitch over stitch. In each round, make 52 sc.
After finishing round 16, begin the hair strands, working in BLO only.
Work 18 sl st through the back loop only. Ch 6. Starting from the second chain, work back with 5 sl st. Go to the next stitch, taking the back loop only, and slip stitch.
Continue taking the back loop only and work 5 sl st. In the next stitch, take the full stitch and slip stitch.
Ch 95. Starting from the second chain, work back with 1 sl st. In the next chain, work 1 sc. In the next chain, work 1 hdc. Continue with 86 dc. Then work 2 hdc, 2 sc, and in the last chain work 1 sl st. Go to the next stitch, taking the full stitch, and slip stitch. This forms the first long hair strand.
Ch 95 again. Starting from the second chain, work back with 1 sl st. In the next chain, work 1 sc. In the next chain, work 1 hdc. Continue with 86 dc. Then work 2 hdc, 2 sc, and in the last chain work 1 sl st. Go to the next stitch, taking the full stitch, and slip stitch.
Make 4 more hair strands exactly the same, following the same sequence. At the end, you should have a total of 6 long hair strands.
After the last strand, go to the next stitch, taking the full stitch, and slip stitch. Continue working in BLO and make 6 sl st. Ch 6. Starting from the second chain, work back with 5 sl st. Go to the next stitch, taking the back loop only, and slip stitch.
Work sl st until reaching the end, taking only the back loop. Make 14 sl st. At the end, go to the next stitch, taking the full stitch, and slip stitch. Ch 1 and cut the yarn. Hide the remaining strand inside the piece.
Braid and Hair Assembly
Cut several strands approximately 12 cm long. Take one strand, fold it in half, and work into the available chains left on the hair. Insert the hook through any chain, take the yarn from the middle, pull the two strands through, and tighten well. Repeat in all available chains.
Once the strands are attached, make 3 groups of 2 strands and braid them to the end. Secure the braid so it does not come undone. You may use an elastic band temporarily, since it will be removed later.
Position the hair on the head. Apply glue to the corresponding area and place the hair, centering the piece. The braid should sit right in the middle. With pins, position the small strands beside the ear. Once positioned, glue or sew them. In the tutorial, they are glued with liquid silicone glue.
Pull the braid forward. Apply a little glue to the upper area and glue the attached strands one beside the other to give the hair a more realistic effect. Cut the excess strands. Continue gluing the remaining strands and trim the excess. In the area where the strands were cut, apply glue and place the braid over them to hide them. Open the braid slightly so it looks fuller.
Hair Detail
With mustard-color yarn, make a slip knot and ch 16.
After finishing the 16 ch, work back with 2 sl st, 1 sc, 1 hdc, 1 dc, 1 tr, 1 dc, 1 hdc, 1 sc, and finish with 1 sl st. Adjust the piece.
Ch 6. Pull the strand and cut the yarn. Use this piece to tie the hair. Position it and knot it. Cut the strands and also remove the temporary elastic band.
Earrings
To make one earring, use wire and fold it in half. Press that part tightly. Take one part of the wire and wrap it around. Cut the excess and tighten it with pliers so it does not come apart. Shape it as desired. Place the earring in the ear and bend the tip so it does not come out.
For the earrings on the other ear, use a jump ring and glued beads. In the tutorial, one silver bead and one white bead are placed.
Arms, Legs, Body, and Internal Support
Original video tutorial for this section: in this second part, you will crochet Rumi Huntrix’s arms, legs, body, piece joining, and internal support.
Arms
Crochet two identical arms with skin-color yarn.
ROUND 1: Make an MR. Ch 1 and work 7 sc inside the ring. Pull the small strand to close.
ROUNDS 2 TO 3: Work stitch over stitch. In each round, make 7 sc.
ROUND 4: Start with 1 inc. Continue with 6 sc. At the end, you should have 8 stitches.
ROUNDS 5 TO 16: Work stitch over stitch. In each round, make 8 sc.
After finishing round 16, pull the strand and cut it. To hide the strand, skip 1 stitch from the last stitch made and insert the needle into the next stitch from the back. Pick up the strand and pull. Return to the last stitch, insert the needle from the back taking only the back loop, pick up the strand, and pull. A stitch will be formed. Hide the remaining strand inside the piece.
First Leg
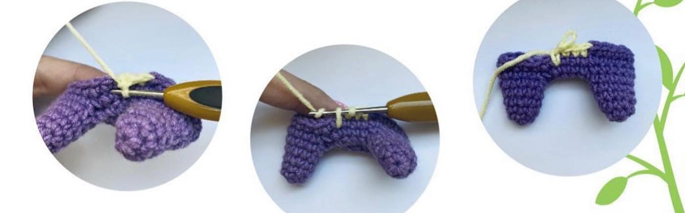
Start with black yarn. Make a slip knot and ch 7.
ROUND 1: Starting from the second chain, work back with 5 sc. In the last chain, work 4 sc in the same space. Work on the other side of the chains, hiding the remaining strand, and make 4 sc. In the last chain, make 1 inc. At the end, you should have 15 stitches. Cut the starting excess strand.
ROUND 2: Start with 1 inc and mark the first stitch. Work 4 sc, 4 inc, 4 sc, and finish with 2 inc. At the end, you should have 22 stitches.
ROUND 3: Work stitch over stitch through the back loop only. Make 22 sc in BLO.
ROUNDS 4 TO 6: Work stitch over stitch. In each round, make 22 sc.
ROUND 7: Start with 5 sc. Continue with 6 dec. Finish with 5 sc. At the end, you should have 16 stitches.
ROUND 8: Start with 4 sc. Continue with 4 dec. Finish with 4 sc. At the end, you should have 12 stitches.
Remove the marker, shape the piece, and stuff.
ROUNDS 9 TO 14: Work stitch over stitch. In each round, make 12 sc. Stuff as you continue crocheting.
After finishing round 14, attach skin-color yarn. Tighten, pull the black strand, and cut it. Hide the remaining strands in the piece.
ROUND 15: Work stitch over stitch through the back loop only. Make 12 sc in BLO.
ROUNDS 16 TO 26: Work stitch over stitch. In each round, make 12 sc.
After finishing round 26, finish stuffing. Change to navy blue yarn. Tighten, pull the skin-color strand, and cut it.
ROUND 27: Work 12 sl st through the back loop only.
ROUND 28: Work 12 sc through the back loop only of the slip stitches.
ROUND 29: Take the full stitch and work stitch over stitch. Make 12 sc.
After finishing round 29, pull the strand and cut it. To hide the strand, skip 1 stitch from the last stitch made and insert the needle into the next stitch from the back. Pick up the strand and pull. Return to the last stitch, insert the needle from the inside taking only the back loop, pick up the strand, and pull. A stitch will be formed. Hide the remaining strand inside the piece.
First Leg Details
Work into the free loops from round 3. Insert from the back and attach black yarn. Ch 1 and in that same loop work 1 sc. Work 1 sc in each available loop. At the end of the round, go to the first stitch made and work 1 sl st. Ch 1 and cut the yarn. Hide the remaining strand inside the piece.
Work into the free loops from round 15. Insert from the back and attach black yarn. Tighten well and ch 1. Go to the next loop and work 1 sl st. Continue with sl st in each available loop. At the end of the round, go to the starting chain and slip stitch. Ch 1 and cut the yarn. Hide the remaining strand inside the piece.
Second Leg and Body Joining
Make a second leg exactly the same, but do not cut the yarn on this piece so you can continue crocheting.
On the second leg, work 6 sc to center the piece. When finished, you should be at the center part of the leg.
Ch 1 and insert into the first leg through the middle area. Work 1 sc. Mark this stitch because it will be the beginning of round 30.
ROUND 30: Work 12 sc on the first leg, counting the first marked stitch. Work 1 sc in the joining chain. Move to the second leg and work 12 sc. Work 1 sc in the joining chain. At the end, you should have 26 stitches.
ROUNDS 31 TO 33: Work stitch over stitch. In each round, make 26 sc.
ROUND 34: Start with 4 sc. Make 1 dec. Continue with 12 sc. Make 1 dec and finish with 6 sc. At the end, you should have 24 stitches.
ROUND 35: Start with 4 sc. Make 1 dec. Continue with 11 sc. Make 1 dec and finish with 5 sc. At the end, you should have 22 stitches.
ROUND 36: Work stitch over stitch. Make 22 sc.
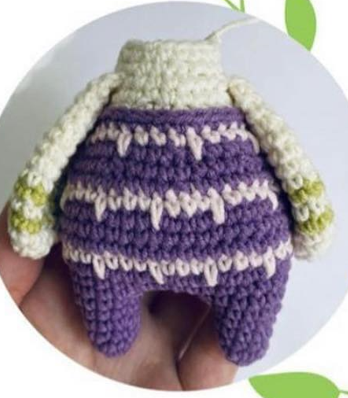
After finishing round 36, change to fuchsia yarn. Tighten the strands and cut the blue strand.
ROUND 37: Work 22 sl st through the back loop only.
ROUND 38: Work 22 sc through the back loop only of the slip stitches.
ROUND 39: Take the full stitch and work stitch over stitch. Make 22 sc.
After finishing round 39, change to skin-color yarn. Tighten the strands and cut the fuchsia strand.
ROUND 40: Work 22 sl st through the back loop only.
ROUND 41: Work 22 sc through the back loop only of the slip stitches.
ROUND 42: Start with 5 sc. Make 1 dec. Continue with 9 sc. Make 1 dec and finish with 4 sc. At the end, you should have 20 stitches.
Before starting round 43, change to white yarn. Tighten the strands and cut the skin-color strand.
ROUND 43: Work 20 sl st through the back loop only. Remember to stuff as you continue crocheting.
ROUND 44: Work 20 sc through the back loop only of the slip stitches.
ROUND 45: Take the full stitch and work stitch over stitch. Make 20 sc.
ROUND 46: Start with 8 sc. In the next space, make 1 triple inc, that is, 3 sc in the same stitch. Continue with 4 sc. In the next space, make 1 triple inc. Finish with 6 sc. At the end, you should have 24 stitches.
Joining the Arms to the Body
ROUND 47: Start with 4 sc. Take one arm and insert through the inside, taking any stitch. Take the next stitch of the body and work 1 sc. Take the next stitch of the arm and the next stitch of the body to work the second sc. Repeat until the arm is joined with 4 sc in total. Continue on the body with 10 sc. Attach the second arm in the same way, joining it with 4 sc. Finish the round with 2 sc.
ROUND 48: Start with 4 sc. Work into the 4 free stitches of the arm, making 4 sc. A space should remain for adding the wire later. Continue with 1 triple dec, taking the front loop of 3 stitches and making 1 sc. Work 4 sc. Make another triple dec. Continue working into the free stitches of the second arm and make 4 sc. Finish with 2 sc. At the end, you should have 20 stitches.
Internal Support
To make the support, use a 30 cm piece of wire and fold it in half. At the top, take approximately 3 cm and bend it. Take one of the ends and bend it upward. Repeat the same on the other side. Place adhesive tape on the ends so they do not come out through the crochet fabric.
Before continuing with round 49, finish stuffing the body. The arms should not be stuffed, because the support is inserted there. Insert the support in the corresponding position.
ROUND 49: Work the sequence of 8 sc and 1 dec. Repeat 2 times. At the end, you should have 18 stitches.
ROUND 50: Work the sequence of 1 sc and 1 dec. Repeat 6 times. At the end, you should have 12 stitches.
ROUND 51: Work stitch over stitch. Make 12 sc. Stuff as you continue crocheting.
After finishing round 51, change to skin-color yarn. Tighten the strands and cut the white strand.
ROUND 52: Work stitch over stitch through the back loop only. Make 12 sc in BLO.
ROUNDS 53 TO 58: Work stitch over stitch. In each round, make 12 sc.
After finishing round 58, finish stuffing.
ROUND 59: Work 6 dec. At the end, you should have 6 stitches.
After finishing round 59, pull the strand and cut it. With a yarn needle, pick up the front loop of each stitch. After passing through the 6 stitches, pull the strand to close. Hide and cut the remaining tail.
Final Details, Boots, Jacket, Necklaces, and Assembly
Original video tutorial for this section: in this third part, the boot details, jacket, sleeves, embroidery, necklaces, and final assembly of Rumi Huntrix are added.
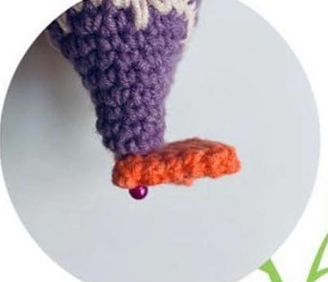
Boot and Body Details
For the details, use red and fuchsia felt.
In red felt, cut 2 pieces approximately half a centimeter wide and 3.5 cm long. Glue them onto the boot using liquid silicone glue or your preferred glue. Place each piece right in the middle of the boot and repeat the same on the other side.
In fuchsia felt, cut 2 pieces approximately half a centimeter wide and 3 cm long. Glue them to one side of the boot. Repeat the same on the other side.
Also glue 2 small pieces measuring 1 cm long in the corresponding area of the boot.
With white yarn separated in half so it is thinner, come out between rounds 38 and 39. Insert from the back and come out right in the middle. Then insert into the last round worked in blue, exactly at the center stitch, and come out at the starting point. Pull the yarn, adjust, and hide the remaining strands.
Continue with white yarn. Come out just below the fuchsia detail and insert from the back. Count 2 stitches to the right, go down 1 stitch, and insert. Come out at the point located below the fuchsia detail. Pull and adjust. Count 2 stitches to the left, go down 1 stitch, insert, and come out through the back. Hide the remaining strands.
Work into the free loops from round 52. Insert from the back and attach white yarn. Tighten the strand, ch 1 to secure, go to the next stitch, and slip stitch. Work sl st in each available loop. At the end of the round, go to the first stitch where you started and slip stitch. Ch 1 and cut the yarn. Hide the remaining strands.
Make sure the body and head fit well together. In the tutorial, the head is left placed on top because it stays firm, but you can also glue or sew it if you want extra security.
Jacket
With yellow yarn, start the jacket. Make a slip knot and ch 23.
ROW 1: Starting from the second chain, work back with 22 sc.
ROW 2: Ch 1, turn the work, and work stitch over stitch. Make 22 sc.
ROW 3: Ch 1 and turn the work. Start with 3 sc. Ch 5. Skip 4 stitches and in stitch number 5, work 1 sc. Continue with 7 sc. Ch 5 again. Skip 4 stitches and in stitch number 5, work 1 sc. Finish with 2 sc.
ROW 4: Ch 1 and turn the work. Start with 3 sc. Work 1 sc in each of the 5 chains. Continue with 8 sc. Work 1 sc in each of the next 5 chains. Finish with 3 sc. At the end, you should have 24 stitches.
ROWS 5 TO 6: Ch 1, turn the work, and work stitch over stitch. In each row, make 24 sc.
After finishing row 6, pull the strand, insert into the two bars that are formed, and attach black yarn. Tighten the yellow strand and cut it.
Work along one side, making sc in each available space until reaching the corner. In the corner stitch, make 1 inc. Continue with sc along the top until reaching the other corner. In the last corner stitch, make 1 inc.
Ch 3. Starting from the second chain, work back with 2 sl st. Work sc along the side until reaching the corner. In the corner stitch, make 1 inc. Continue with sc along the entire side until reaching the next corner. In the last corner stitch, make 1 inc. Go to the next stitch and slip stitch. Ch 1 and cut the yarn. Hide the remaining strand in the piece.
Jacket Sleeves
Work into the 5 chains made, the stitch on one side, the 4 skipped stitches, and the remaining side.
Insert into the first chain and attach yellow yarn. Ch 1 to secure and in that same space, work 1 sc. This will be the starting point.
ROUND 1: Continue with 4 sc in the chains. On the side, work 1 sc. Work into the skipped stitches and make 4 sc. On the other side, work 1 sc. At the end, you should have 11 stitches.
ROUND 2: In the starting point, make 1 inc and mark the first stitch. Continue with 5 sc. In the next space, make 1 inc. Finish with 4 sc. At the end, you should have 13 stitches.
ROUNDS 3 TO 12: Work stitch over stitch. In each round, make 13 sc.
After finishing round 12, go to the next stitch and slip stitch. Ch 1 and cut the yarn. Hide the remaining strand. Make the other sleeve in the same way.
Jacket Embroidery
With red yarn separated in half so it is thinner, embroider one part of the jacket. Insert the needle into the indicated point and come out 2 stitches downward. Then come out beside the previous stitch and pull the strand. Embroider until forming 4 small strips. When finished, hide the remaining strands.
With thin burgundy yarn, embroider the other part of the jacket. Insert the needle in the upper area and make several horizontal stitches to form the design.
On the lower part, use calypso blue yarn and make several horizontal stitches. Then use burgundy again and repeat the horizontal stitches. Use calypso blue again and make several horizontal stitches. When finished, hide the remaining strands.
Necklaces and Final Accessories
For the first necklace, use 2 wires and intertwine them until they have the desired shape. Place it around the neck, making sure it fits snugly.
For the second necklace, join several jump rings until you reach the desired length. Place it around the neck and adjust it well.
Put the jacket on the body and make sure everything fits correctly.
Assembly and Finishing
To assemble Rumi, first check that the head and body fit well together. If the head stays firm, it can be left placed on top as shown in the tutorial; if the doll will be handled often, it is better to sew or glue it for extra security.
The hair should be centered, with the braid in the middle and the small strands positioned near the ears. When gluing the upper strands, it is best to work little by little so the hair looks neat and no empty spaces remain.
The arms are joined while crocheting the body and should not be stuffed, because they include internal support. Before closing the body, check that the wire is well protected with adhesive tape to prevent the ends from damaging the crochet fabric.
The felt details on the boots, the jacket embroidery, the necklaces, earrings, eyelashes, and blush are what give the doll its personality. Work these finishing details patiently, using only a small amount of glue so it does not stain the crochet fabric.
My Experience and Tips for Crocheting This Amigurumi
While reviewing and organizing this pattern, the most important thing I noticed is that this is not a basic doll: it is a project with many layers of detail. The head, hair, and jacket require more patience than actual difficulty, so it is best to work in sections and not try to finish everything in one sitting.
For the head, I would pay special attention to the tension between rounds 8 and 20, because that area supports the facial expression. If the stitches are too loose, the stuffing may show or the shape may shift when placing the eyes. I also recommend marking the eye placement carefully before closing, because it will be much harder to correct later.
The hair is one of the most eye-catching parts. To make it look neat, it is better not to rush the gluing of the strands: position everything first, check that the braid is centered, and only then secure each section. If you use glue, apply only a small amount and help yourself with pins to keep everything in place while it dries.
For the body, pay attention to the color changes and the rounds worked in BLO, because they help define the stripes and clothing details. The wire support must be very well protected, especially if the amigurumi will be near children. For children’s pieces, you can also replace safety eyes, eyelashes, and glued accessories with embroidery, although this will change the visual finish.
The jacket has several embroidered finishing details, and neatness makes a big difference there. Separating the yarn strands to embroider with a thinner thread helps the details look lighter and cleaner. It is also a good idea to try the jacket on the body before hiding all the strands, so you can adjust the sleeves and sides if needed.
Frequently Asked Questions
Can I crochet this doll with a different type of yarn?
Yes, you can use a different yarn, but the finished size will change. The important thing is to choose a hook that keeps the stitches tight so the stuffing does not show.
Is this pattern suitable for beginners?
It may be challenging for absolute beginners because it includes long hair, color changes, embroidery, glued pieces, and wire support. If you already know how to make a magic ring, increases, decreases, and color changes, you can follow it with patience.
How can I prevent the pieces from looking crooked or uneven?
Use a stitch marker, count the stitches at the end of each important round, and check symmetry before sewing or gluing. For the face and hair, position everything with pins first before securing it permanently.
Pattern Credits
Pattern based on the Rumi Huntrix tutorial shared by Mundo Crochet. The instructions, visible materials, step-by-step structure, and main details from the original tutorial have been preserved.
I invite you to follow the author on her YouTube channel, where she shares complete step-by-step amigurumi tutorials: Mundo Crochet on YouTube.
Zayu amigurumi: Mexico’s 2026 World Cup mascot crocheted by hand
If you love soccer, crochet, and handmade dolls with a story, this free Zayu amigurumi pattern has the special charm of pieces made by hand. Zayu is not just a crocheted doll: it is a handmade version inspired by one of the mascots of the FIFA World Cup 2026™, the tournament hosted by Canada, Mexico, and the United States.
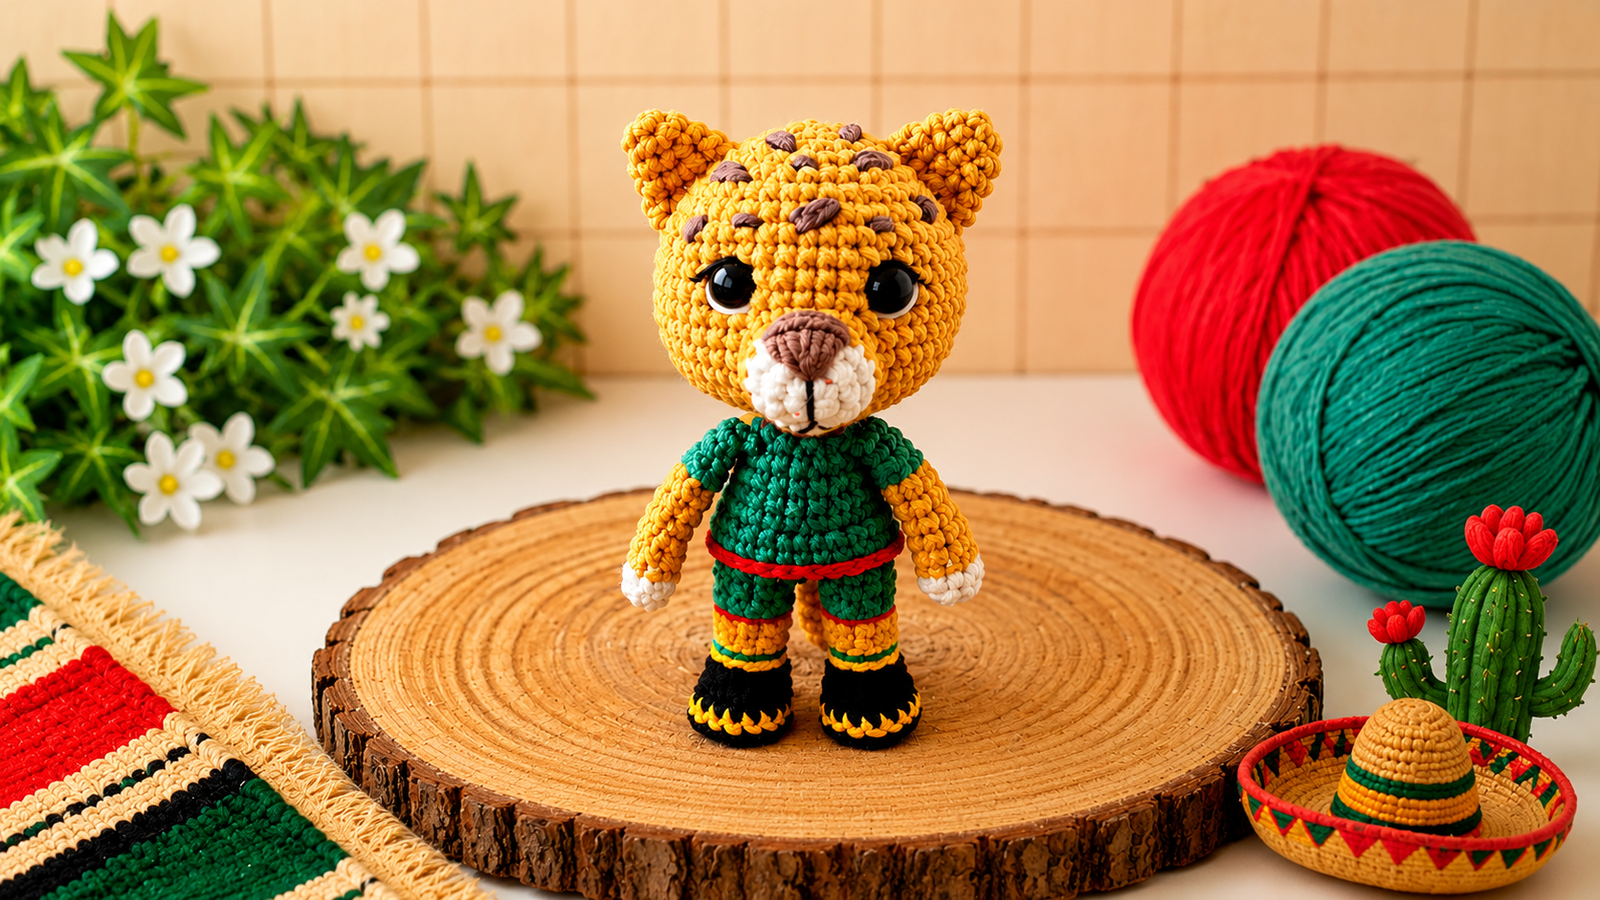
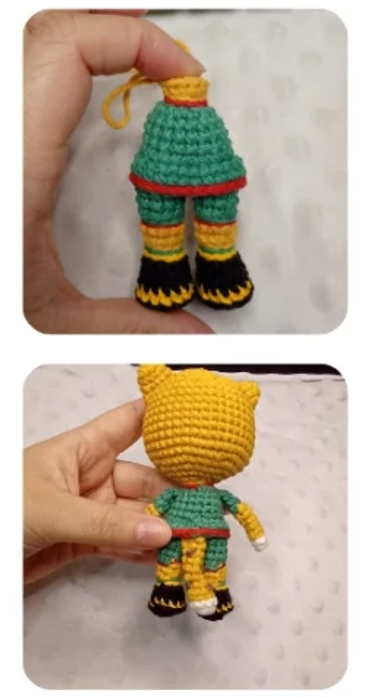
In this project, you will find a colorful amigurumi toy with jaguar details, a green uniform, little boots, embroidered spots, and a sweet expression that makes it perfect for anyone who loves collecting crocheted characters. The pattern is organized step by step, with complete rounds, color changes, and assembly details so you can crochet it with more confidence.
Zayu is the mascot that represents Mexico in the 2026 World Cup. According to the official information published by FIFA, Zayu is a Mexican jaguar that embodies the country’s heritage, dynamism, unity, strength, and joy. Zayu is also presented as a fast and agile forward, connected to Mexican culture, tradition, food, dance, and the pride of bringing people together through soccer.
This crochet pattern is inspired by that spirit: a small, colorful piece full of personality, perfect for anyone who wants to celebrate the World Cup through amigurumi and handmade crafts.
Important: this handmade pattern is not an official FIFA product and is not affiliated with, approved by, or sponsored by FIFA. It is a crocheted interpretation of the character, made from the free pattern created by Jessiane Oliveira of Arco-Íris Crochê Ateliê, and published in English with the author’s permission.
Reviewed and organized by Patterns Amigurumis. This pattern was edited to improve readability, preserve the complete rounds, and make the step-by-step crochet process easier to follow.
Amigurumi technical details
Difficulty level: basic/intermediate.
Estimated crochet time: approximately 4 to 6 hours, depending on your experience, tension, and sewing pace.
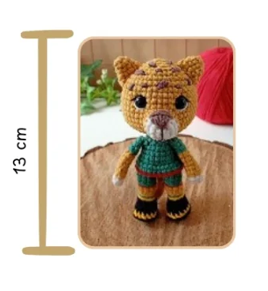
Approximate finished size: 13 cm, which may vary depending on the yarn, hook, and tension.
Project type: amigurumi doll / World Cup mascot crocheted by hand.
Ideal for: soccer fans, amigurumi collectors, World Cup decoration, gifts, and practicing color changes.
Main technique: single crochet, increases, decreases, BLO, stitch post/bar crochet, embroidery, and assembly of small pieces.
Zayu and the spirit of the 2026 World Cup
Zayu is part of the trio of mascots for the FIFA World Cup 2026™, together with Maple, the moose from Canada, and Clutch, the eagle from the United States. In this edition, the mascots represent the cultural richness, legacy, and spirit of each host country.
In Zayu’s case, the character is inspired by the Mexican jaguar and the symbolic strength of this animal within Mexican culture. Its design connects with ideas of agility, energy, celebration, and cultural pride, something that is reflected beautifully in this amigurumi version: a small doll with many visual details that make it recognizable and special.
That is why this project works not only as a lovely crochet pattern, but also as a collectible piece to enjoy the build-up to the 2026 World Cup through handmade crafts.
Original usage note from the author
This is a free pattern created with a lot of love and care, and selling it is prohibited. When sharing it, the author asks that you share the link to the original post to support and encourage her work.
You may sell the finished piece made from this pattern.
The original note states that the pattern may not be translated, sold, or reproduced in video lessons. For this English publication, direct permission was granted by Jessiane Oliveira.
When posting your finished piece on social media, the author asks that you tag @arcoiriscroche.atelie.
Materials
2.2 mm crochet hook.
1 pair of size 9 safety eyes.
Tapestry needle or yarn needle.
Stuffing.
A piece of white yarn to embroider the waterline of the eyes.
Black embroidery thread.
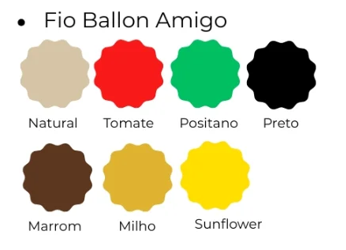
Ballon Amigo yarn in the colors: Natural, Tomate, Positano, Preto, Marrom, Milho, and Sunflower.
Optional or recommended: stitch marker, pins to position the pieces before sewing, and fine-point scissors for more precise work.
Read the entire pattern before beginning, because Zayu has several color changes and some pieces are sewn onto specific rounds.
Use a stitch marker, especially on the body and head, so you do not lose the placement of the eyes, tail, arms, and ears.
Stuff gradually as you crochet; for small pieces such as the arms, tail, and legs, it is best to use a small amount of stuffing so they do not lose their shape.
During color changes, try to keep the inner strands neat so they do not show through from the outside.
Before sewing the ears, arms, and muzzle, pin them in place to check symmetry and expression.
Complete step-by-step pattern
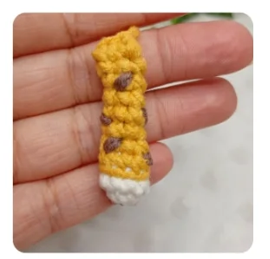
Tail
With Natural color.
ROUND 1: 8 sc in MR.
ROUND 2: 8 sc.
Change to Milho color.
ROUND 3: 8 sl st. This is not BLO.
ROUND 4: 8 sc.
ROUND 5: (2 sc, 1 dec) x 2 (6).
ROUNDS 6 TO 10: 6 sc in each round (5 rounds).
Add a little stuffing to the tip.
Close the piece by joining both sides with 3 sc.
Fasten off, leaving a tail for sewing.
Set aside.
With Marrom yarn, embroider a few small spots.
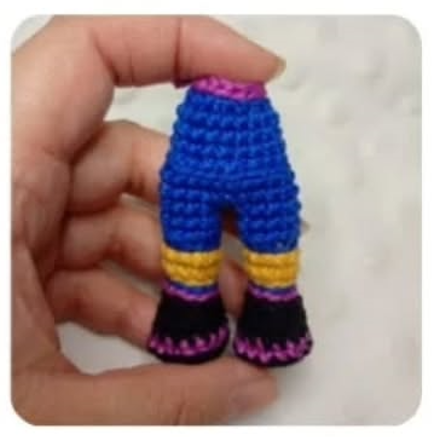
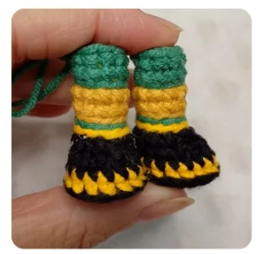
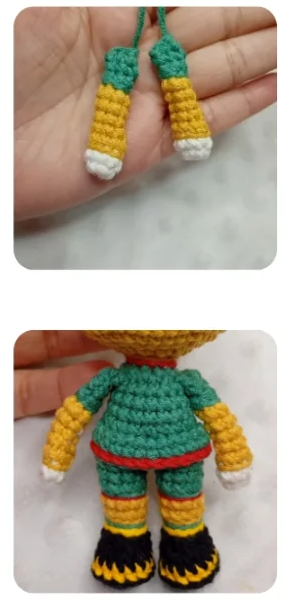
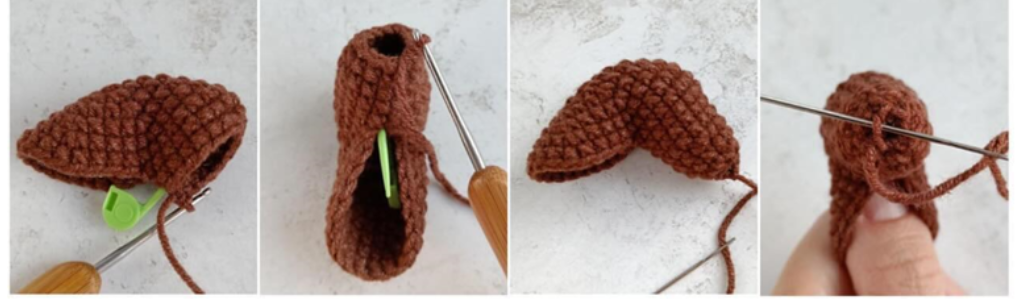
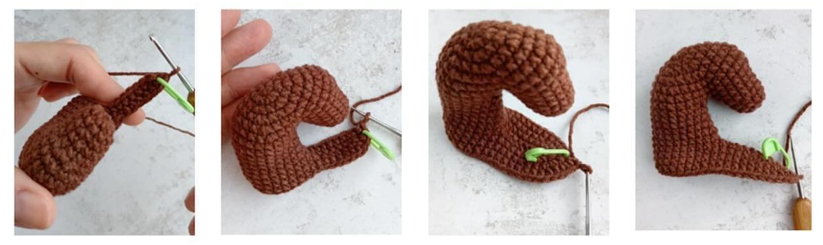
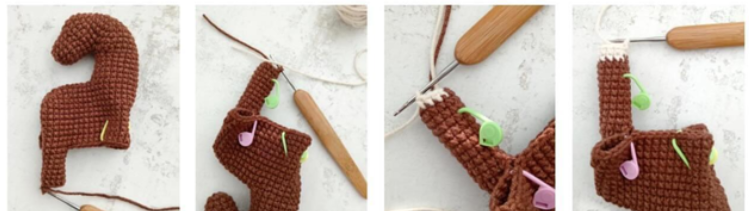
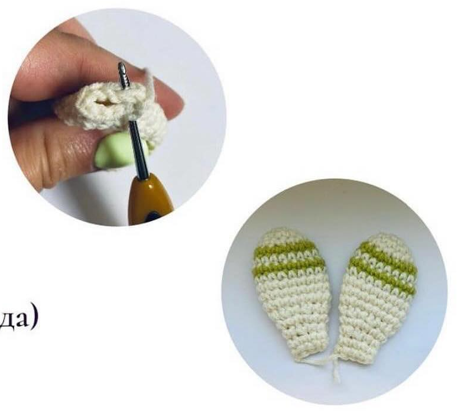
Feet and legs 2x
With Preto color.
Make 5 ch and work back into the 2nd ch from the hook, making:
ROUND 3: Working sc into the stitch post/bar, 15 sc.
Change to Preto color.
Add stuffing as you crochet.
ROUND 4: 15 sc.
ROUND 5: 4 sc, 3 dec, 5 sc (12).
ROUND 6: 4 sc, 1 triple dec, 5 sc (10).
Change to Sunflower color, yellow.
ROUND 7: 10 sl st. This is not BLO.
Change to Positano color, green.
ROUND 8: In BLO, 10 sl st.
Change to Milho color, skin tone.
ROUND 9: In BLO, 10 sl st.
ROUND 10: In BLO, 10 sc.
ROUND 11: 10 sc.
Change to Tomate color, red.
ROUND 12: 10 sl st. This is not BLO.
Change to Positano color, green.
ROUND 13: In BLO, 10 sc.
ROUND 14: 10 sc.
Fasten off with an invisible finish.
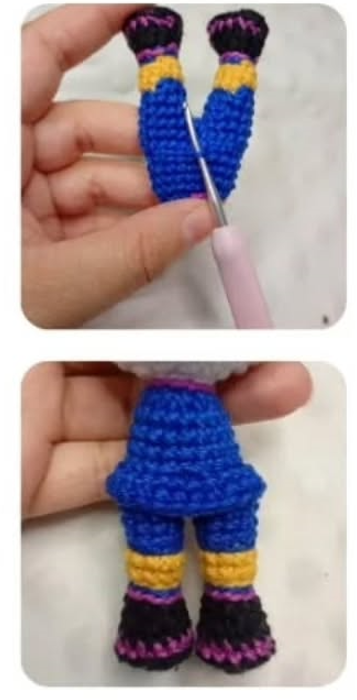
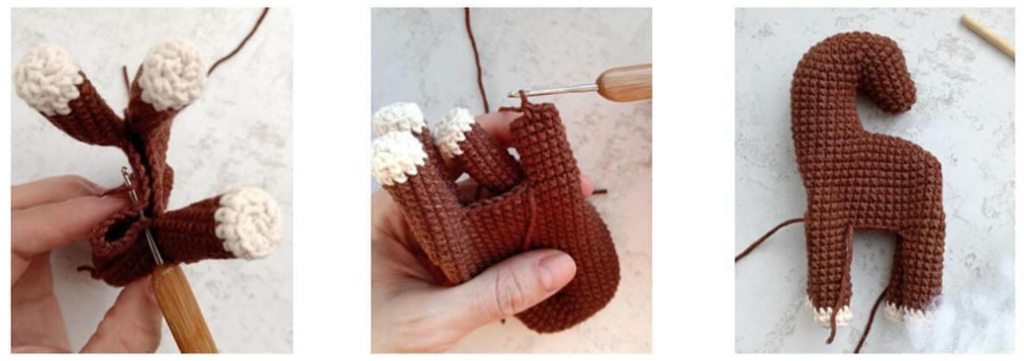
Make the second leg in the same way, but do not fasten off, because we will join them.
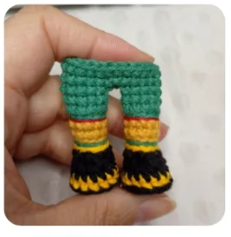
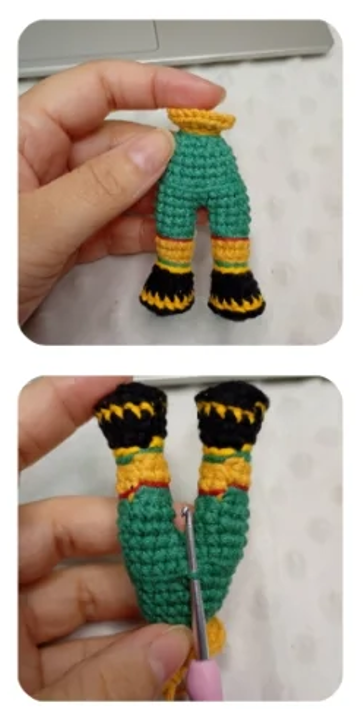
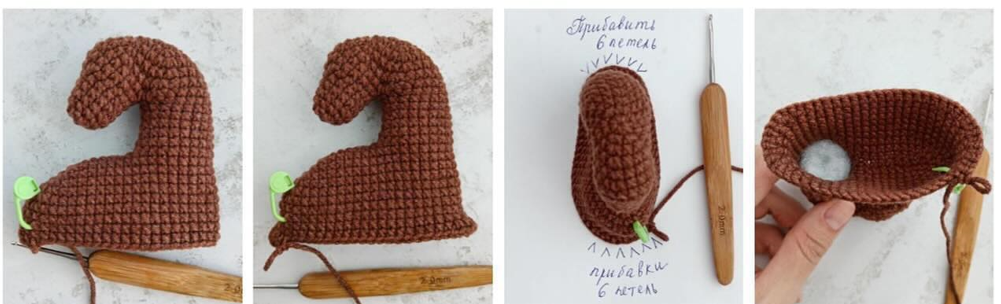
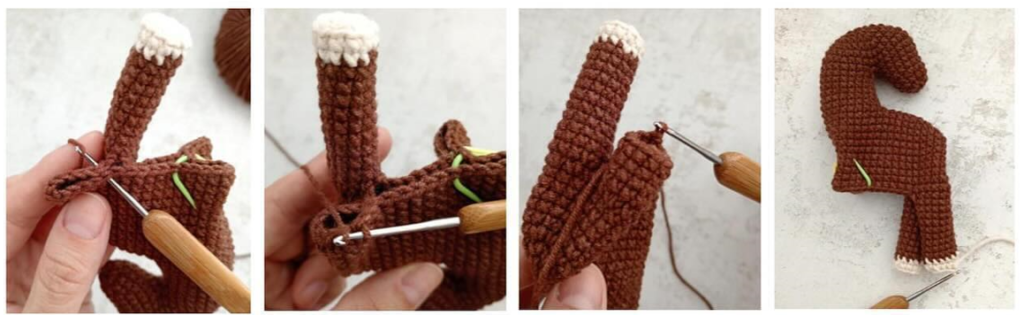
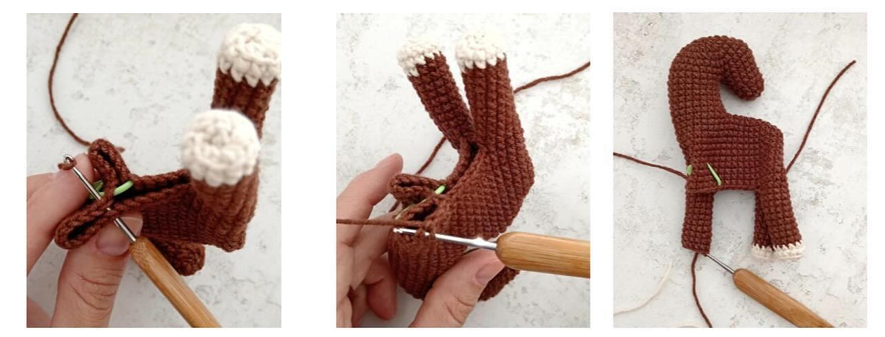
Joining the legs
Continue on the second leg.
ROUND 15: Work approximately 4 sc around to the side, make 2 ch, and join to the side of the other leg with 1 sc. This stitch will be the beginning of the round from now on. Continue with 9 more sc, 2 sc in the ch, 10 sc, 2 sc in the ch (24).
Important: pay attention so the feet face forward.
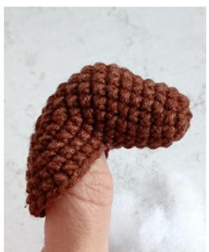
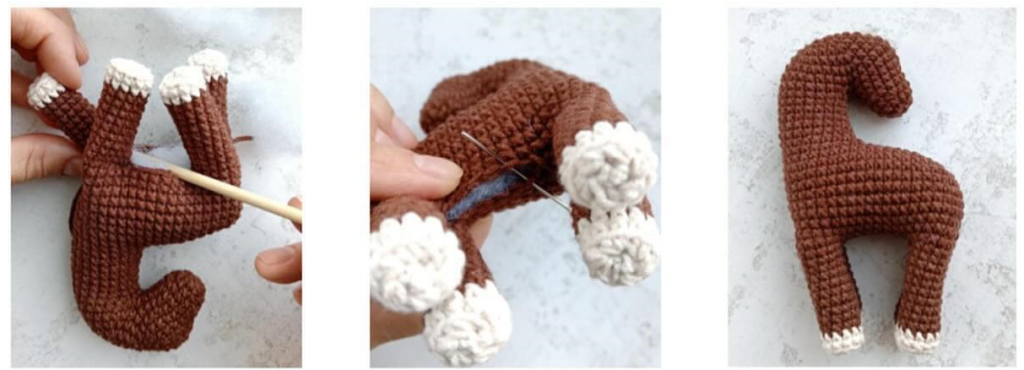
Body
Continue for the body.
ROUNDS 16 TO 17: 24 sc in each round (2 rounds).
Add stuffing as you crochet.
ROUND 18: In BLO, (2 sc, 1 dec) x 6 (18).
ROUNDS 19 TO 21: 18 sc in each round (3 rounds).
ROUND 22: (1 sc, 1 dec) x 6 (12).
Change to Tomate color, red.
ROUND 23: 12 sl st. This is not BLO.
Change to Milho color, skin tone.
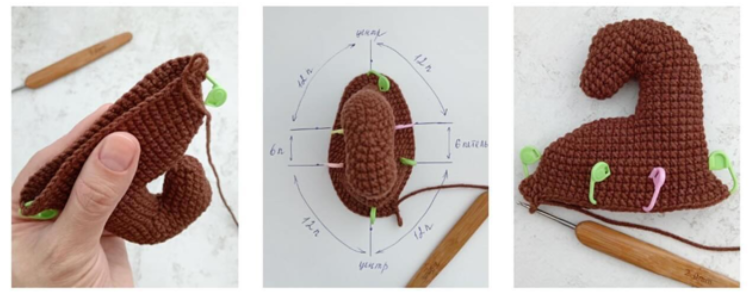
Before starting the head, sew the tail between rounds 15 and 16, so it stays centered between the legs.
We will also work into the sweater loops left from round 18.
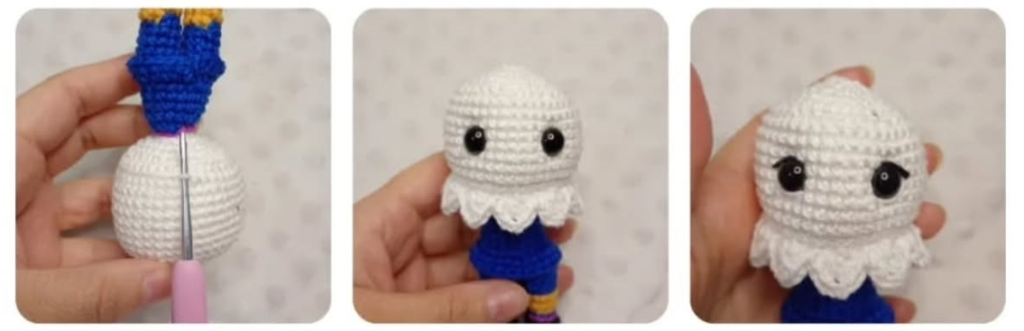
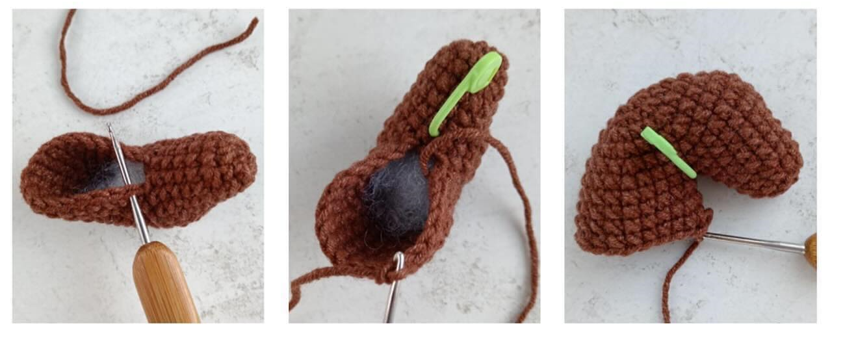
Sweater detail
ROUND 1: With Positano yarn, green, place the body with the legs facing upward and attach the yarn to the first loop with 1 sc. Continue with 24 more sc, working 1 sc into each loop.
ROUND 2: 24 sc.
Change to Tomate color, red.
ROUND 3: 24 sl st.
Fasten off.
Return with Milho yarn to begin the head.
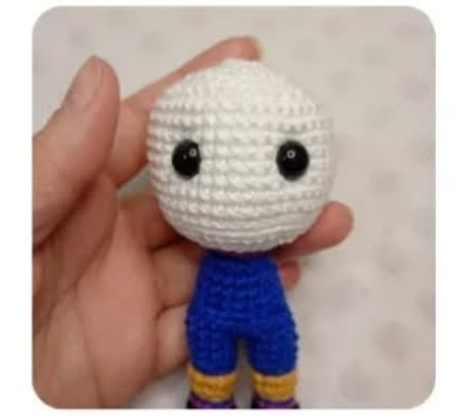
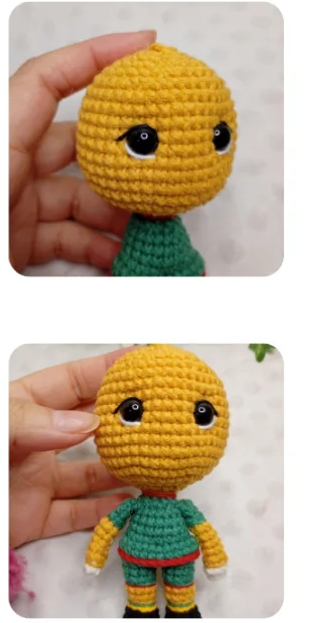
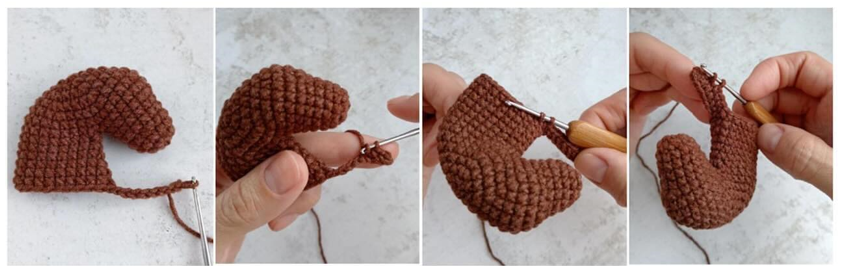
Head
ROUND 24: In BLO, 12 sl st.
ROUND 25: In BLO, 12 sc.
ROUND 26: 12 inc (24).
ROUND 27: (3 sc, 1 inc) x 6 (30).
ROUND 28: (4 sc, 1 inc) x 6 (36).
ROUND 29: (5 sc, 1 inc) x 6 (42).
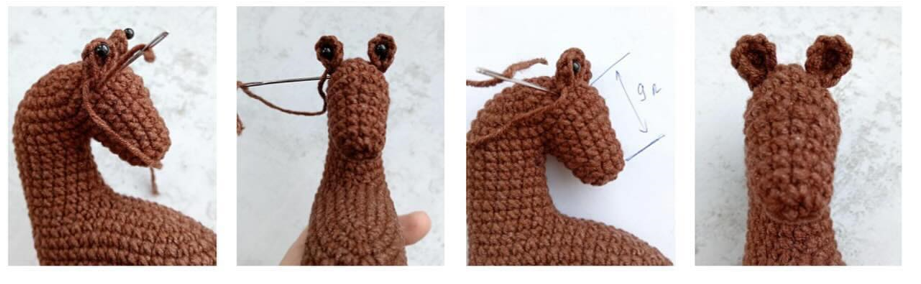
ROUNDS 30 TO 38: 42 sc in each round (9 rounds).
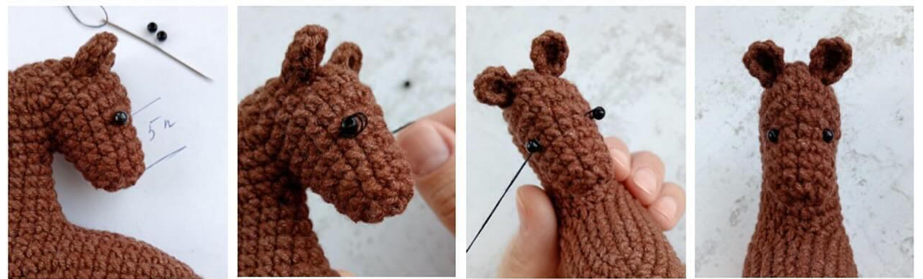
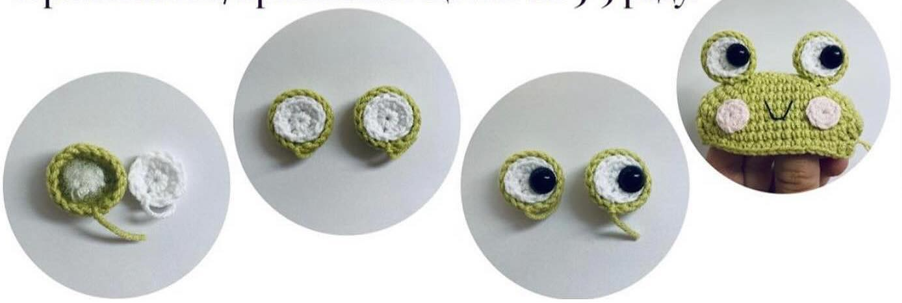
Place the eyes between rounds 34 and 35, with 5 visible stitches between them.
Add stuffing as you close the head.
ROUND 39: (5 sc, 1 dec) x 6 (36).
ROUND 40: (4 sc, 1 dec) x 6 (30).
ROUND 41: (3 sc, 1 dec) x 6 (24).
ROUND 42: (2 sc, 1 dec) x 6 (18).
ROUND 43: (1 sc, 1 dec) x 6 (12).
ROUND 44: (1 sc, 1 dec) x 4 (8).
Close with an IR and fasten off.
With white yarn, embroider the waterline of the eyes. With black embroidery thread, make the eyelids.
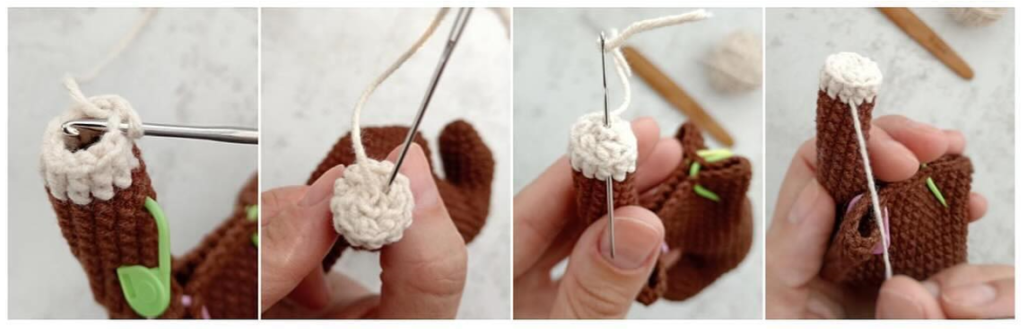
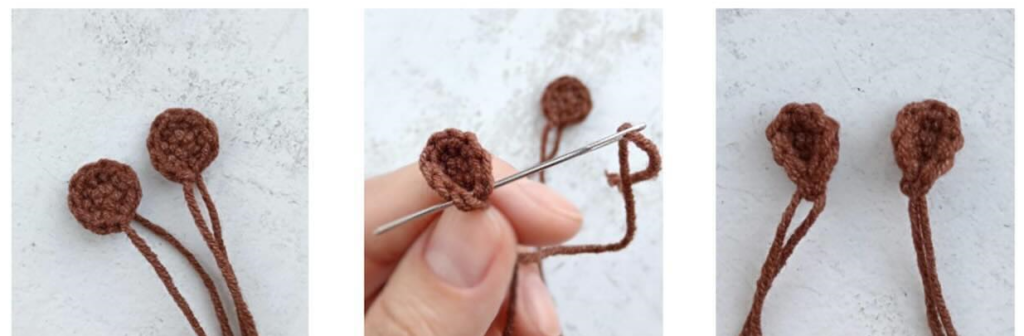
Arms 2x
With Natural color.
ROUND 1: 8 sc in MR.
ROUND 2: 8 sc.
Change to Milho color.
ROUND 3: 8 sl st. This is not BLO.
ROUND 4: In BLO, 8 sc.
ROUND 5: (2 sc, 1 dec) x 2 (6).
Add a little stuffing.
ROUNDS 6 TO 8: 6 sc in each round (3 rounds).
Change to Positano color, green.
ROUND 9: 6 sl st. This is not BLO.
ROUND 10: In BLO, 6 sc.
ROUND 11: 6 sc.
Close the piece with 3 sc. Fasten off, leaving a tail for sewing.
If you want, you can make spots like the ones on the tail.
Sew the arms between rounds 21 and 22, on the sides of the body.
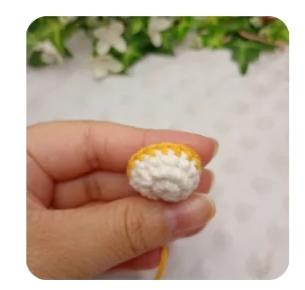
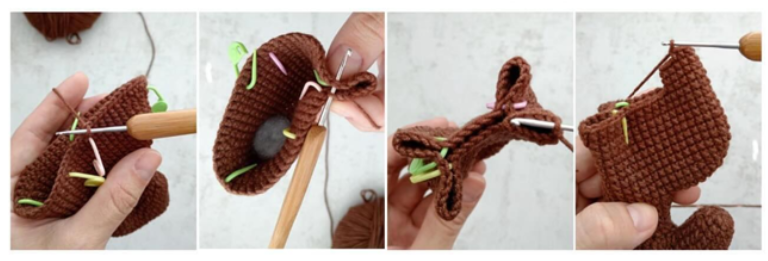
Muzzle
With Natural color, skin tone.
ROUND 1: 8 sc in MR.
ROUND 2: 8 inc (16).
ROUND 3: 16 sc.
Change to Milho color.
ROUND 4: 16 sc.
Fasten off with an invisible finish and leave a tail for sewing.
With Marrom yarn, embroider the muzzle over approximately 3 stitches between rounds 3 and 2. With black embroidery thread, embroider the mouth.
Sew the muzzle between rounds 29 and 33, so it sits between the eyes.
Add stuffing as you finish sewing.
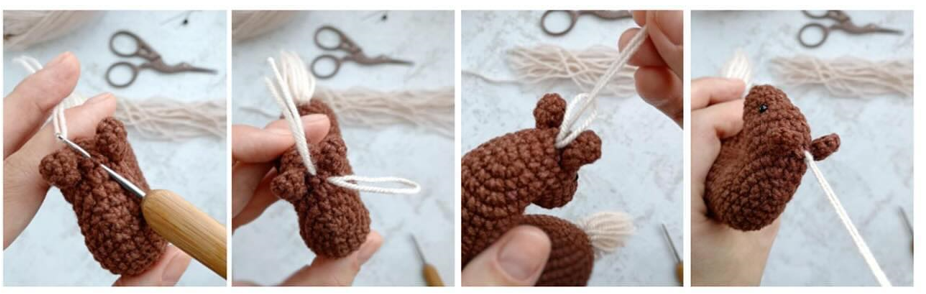
Ears 2x
With Milho color.
ROUND 1: 6 sc in MR.
ROUND 2: (1 sc, 1 inc) x 3 (9).
ROUND 3: 9 sc.
ROUND 4: (2 sc, 1 inc) x 3 (12).
Cut the yarn, leaving a tail for sewing.
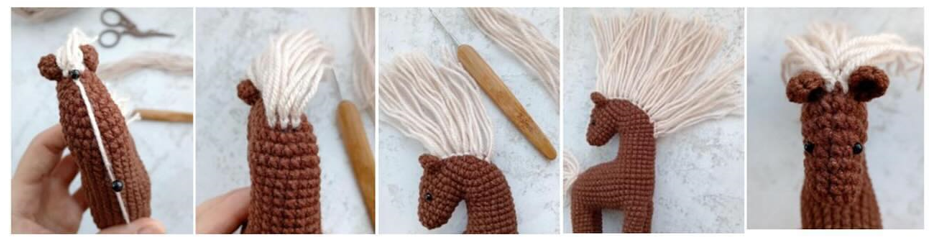
Sew the ears between rounds 38 and 42, on the sides of the head, approximately 4 stitches away from the eyes.
Assembly and finishing
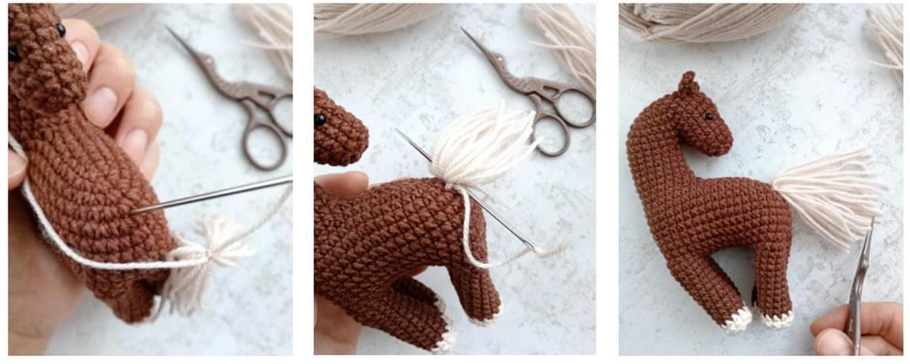
Sew the tail between rounds 15 and 16, centered on the back, between the legs.
Work the sweater detail into the loops left from round 18, using Positano and then Tomate.
Sew the arms between rounds 21 and 22, on the sides of the body.
Embroider the spots on the tail and, if you want, repeat similar spots on the arms.
Place the eyes between rounds 34 and 35, leaving 5 visible stitches between them.
Embroider the waterline with white yarn and the eyelids with black embroidery thread.
Embroider the muzzle with Marrom yarn, taking approximately 3 stitches between rounds 3 and 2 of the muzzle, and embroider the mouth with black thread.
Sew the muzzle between rounds 29 and 33, positioned between the eyes, stuffing lightly before closing completely.
Sew the ears between rounds 38 and 42, on the sides of the head, approximately 4 stitches away from the eyes.
My experience and tips for crocheting this amigurumi
While reviewing and organizing this pattern, the first thing that stands out is that Zayu has a small silhouette but many important details: the boots, uniform, tail, embroidered muzzle, spots, and facial expression. That is why it is best to crochet without rushing and check each color change before moving on to the next section.
For such a recognizable character as a World Cup mascot, neat color work helps a lot. The green uniform, the red and yellow details, and the jaguar spots are the elements that visually connect the doll with Zayu. If the color changes look clean, the finished piece will look much more polished and expressive.
I also recommend paying close attention when joining the legs. The original pattern says to make sure the feet face forward, and that instruction is key. If the feet are twisted, the whole body may look misaligned, especially because this doll has the pose of a sporty mascot.
For the face, use pins before sewing the muzzle and ears. Placing the eyes between rounds 34 and 35, the muzzle between rounds 29 and 33, and the ears between rounds 38 and 42 helps create that sweet jaguar expression. If this amigurumi will be used by a small child, you can replace the safety eyes with embroidered eyes for greater safety.
As a piece inspired by a 2026 World Cup mascot, this amigurumi can also look beautiful as themed decoration, a keepsake for soccer fans, or part of a handmade character collection. The loveliest thing about this design is that it brings together two very different worlds: the excitement of the World Cup and the tenderness of handmade crochet.
Frequently asked questions
Is this Zayu pattern an official FIFA pattern?
No. It is a handmade crochet pattern inspired by Zayu, Mexico’s mascot for the 2026 World Cup. It is not an official FIFA product and is not affiliated with, approved by, or sponsored by FIFA.
Can I use another yarn to crochet Zayu?
Yes, you can use another yarn with a similar thickness. Keep in mind that the finished size may change if you use a thicker or thinner yarn than the one indicated in the original pattern.
What should I do if the legs do not face forward?
Before completing the leg join, check the position of the feet. If they are twisted, adjust the number of stitches you work around the second leg before joining them.
How can I prevent the stuffing from showing?
Work with firm tension, use the recommended hook, and add stuffing little by little. In small pieces such as the arms, tail, and muzzle, too much stuffing can open the stitches.
Pattern credits
This original pattern was created by Jessiane Oliveira, amigurumi designer and creator of Arco-Íris Crochê Ateliê.
Special thanks to Jessiane for her kindness and for authorizing the publication of the translated pattern, while respecting her authorship and sharing her social media so more crocheters can discover her original work.
Visible credit in the original pattern: 2026 – Desenvolvido por Jessiane Oliveira – @arcoiriscroche.atelie.
You can follow and support the author’s work through her official social media:
Information about Zayu, Maple, and Clutch was consulted from FIFA’s official article about the FIFA World Cup 2026 mascots: FIFA World Cup 2026 mascots.
Did you crochet it? Leave me a comment or share it on social media using #PatternsAmigurumi so I can see it.
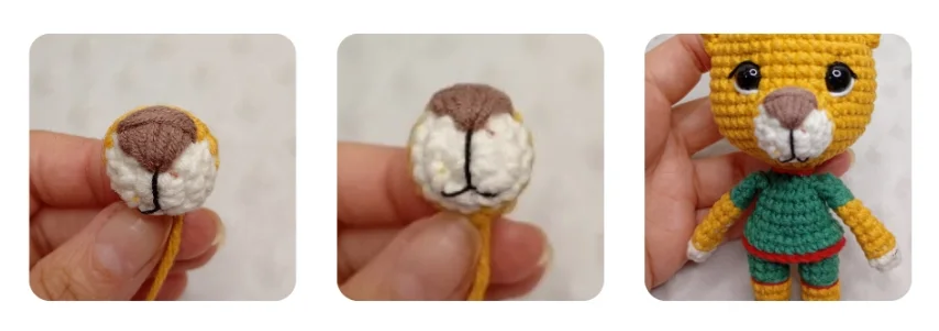
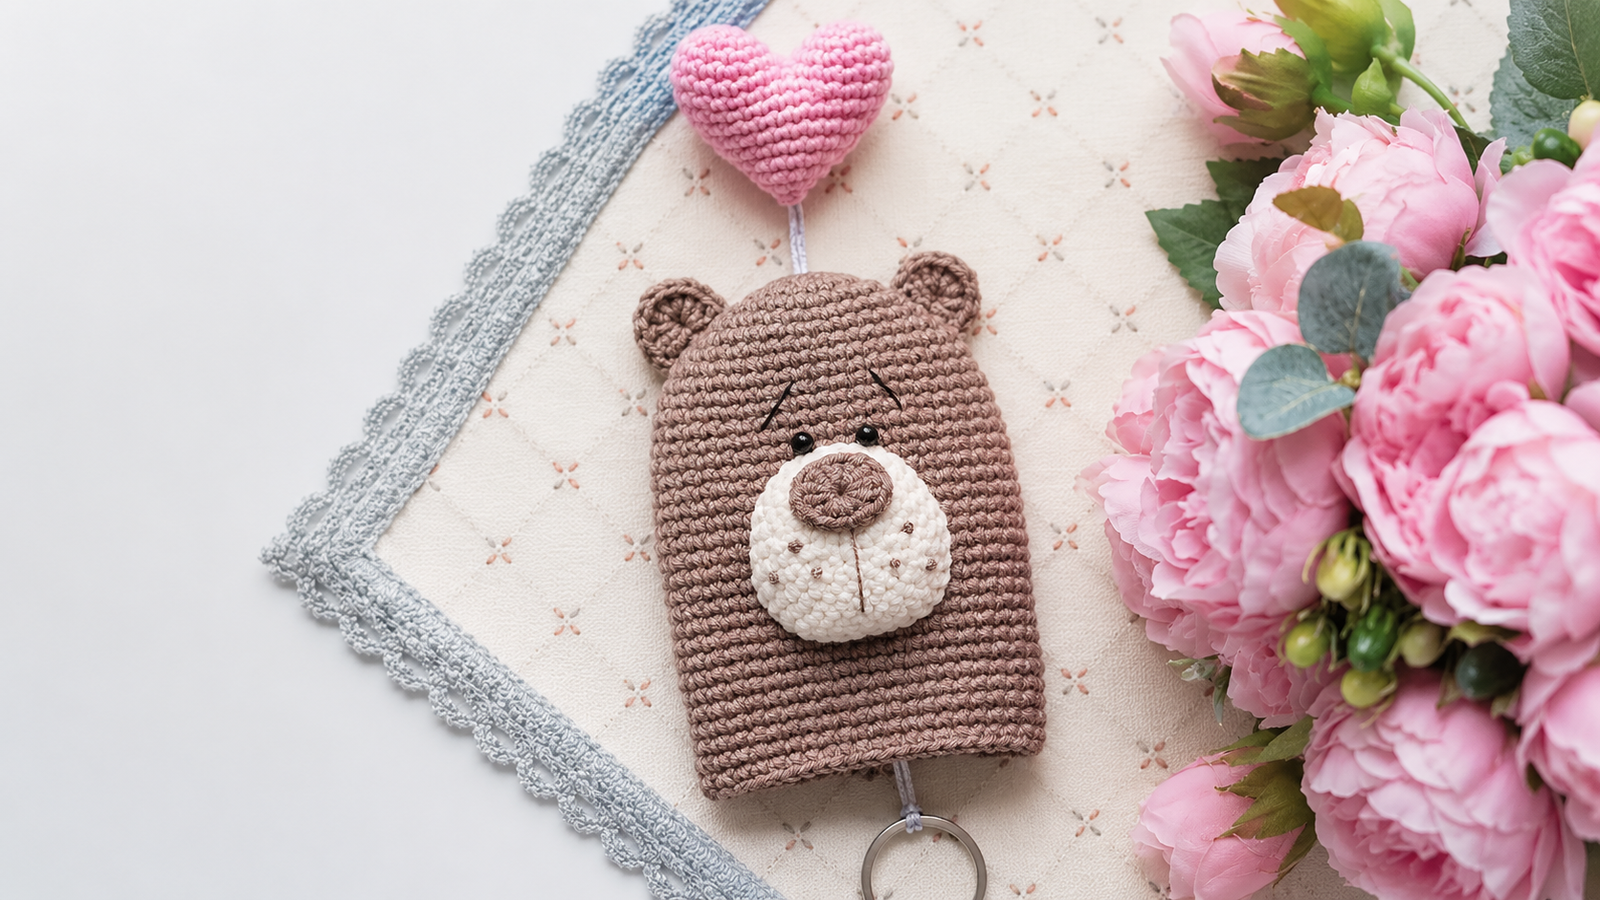
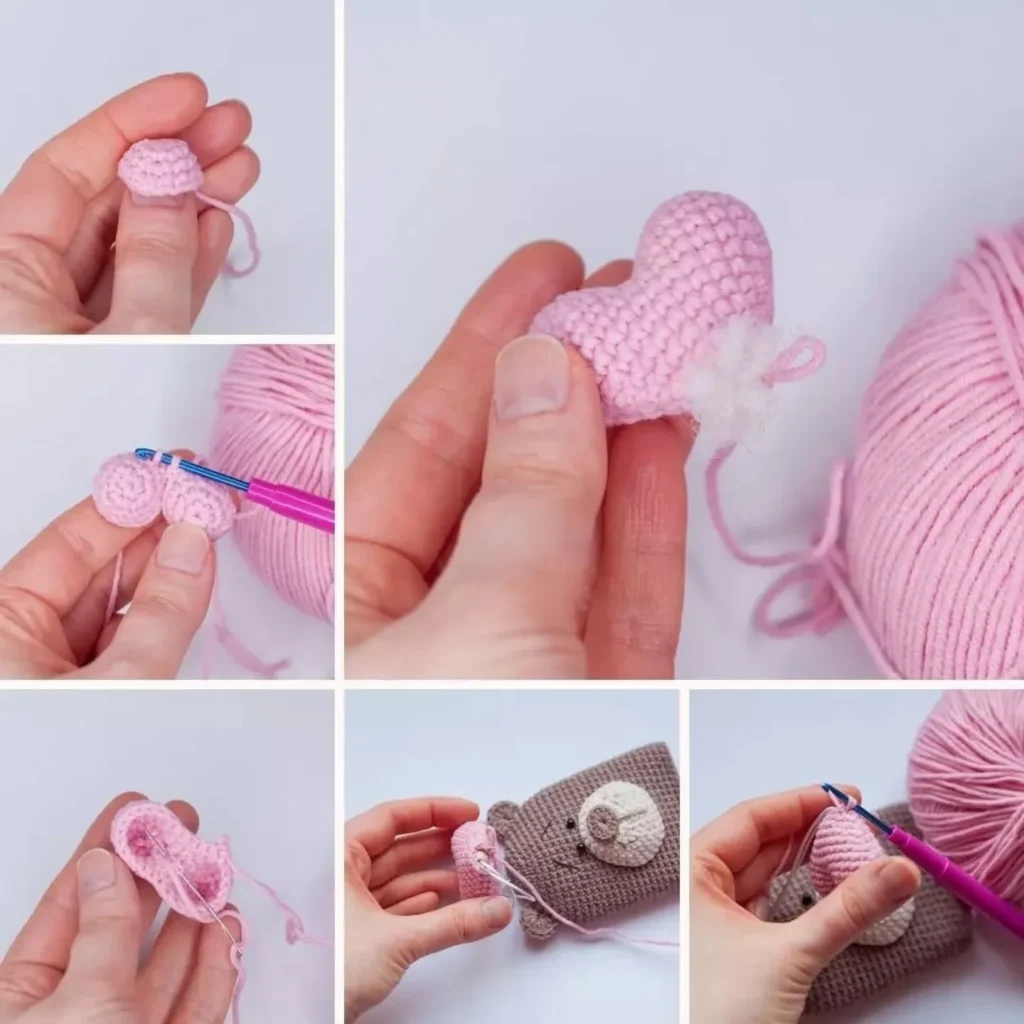
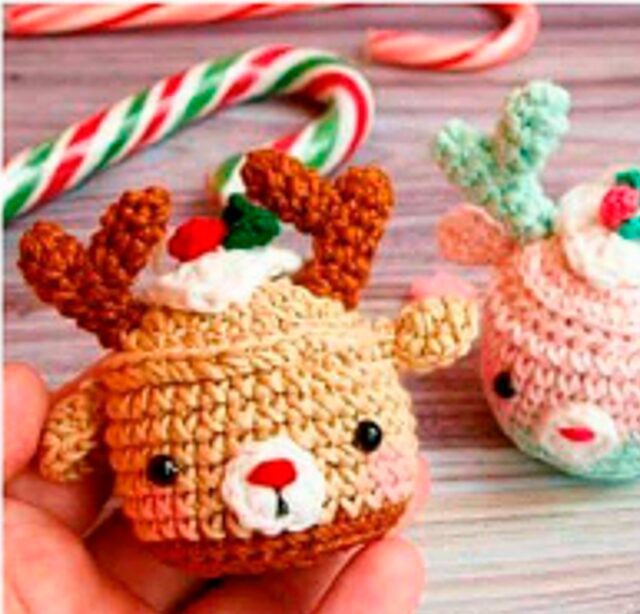
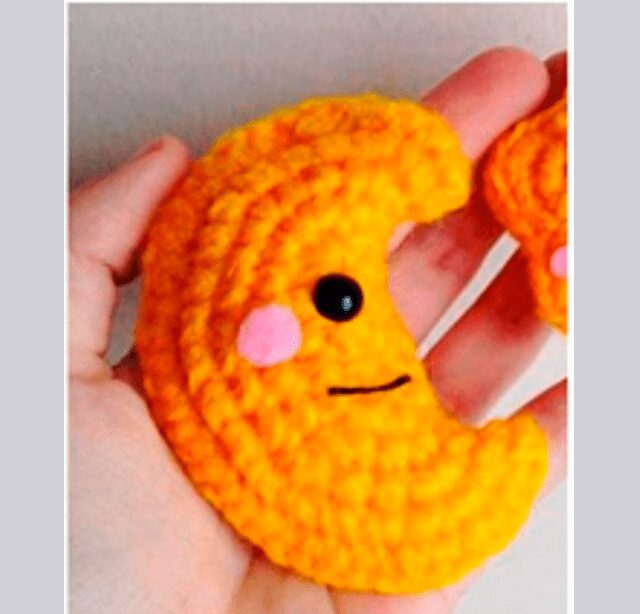
This crocheted bear amigurumi is one of those small pieces that wins you over with its details: it has a sweet face, an embroidered muzzle, soft little ears, and a pink heart that works as a decorative detail for the key cover. It is a free step-by-step pattern, ideal if you want to make a practical, cute, and charming accessory.
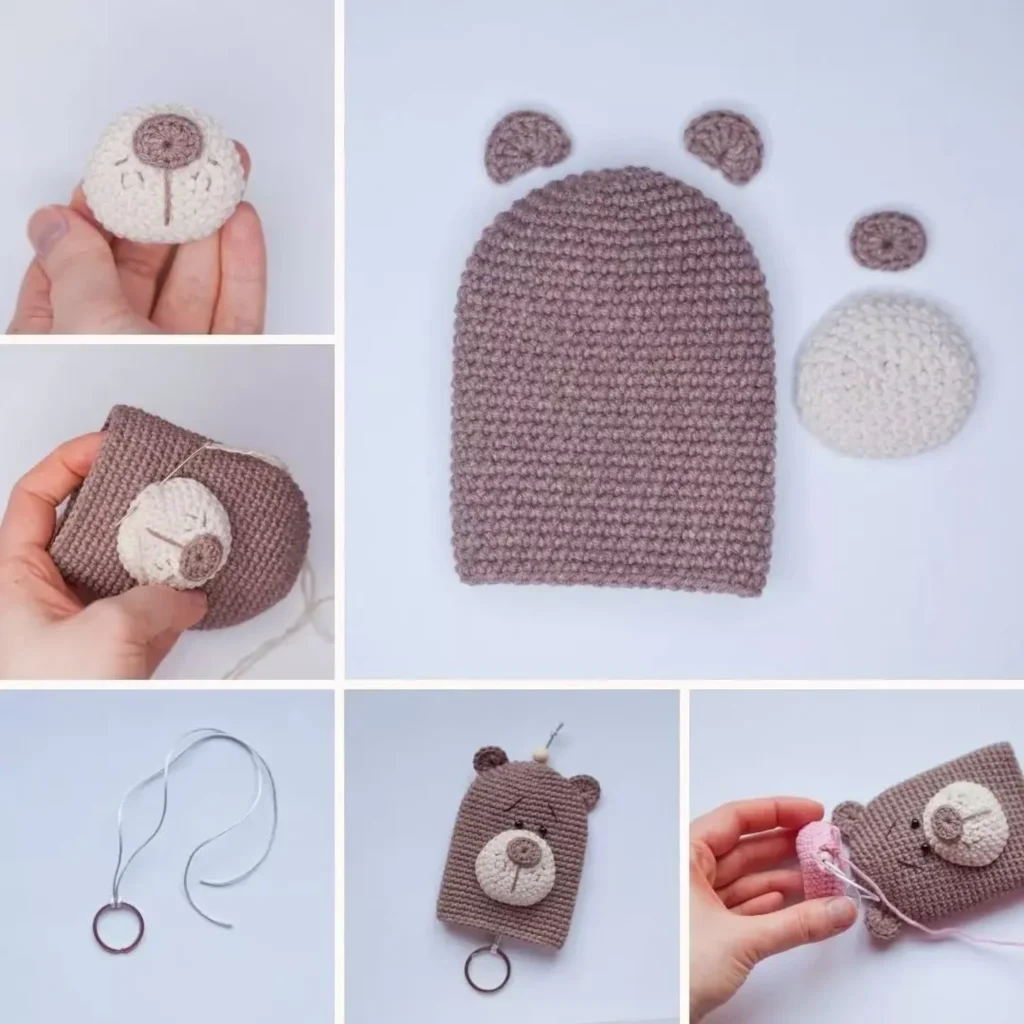
The design combines a main rectangular bear-shaped piece with a separately crocheted muzzle, ears, nose, and a small amigurumi heart attached to the cord. Although it is a small project, it includes several important finishing details, so it is best to follow the pattern calmly to achieve a neat finish.
If you like crocheted accessories, keychains, key covers, and small amigurumi toys, this pattern is perfect to save, share, and make with leftover cotton yarn.
Reviewed and organized by Patterns Amigurumis. This pattern was edited to improve readability, preserve the complete rounds, and make the step-by-step crochet process easier to follow.
Amigurumi Technical Sheet
Difficulty level: beginner-intermediate, because of the assembly, embroidery, and cord system.
Estimated crochet time: approximately 3 to 5 hours, depending on experience and tension.
Approximate finished size: may vary depending on the yarn, hook, and tension used.
Project type: key cover / amigurumi keychain.
Ideal for: gifts, craft fairs, using as a bag accessory, or protecting a key.
Main technique: spiral crochet, oval crochet, increases, decreases, sewing, and embroidery.
Materials
Alize Cotton Gold yarn, 55% cotton and 45% acrylic, 330 m / 50 g.
Color #62 milk white for the muzzle.
Color #518 pink for the heart.
Color #688 cocoa for the main piece and the ears.
A crochet hook suitable for this type of yarn. In the original pattern, a 2.5 mm hook was used.
Sewing needles.
Keychain ring.
Scissors.
Safety pins.
Stuffing, such as holofiber or any similar synthetic material.
Nylon cord, 1 to 1.5 mm in diameter, approximately 16 inches / 40 cm long.
One spare bead, 10 to 12 mm in diameter, to use as a stopper.
2 plastic beads, 4 mm, for the eyes.
Optional or recommended: you can use a stitch marker to avoid losing the beginning of each round and a fine yarn needle to sew the muzzle and ears, and to hide the yarn tails neatly.
Crochet 3 more sc to get an even oval piece. Cut the yarn and hide the tail inside the piece.
Nose
Crochet in a magic ring: 1 sc, 1 hdc, 3 dc, 3 hdc, 3 dc, 1 hdc, 1 sc. Close the circle (13). Fasten off and cut the yarn. Join with the beginning and ending yarn tails of your work.
Carefully secure the thread with the help of a needle.
Ears
Make two ears.
Into the MR: 3 ch, 8 dc.
Pull the MR tight, but do not form a closed circle. Fasten off and cut the yarn. Hide the tail inside the piece.
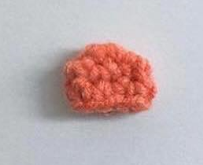
Heart
First, make 2 cups, which will then be joined to form the heart.
ROUND 1: 6 sc in MR (6).
ROUND 2: (inc, 1 sc) x 3 times (9).
ROUND 3: (inc, 2 sc) x 3 times (12).
ROUND 4: (inc, 3 sc) x 3 times (15).
Cut the yarn and leave a long tail of 15 to 20 cm.
Crochet the second cup in the same way, but do not cut the yarn this time.
With the loop from the second cup on the hook, join the pieces to form the heart.
ROUND 5: starting with the stitch next to the last one where you cut the yarn, crochet 15 sc around the first cup. Then crochet 15 sc around the second cup (30).
Please note that the beginning of the round is at the center of the heart. If there is a hole where the two cups were joined, sew it at this stage using the yarn tail from the first cup.
ROUND 6: 30 sc (30).
ROUND 7: 7 sc, dec, 13 sc, dec, 6 sc (28).
ROUND 8: 7 sc, dec, 12 sc, dec, 5 sc (26).
ROUND 9: 7 sc, dec, 11 sc, dec, 4 sc (24).
ROUND 10: 5 sc, 2 dec, 8 sc, 2 dec, 3 sc (20).
ROUND 11: 4 sc, 2 dec, 6 sc, 2 dec, 2 sc (16).
ROUND 12: 3 sc, 2 dec, 4 sc, 2 dec, 1 sc (12).
Stuff the heart at this point. It is recommended to stuff it as firmly as possible. When you finish stuffing, insert the stopper bead located at the end of the cord into the opening and continue crocheting.
ROUND 13: 2 sc, 2 dec, 2 sc, 2 dec (8).
ROUND 14: 4 dec (4).
Fasten off, close the hole, cut the yarn, and hide the tail inside the piece.
Assembly and Finishing
At this point, finish the bear completely: sew on the nose, embroider the specks on the muzzle, and sew the muzzle to the main piece.
In the original pattern, the muzzle was sewn on with the wrong side facing out. Sew on the ears and eyes as well. Then embroider the brows with black thread.
The muzzle was placed between rounds 13 and 26. For a neater result, it is recommended to split the yarn and use two of the four strands instead of sewing with a thick thread.
Fix the cord to the ring as shown in the photo from the original pattern. Feed the cord through the magic ring opening of the main piece.
Place the spare bead as a stopper to prevent the knot from slipping out when the cover is in use. Measure a comfortable cord length and tie a knot. Cut the remaining ends.
Your key cover is ready. Enjoy it!
My Experience and Tips for Crocheting This Amigurumi
When reviewing this pattern, the most important thing for the bear to look beautiful is taking care of the shape of the main piece. Since it works as a key cover, it is best not to crochet too loosely: even tension helps the body keep its shape and allows the cord mechanism to slide better.
I would also pay close attention to the muzzle. It is a small piece, but it defines the entire expression of the bear. Before sewing it permanently, it is a good idea to secure it with pins between the indicated rounds and look at the piece from the front. If it is even slightly crooked, it will be quite noticeable on such a simple little face.
For the eyes, the pattern uses 4 mm plastic beads. If the piece is going to be used by small children, it is safer to embroider the eyes with thread, because beads can come loose with use. On the other hand, if it will be a decorative accessory for an adult, the beads give it a very sweet and delicate shine.
The heart should be well stuffed so it keeps its shape. My advice is to add the stuffing little by little, gently pushing it toward the upper cups before closing. It does not need to be packed so tightly that the piece becomes distorted, but it should be stuffed enough so the heart does not look flat.
For the final seams, using a thinner strand or splitting the yarn helps a lot. This type of accessory is viewed up close, so neat sewing on the muzzle, ears, and nose makes the finish look much more professional.
Frequently Asked Questions
Can I crochet this key cover with another yarn?
Yes, you can use another yarn with a similar thickness. Just keep in mind that the finished size may change and that you may need to adjust the hook size so the fabric stays firm.
Can I embroider the eyes instead of using beads?
Yes. In fact, if the cover will be used by a child or by a piece that will get a lot of use, embroidering the eyes may be a safer option than using plastic beads.
How do I keep the muzzle from looking crooked?
Before sewing, secure the muzzle with pins between rounds 13 and 26, check the symmetry from the front, and only then sew it with small stitches. This helps keep the face balanced.
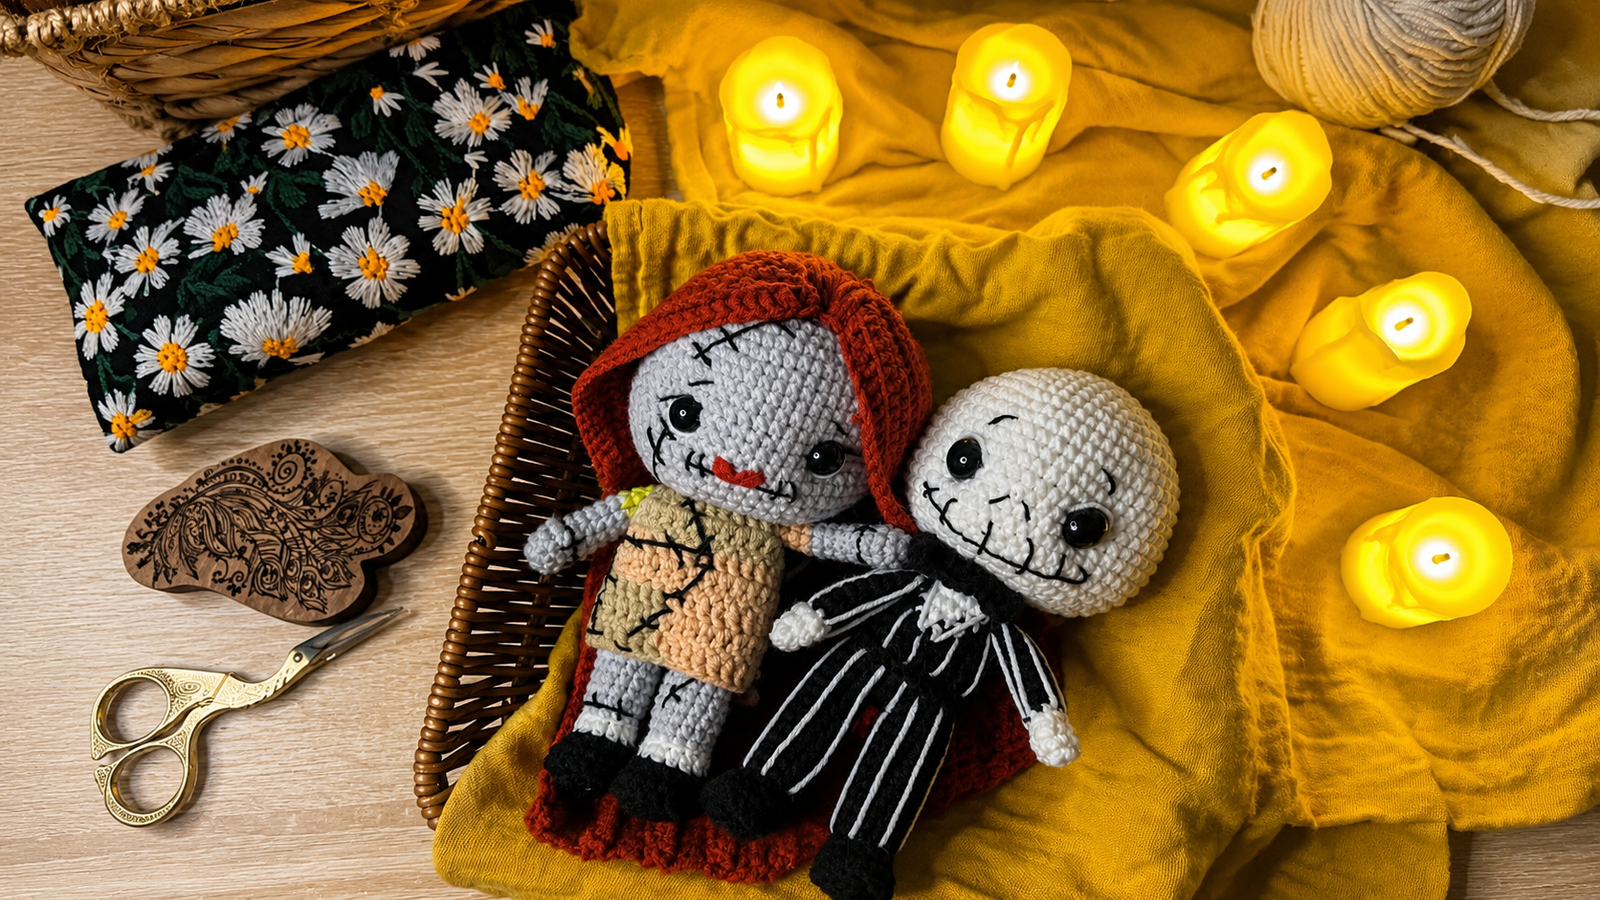
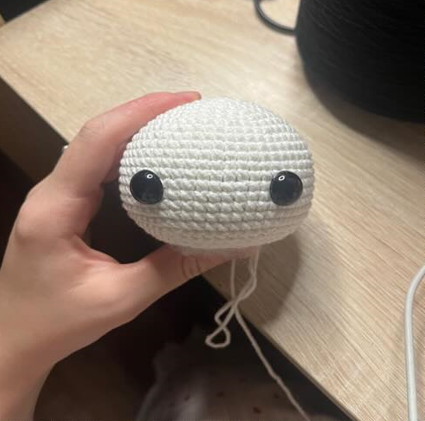
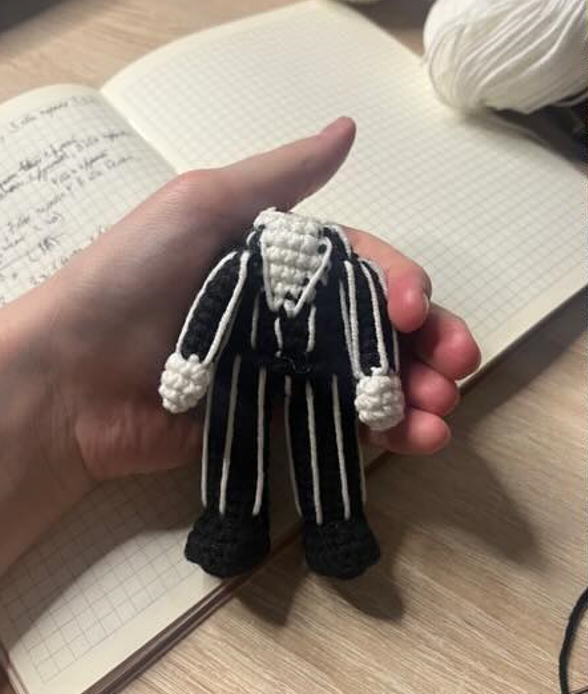
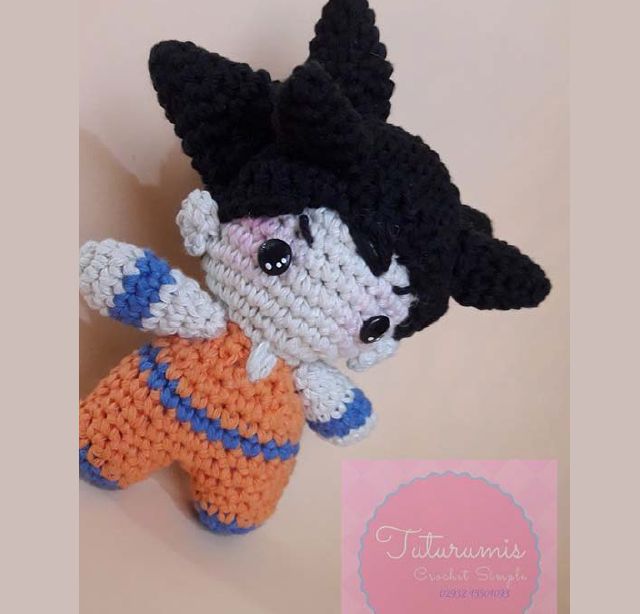
If you love crocheted dolls with personality, this Jack amigurumi is one of those pieces you enjoy from the very first round. His striped suit, embroidered smile, and black-and-white details make him a perfect amigurumi toy for anyone who loves crochet with a Halloween-inspired look.
In this free pattern, you will find the complete step-by-step instructions to crochet the doll, including the legs, body, arms, head, bow tie, and embroidered details. It is a project with several small finishing details, ideal for practicing color changes, embroidery on amigurumi, and piece assembly.
This design is inspired by a gothic-style character, easily recognized by his dark suit, white face, and expressive smile. The charm of the pattern lies in keeping the crochet work neat and making the facial embroidery express that distinctive mix of sweetness and mystery.
Reviewed and organized by Patterns Amigurumis. This pattern was edited to improve readability, preserve the complete rounds, and make the step-by-step crochet process easier to follow.
Amigurumi technical details
Difficulty level: intermediate, mainly because of the color changes, arm joining, and final embroidery.
Estimated crochet time: several hours of work, depending on your pace, tension, and experience with small amigurumis.
Approximate finished size: not indicated in the original pattern; it may vary depending on the yarn, hook, and tension.
Type of project: crocheted amigurumi doll of a decorative character.
Ideal for: Halloween decoration, crocheted character collections, handmade gifts, and crochet projects with embroidered details.
Main technique: spiral crochet, single crochet, increases, decreases, color changes, BLO, embroidery, and sewing pieces together.
Materials
YarnArt Jeans or Alize Cotton Gold yarn in black.
YarnArt Jeans or Alize Cotton Gold yarn in white.
2 mm crochet hook.
14 mm safety eyes.
Amigurumi stuffing.
Large-eye needle for sewing and weaving in ends.
Scissors.
Optional or recommended:stitch marker so you do not lose the beginning of each round, especially on the legs, body, and head.
Next, work with yarn changes to form the collar. You may also skip the color change and embroider the collar later with white yarn. BLK stands for black and W stands for white.
ROUND 24: 13 sc in BLK, 2 sc in W, 5 sc in BLK. Total: 20 stitches.
ROUND 25: 12 sc in BLK, 4 sc in W, 4 sc in BLK. Total: 20 stitches.
ROUND 26: 11 sc in BLK, 6 sc in W, 3 sc in BLK. Total: 20 stitches.
ROUND 27: Join the arms: 1 sc in BLK through the arm, 7 sc in BLK, 4 sc in BLK through the arm, 6 sc in W, 3 sc in BLK through the arm. Indicated total: 20 stitches.
ROUND 28: (3 sc, 1 dec) repeat 2 times in BLK, 2 sc in BLK, 1 sc in W, 1 dec in W, 3 sc in W, 1 dec in BLK, 2 sc in BLK. Total: 18 stitches. Stuff the body.
ROUND 29: All in white: (1 sc, 1 dec). Secure the yarn, cut, and hide the end.
Make one round of sc on round 21, working into the front loops. Embroider the suit stripes with white yarn and outline the collar. Sew the head to the body.
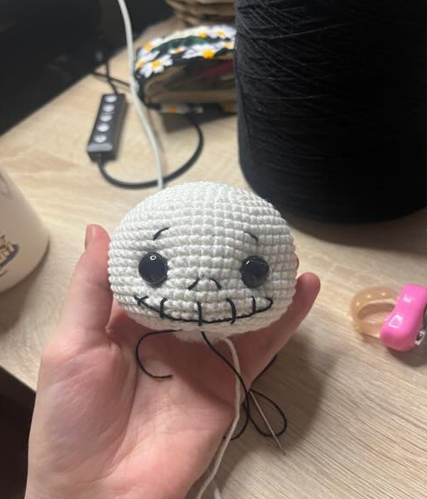
Secure the yarn and leave a long tail for sewing. Make a good indentation around the eyes. Embroider the eyelids with white yarn and, with black yarn, embroider the nose, smile, and eyebrows.
Arms
Make 2 pieces. Start with white yarn.
ROUND 1: 5 sc in MR.
ROUND 2: 5 inc. Total: 10 stitches.
ROUND 3: 10 sc.
ROUND 4: (2 sc, 1 dec) repeat 2 times, 2 sc. Total: 8 stitches. Change to black yarn.
ROUND 5: 8 sc.
ROUND 6: 8 sc.
ROUND 7: 8 sc.
ROUND 8: 8 sc.
ROUND 9: 8 sc.
ROUND 10: 8 sc.
ROUND 11: 8 sc.
ROUND 12: 8 sc.
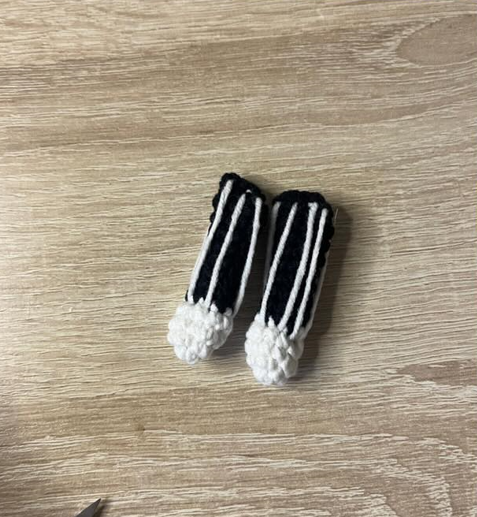
Do not stuff. Join the sides with 4 sc. Embroider the stripes with white yarn.
Bow tie
Work with black yarn. Leave a small tail at the beginning; it will be the first little strip.
ROUND 1: 6 sc in MR.
ROUND 2: 5 ch. In the third chain from the hook: 1 dc, 1 dc, 1 hdc, 1 sl st.
ROUND 3: 4 sc around, 5 ch. In the third chain from the hook: 1 tr, 1 dc, 1 hdc, 1 sl st.
Secure the yarn and leave a little tail for the second little strip.
Assembly and finishing
Sew the head to the body using the long tail left after closing the head.
After round 21 of the body, work one round of sc over the front loops that were left free to form the clothing detail.
Embroider the suit stripes with white yarn, trying to keep them even across the front of the body, arms, and legs.
Outline the collar with white yarn if you did not make the color change while crocheting.
Make the eye indentation before finishing the facial embroidery so the expression looks more defined.
Carefully embroider the eyelids, nose, smile, and eyebrows.
Sew the bow tie to the front, below the head, centered over the collar.
My experience and tips for crocheting this amigurumi
While reviewing and organizing this pattern, the most important thing I notice is that neatness depends heavily on three areas: joining the legs, changing color for the collar, and the final embroidery. They are small details, but they are what make the doll recognizable and expressive.
For the body, I recommend working with firm tension, especially on the black part of the suit, because the white lines are embroidered over it later and any loose stitch may lose its shape. It is also best to crochet the arms before reaching the round where they are joined to the body, so you do not have to interrupt your rhythm or improvise.
On the head, the eye indentation changes the result a lot. It is better to do it gradually, checking both sides before securing the yarn. If the doll is going to be for a small child, the safest option is to embroider the eyes instead of using safety eyes, even though the original pattern indicates 14 mm eyes.
For the suit embroidery, using even white strands helps the stripes look clean. There is no need to pull too tightly: if the white yarn pulls on the black crochet fabric, the piece may lose its shape. Ideally, secure each line with discreet stitches and hide the ends well inside.
Frequently asked questions
Can I use a different yarn to crochet this Jack amigurumi?
Yes, you can use another yarn of a similar thickness. Keep in mind that if you change the yarn weight or hook size, the final size of the doll may also vary.
What should I do if the white stripes on the suit look crooked?
Before weaving in each line, adjust it with a needle and check the doll from the front. It is better to correct a stripe before hiding the yarn than to try to adjust it once it is already secured.
Can the eyes be embroidered instead of using safety eyes?
Yes. If the amigurumi will be for a baby or a small child, embroidering the eyes is a safer alternative than using plastic pieces.
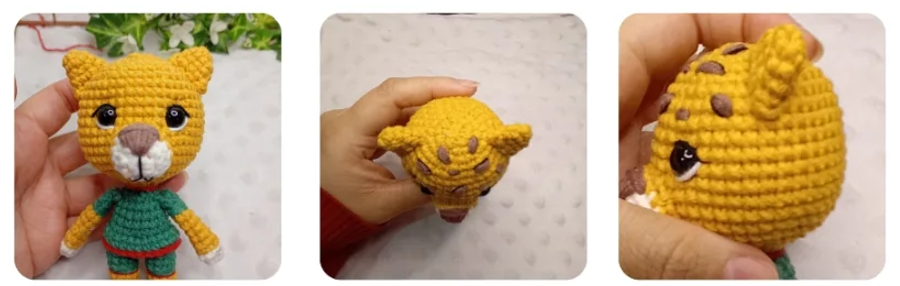
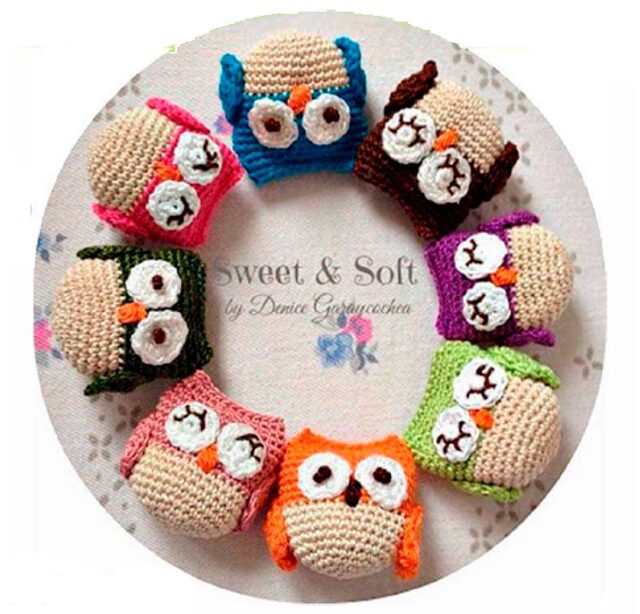
This crocheted squirrel doll is absolutely adorable: it combines the softness of amigurumi with a wooden ring, a long little tail, tasseled ears, and a red collar that gives it a very special detail. It is an ideal amigurumi toy for gifting, decorating a nursery, or making a handmade rattle full of charm.
In this free pattern, you will find the complete step-by-step instructions to crochet the head, muzzle, ears, collar, tail, and the pieces that cover the ring. It is a lovely crochet project to practice increases, decreases, facial embroidery, and neat assembly.
Squirrels are often associated with playful, sweet, autumn-inspired details, and in amigurumi form they look especially expressive. This design keeps a simple shape, but includes details that make it stand out: the white muzzle, embroidered nose, red collar, and small crocheted tail.
Reviewed and organized by Patterns Amigurumis. This pattern was edited to improve readability, preserve the complete rounds, and make the step-by-step crochet process easier to follow.
Amigurumi Quick Details
Difficulty level
Beginner-intermediate. You should know how to crochet in a spiral, make increases, decreases, flat pieces, and sew pieces together.
Estimated crochet time
Approximately 3 to 5 hours, depending on your rhythm and experience.
Approximate final size
May vary depending on the yarn and tension. The pattern uses a wooden ring with an outer diameter of 65 mm.
Project type
Amigurumi rattle with a wooden ring.
Ideal for
Baby gifts, nursery decoration, or handmade crocheted accessories.
Main technique
Spiral crochet, flat back-and-forth crochet, embroidery, and sewing pieces together.
Materials
Cotton-blend yarn in orange, red, and white. The original pattern mentions YarnArt Jeans.
Black Iris thread or a similar thread for embroidering details.
2.0 mm crochet hook.
Wooden ring with an outer diameter of 65 mm.
Small bell or rattle insert.
Yarn needle or blunt-tip needle for sewing.
Fiberfill or synthetic stuffing.
Optional or recommended:stitch marker, pins to position the pieces before sewing, and small scissors to cut the threads neatly.
Crochet with firm tension so the stuffing does not show between the stitches, especially on the head and muzzle.
Use a stitch marker for the circular pieces, because the head includes several consecutive rounds of 48 stitches.
Before sewing the muzzle, ears, and head to the ring, hold everything in place with pins to check the symmetry.
If the rattle will be used by a baby, make sure all seams are very secure and there are no loose threads.
Read the full pattern before starting, because the final assembly depends on the correct placement of the ring covers.
Complete Step-by-Step Pattern
Muzzle
Crochet with white yarn.
ROUND 1: 6 Sc in MR. (6)
ROUND 2: 6 Inc. (12)
ROUND 3: 12 Sc. (12)
ROUND 4: (1 Sc, 1 Inc) x6. (18)
ROUND 5: 18 Sc. (18)
ROUND 6: (2 Sc, 1 Inc) x6. (24)
ROUND 7: 24 Sc. (24)
Fasten off and cut the yarn, leaving a tail of approximately 20 cm for sewing.
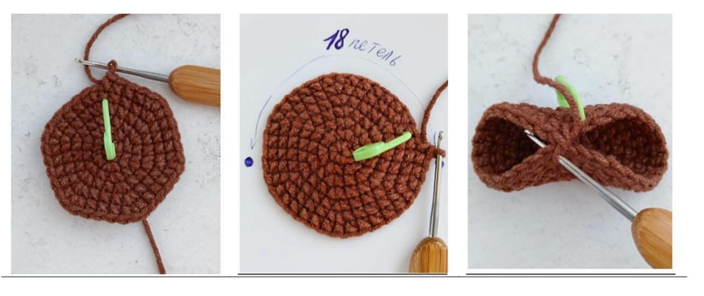
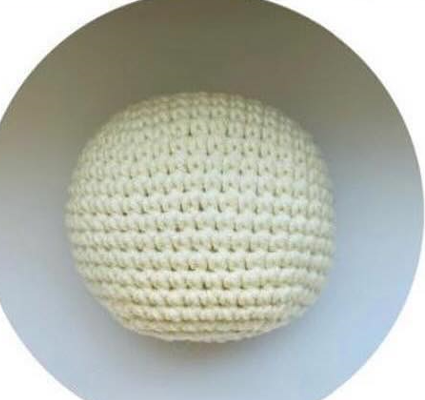
Head
Crochet with orange yarn.
ROUND 1: 6 Sc in MR. (6)
ROUND 2: 6 Inc. (12)
ROUND 3: (1 Sc, 1 Inc) x6. (18)
ROUND 4: (2 Sc, 1 Inc) x6. (24)
ROUND 5: (3 Sc, 1 Inc) x6. (30)
ROUND 6: 30 Sc. (30)
ROUND 7: (4 Sc, 1 Inc) x6. (36)
ROUND 8: 36 Sc. (36)
ROUND 9: (5 Sc, 1 Inc) x6. (42)
ROUND 10: 42 Sc. (42)
ROUND 11: (6 Sc, 1 Inc) x6. (48)
ROUND 12: 48 Sc. (48)
ROUND 13: 48 Sc. (48)
ROUND 14: 48 Sc. (48)
ROUND 15: 48 Sc. (48)
ROUND 16: 48 Sc. (48)
ROUND 17: 48 Sc. (48)
ROUND 18: 48 Sc. (48)
ROUND 19: 48 Sc. (48)
ROUND 20: (6 Sc, 1 Dec) x6. (42)
ROUND 21: (5 Sc, 1 Dec) x6. (36)
ROUND 22: (4 Sc, 1 Dec) x6. (30)
Stuff with fiberfill and insert the small bell or rattle insert.
ROUND 23: (3 Sc, 1 Dec) x6. (24)
ROUND 24: (2 Sc, 1 Dec) x6. (18)
ROUND 25: (1 Sc, 1 Dec) x6. (12)
Do not close the stitches completely. Leave an opening and a yarn tail of 20 to 30 cm for sewing. If needed, add a little more stuffing through the remaining opening in the head.
Ears
Crochet with orange yarn. Make two ears.
ROUND 1: 6 Sc in MR. (6)
ROUND 2: 6 Inc. (12)
ROUND 3: (1 Sc, 1 Inc) x6. (18)
ROUND 4: (2 Sc, 1 Inc) x6. (24)
ROUND 5: (3 Sc, 1 Inc) x6. (30)
ROUND 6: (4 Sc, 1 Inc) x6. (36)
Fold the piece in half and join the edges with Sc.
Fasten off and cut the yarn, leaving a tail of 15 to 20 cm for sewing.
Twist the ear lengthwise and secure it with thread. Make the second ear the same way, but mirrored. Make small tassels or little tufts at the tips.
Snood-Style Collar
Crochet with red yarn.
Make 16 Ch.
Then work back and forth in rows, crocheting 15 Sc per row until you reach the needed length. The original pattern indicates 36 rows.
Fasten off and leave a yarn tail of 15 to 20 cm for sewing.
The finished piece can be gently steamed with an iron, without flattening the crochet fabric.
Then sew the collar directly onto the rattle or ring, so it fits snugly.
At the end, fold the collar and embroider a snowflake with white thread.
Tail
Crochet with orange yarn.
ROUND 1: 6 Sc in MR. (6)
ROUND 2: 6 Sc. (6)
ROUND 3: 6 Inc. (12)
ROUND 4: 12 Sc. (12)
ROUND 5: 12 Sc. (12)
ROUND 6: (1 Sc, 1 Inc) x6. (18)
ROUND 7: 18 Sc. (18)
ROUND 8: 18 Sc. (18)
ROUND 9: 18 Sc. (18)
ROUND 10: 18 Sc. (18)
ROUND 11: (1 Sc, 1 Dec) x6. (12)
ROUND 12: 12 Sc. (12)
ROUND 13: 12 Sc. (12)
Stuff the tail with fiberfill.
ROUND 14: (2 Sc, 1 Dec) x3. (9)
ROUND 15: 9 Sc. (9)
ROUND 16: (1 Sc, 1 Dec) x2. (6)
ROUND 17: 6 Sc. (6)
Fasten off and cut the yarn, leaving a tail of 15 to 20 cm for sewing.
Ring Cover No. 1
Crochet with orange yarn.
ROW 1: Make 10 Ch. Turn the work and, starting from the second chain from the hook, crochet 9 Sc.
ROW 2: Make 1 turning Ch and crochet back with 9 Sc.
Continue crocheting this way until you reach the needed length. The original pattern indicates 32 rows.
Ring Cover No. 2
Crochet with orange yarn.
ROW 1: Make 10 Ch. Turn the work and, starting from the second chain from the hook, crochet 9 Sc.
ROW 2: Make 1 turning Ch and crochet back with 9 Sc.
Continue crocheting this way until you reach the needed length. The original pattern indicates 8 rows.
Assembly and Finishing
Stuff the muzzle with fiberfill and sew it to the front part of the head.
With black thread, embroider the nose and eyes.
Sew the ears to the upper part of the head, on the sides, between rounds 6 and 11 of the head, starting from the center.
On the top of the head, make a small tuft with orange threads.
With white thread, embroider small V shapes on the forehead.
Sew the covers onto the wooden ring. Turn the seam toward the inside of the ring so it looks neater.
Sew the head to ring cover No. 1. To do this, find the center of the cover and secure the head with pins.
Sew all around so the head stays firm and does not move on the ring.
Sew on the snood-style collar.
Sew the tail to ring cover No. 2.
The little squirrel is ready. Enjoy the creative process!
My Experience and Tips for Crocheting This Amigurumi
While reviewing and organizing this pattern, the most important thing I notice is the final assembly. The head, collar, ring covers, and tail need to be well aligned so the rattle looks balanced and feels comfortable to hold.
For the head, it is best to add the stuffing little by little, without overpacking it, so it keeps a rounded shape and the stitches do not stretch out. When you insert the small bell, make sure it is well surrounded by stuffing and does not press directly against the crocheted fabric.
The white muzzle defines much of the squirrel’s expression. Before sewing it permanently, I recommend pinning it in place and looking at the piece from the front. The same goes for the ears: if one is more tilted than the other, it will be quite noticeable in this type of doll.
Since this design can be used for babies, it is better to embroider the eyes and nose, as indicated in the pattern, instead of using plastic pieces. I would also check the seams of the ring, collar, and tail very carefully so there are no loose parts.
The detail of the red collar with the embroidered snowflake is small, but it gives the piece a lot of personality. To keep it neat, use simple, gentle stitches without pulling the white thread too tightly, so the red crochet fabric does not pucker.
Frequently Asked Questions
Can I use a different yarn instead of YarnArt Jeans?
Yes. You can use another cotton-blend yarn of a similar thickness. Keep in mind that if you choose a thicker or thinner yarn, the final size of the squirrel and the fit around the ring may vary.
Can I make it without the small bell?
Yes, if you want to use it only as a decoration or a crocheted teether-style ornament. The original pattern includes a small bell, but if you leave it out, stuff the head well so it keeps its shape.
How can I keep the pieces from looking crooked when sewing?
Before sewing, place pins in the muzzle, ears, head, and tail. Look at the piece from the front, from above, and from the side. Only when everything is centered, sew with small, firm stitches.
This pony amigurumi is one of those projects that wins you over with its details: the small body, the curved shape of the neck, the integrated legs, and a fluffy mane that gives it so much personality. If you enjoy crocheted toys with a sweet and delicate look, this free pattern is a beautiful option to save and crochet calmly.
In this step-by-step crochet tutorial, you will find the complete construction of the amigurumi toy, from the initial base to the final assembly with ears, eyes, mane, and tail. It is an ideal crocheted toy for those who already have some experience with amigurumi and want to try a different structure, with the body and legs formed directly from the main piece.
Crocheted ponies and little horses are usually very loved because they combine sweetness, movement, and fantasy. In this design, the mane and tail, separated strand by strand, create a soft and very special finish. Keep reading to crochet the complete pattern and preserve all the original details.
Reviewed and organized by Patterns Amigurumis. This pattern was edited to improve readability, preserve the complete rounds, and make the step-by-step crochet process easier to follow.
Amigurumi technical details
Difficulty level: intermediate, especially because of the piece division, the integrated legs, and the mane assembly.
Estimated crochet time: approximately 4 to 6 hours; this may vary depending on experience and sewing speed.
Approximate final size: small, designed as a palm-sized pony; the size may vary depending on yarn thickness, tension, and stuffing.
Project type: amigurumi crocheted toy with body, legs, ears, mane, and tail.
Ideal for: gifting, decorating, collecting, or using as a handmade detail.
Main technique: spiral crochet with single crochet stitches, increases, decreases, color changes, and sewn assembly.
Materials
Brown yarn for the pony’s body.
Light beige yarn for the hooves, mane, and tail.
2 mm crochet hook, as indicated in the original pattern.
Read the entire pattern before starting, because the head, neck, body, and legs are formed with one continuous construction, and it is helpful to understand the direction of the crochet work.
Use a round marker from the beginning, especially when dividing the piece into two parts and later when distributing the stitches for the legs.
Keep firm tension so the stuffing does not show through, but do not crochet too tightly around the neck and legs.
Carefully stuff the body and legs before closing the belly, shaping the pony neatly.
For the mane and tail, separate the strands patiently: that detail is what creates the final fluffy effect.
Complete step-by-step pattern
Beginning of the main piece
In this example, start with brown yarn and a 2 mm crochet hook.
ROUND 1: 6 sc in MR (6).
ROUND 2: crochet 2 sc in each stitch (12).
ROUND 3: 1 sc, inc; repeat 6 times (18).
ROUND 4: 2 sc, inc; repeat 6 times (24).
ROUND 5: 3 sc, inc; repeat 6 times (30).
ROUND 6: 4 sc, inc; repeat 6 times (36).
ROUND 7: crochet sc without changes (36).
Do not cut the yarn. Divide the piece in half, into 18 stitches and 18 stitches. Fold and close in the center, forming a kind of “eight”, with the right side facing out. Crochet each part separately. The beginning of the round is counted from the place of the central join.
Muzzle
Continue crocheting with the same yarn, in the round.
ROUND 1: crochet sc without changes (18).
ROUND 2: 6 sc; dec, repeat 3 times; 6 sc (15).
ROUNDS 3-4: crochet 2 rounds of sc without changes (15).
ROUND 5: 3 sc, dec; repeat 3 times (12).
ROUND 6: crochet sc without changes (12).
ROUND 7: dec; repeat 6 times (6).
Cut the yarn. Tighten and close the opening with a needle or with crochet. Hide the yarn tails.
Neck
Crochet the second part of the “eight”. Join the yarn and begin crocheting from the central join; this is where the beginning of the round is counted.
ROUNDS 1-2: crochet 2 rounds of sc without changes (18).
ROUND 3: 17 sc, inc (19).
ROUND 4: crochet sc without changes (19).
ROUND 5: 18 sc, inc (20).
ROUND 6: crochet sc without changes (20).
ROUND 7: 19 sc, inc (21).
Then crochet 8 ch for the back.
The chain can be directed from the place where this part ended, which is the option worked in this pattern, or you can crochet 10 stitches forward so the horse’s muzzle faces the front.
Body
Crochet 8 ch.
ROUND 1: crochet sc along one side of the chain. Insert the hook into the next chain from the stitch that is on the hook. After the chain, move to the neck, crochet around it with sc, and continue crocheting along the second side of the chain (35).
ROUND 2: inc, 32 sc, inc, inc (38).
ROUND 3: inc, 35 sc, inc, inc (41).
ROUND 4: inc, 38 sc, inc, inc (44).
ROUND 5: inc, 41 sc, inc, inc (47).
ROUNDS 6-10: crochet 5 rounds of sc without changes (47).
Do not cut the yarn: you will use it to crochet the right hind leg. First, divide the stitches using the center as a reference and place markers. Set aside 12 stitches for each leg, according to the original visual reference.
Legs
After distributing the stitches for the legs, crochet up to the stitch counted as stitch number 12 and join it to the center. Close and crochet the right leg in the round.
Right hind leg
ROUNDS 1-10: crochet 10 rounds of 12 sc (12).
Cut the yarn and change to light beige yarn.
ROUNDS 11-12: crochet 2 rounds of sc without changes (12).
Then decrease all stitches through the back loop.
ROUND 13: dec in BLO; repeat 6 times (6).
Cut the yarn, leaving a tail for sewing, close the opening, and hide the yarn tail.
Crochet the other legs in the same way.
Left hind leg
Work the left hind leg following the same sequence as the previous leg.
Right front leg
Work the right front leg following the same sequence as the previous leg.
Left front leg
Work the left front leg following the same sequence as the previous leg.
Stuff the body and legs well. Sew the remaining belly opening and hide the leftover yarn tails.
Ears
ROUND 1: 6 sc in MR (6).
ROUND 3: 1 sc, inc; repeat 3 times (9).
Hide the yarn tail from the beginning of the round inside the crochet piece. Fold the ears, press them to shape the base, and sew along the bottom, according to the original visual reference.
Assembly and finishing
Placing the ears and eyes
Sew on the ears, pinning them first to check the position.
Sew on the bead eyes. The distance between the eyes is approximately 4 stitches. When sewing them on, sink the eyes just a little by gently pulling the thread to give expression to the muzzle.
Mane and tail
For the mane, cut strands approximately 15 cm long. For the tail, cut strands approximately 12 cm long.
The number of strands depends on personal preference. In the original pattern, it is not made very thick, because after separating the yarn, the mane and tail become very fluffy.
Tie the tail strands in the center with a longer strand. Use that same strand to sew the tail to the body.
Test the position of the tail and sew it on. If necessary, even out the length a little with scissors.
Attach the mane with the crochet hook. To do this, fold each strand in half and pull it through the stitches along the center of the head and neck with the crochet hook. Pass the free ends of the strand through the loop that forms and tighten well.
Three attachment points per row are enough. Start from the ears and finish approximately at the middle of the neck. Check that the mane looks symmetrical and centered.
After that, if you have patience, separate each strand of the mane and tail into three thinner strands. To do this, untwist the yarn, help yourself with a needle, and divide the main strand. This creates a wavy, light, and voluminous mane.
Keep in mind that, once separated this way, the strand may break more easily and the toy will need gentle handling.
Gently brush the ends with a slicker brush. The mane and tail will become soft and fluffy, like a cloud.
The little horse is ready! Thank you for your attention.
My experience and tips for crocheting this amigurumi
When reviewing and organizing this pattern, the most important thing is to respect the construction shape: first, a base is created and divided into two parts, and from there the muzzle and neck are formed. That is why I recommend marking the beginnings of the rounds very well and not removing the markers until you clearly understand the body’s orientation.
In this pony, symmetry is key. Before sewing on the ears and eyes, it is best to hold them with pins and look at the toy from the front and from the side. A small difference in the height of the beads can change the little horse’s expression a lot.
I would also pay special attention to the stuffing. The neck and legs should be firm, but not hard. If you stuff everything at once, they may become misshapen; it is better to add small portions and arrange them with the handle of the crochet hook or a thin tool.
If the toy will be for a small child, it is better to embroider the eyes instead of using beads. Beads look very pretty, but they are not the safest option for babies or children who may put the toy in their mouth.
The mane and tail are the most eye-catching detail. Separating the strands takes time, but it completely transforms the finish. Do it gently and do not pull the yarn too much, because the original pattern warns that separated yarn may break and requires care.
Frequently asked questions
Can I crochet this pony with a different yarn thickness?
Yes, you can use another yarn, but the final size will change. If you use thicker yarn, the pony will be larger; if you use thinner yarn, it will be smaller. The important thing is to choose a crochet hook that creates a closed fabric so the stuffing does not show through.
What should I do if the legs are not symmetrical?
Before starting each leg, check the distribution of the 12 reserved stitches and the position of the markers. If one leg looks twisted, it is better to undo a few rounds and correct the division before continuing.
How can I wash this amigurumi?
Ideally, wash it by hand with cold water and mild soap. Do not wring it. Remove excess water with a towel and let it air dry. If you separated and brushed the mane, comb it very carefully after drying.
Pattern credits
This pattern belongs to WasilenaToys, by Alena Vasilyeva. You can find more of the author’s work on her Instagram: @wasilenatoys.
Did you crochet it? Leave me a comment or share it on social media using #PatternsAmigurumi so I can see it.
Looking for a quick, adorable crochet project that is perfect for gifting or selling? You have come to the right place! Dive into this wonderful roundup with 30 free amigurumi keychain patterns, a collection designed to spark your creativity and fill your days with color. Each amigurumi toy in miniature is a chance to create something unique with your own hands, from sweet little animals and delicious foods to fantasy-filled characters. With our step-by-step guide, you will turn simple yarn into a small crocheted doll that you can carry everywhere. Prepare your crochet hook and enjoy the magic of creating these tiny treasures. Let’s start crocheting smiles!
General Materials for Your Keychains
Although each design is unique, most of these patterns share a basic list of materials. Make sure you have them ready!
ROW 1: sc in the 2nd ch and in the following chains, turn (4).
ROWS 2-3: 1 ch, 4 sc, turn (4).
ROW 4: 1 ch, 2 dec, turn (2).
ROW 5: 1 ch, 1 dec (1). Fasten off.
14. Amigurumi Strawberry Keychain
FRUIT
ROUND 1′: 6 sc in MR (6) ROUND 2: 1 sc, inc. (9) ROUND 3: 2 sc, inc. (12) ROUND 4: 3 sc, inc. (15) ROUND 5: 4 sc, inc. (18) ROUND 6: 5 sc, inc. (21) ROUND 7: 6 sc, inc. (24) ROUND 8: 1 sc in each stitch (24) ROUND 9: 3 sc, inc (30) ROUNDS 10 and 11: 1 sc in each stitch (30) ROUND 12: 1 sc, dec. (20) ROUND 13: 1 sc, dec. (14) Stuff the piece ROUND 14: Dec in everand stitch (7) Fasten off
LEAVES
Make a magic ring with six stitches. In every stitch: In the same space (3 ch, 2 dc, 3 ch more and close with a sl st). Make a sl st in the next chain of the ring and repeat the same process until you have 6 leaves Sew the leaves to the fruit
15. Amigurumi Cat Keychain
Body and Head
Make 5 ch.
ROUND 1: Start in the 2nd ch, 3 sc, 3 sc in the same st, 2 sc, 1 inc (10).
ROUND 2: 1 inc, 2 sc, 3 inc, 2 sc, 2 inc (18).
ROUNDS 3 to 11: 18 sc (18).
ROUND 12: (7 sc, dec) x 2 (16).
ROUND 13: 16 sc (16).
ROUND 14: (6 sc, dec) x 2 (14).
ROUND 15: 14 sc (14).
ROUND 16: (5 sc, dec) x 2 (12).
ROUND 17: 12 sc (12).
ROUND 18: 12 inc (24).
ROUNDS 19 to 28: 24 sc (24).
ROUND 29: (2 sc, dec) x 6 (18).
ROUND 30: (1 sc, dec) x 6 (12).
ROUND 31: 6 dec (6). Fasten off.
16. Potted Clover Keychain
Stem and Soil
With green yarn:
ROUND 1: 4 sc in MR (4).
ROUNDS 2 to 6: 4 sc (4).
Change to brown:
ROUND 7: 4 inc (8).
ROUND 8: (1 sc, inc) x 4 (12).
ROUND 9: (1 sc, inc) x 6 (18).
ROUND 10: (2 sc, inc) x 6 (24).
ROUND 11: (3 sc, inc) x 6 (30). Fasten off.
Flower Pot
ROUND 1: 6 sc in MR (6).
ROUND 2: 6 inc (12).
ROUND 3: (1 sc, inc) x 6 (18).
ROUND 4: (2 sc, inc) x 6 (24).
ROUND 5: (3 sc, inc) x 6 (30).
ROUNDS 6 to 13: 30 sc (30). Fasten off.
Clover Leaves
In an MR, repeat 4 times: (3 ch, 2 tr, 3 ch, 1 sc).
17. Amigurumi Little Bee Keychain
Body
With black yarn:
ROUND 1: 6 sc in MR (6).
ROUND 2: 6 inc (12).
With yellow yarn:
ROUND 3: (1 sc, inc) x 6 (18).
ROUND 4: (2 sc, inc) x 6 (24).
ROUND 5: 24 sc (24).
With black yarn:
ROUNDS 6 to 9: 24 sc (24).
With yellow yarn:
ROUNDS 10 to 11: 24 sc (24).
ROUND 12: (2 sc, dec) x 6 (18).
ROUND 13: (1 sc, dec) x 6 (12).
ROUND 14: 6 dec (6). Fasten off.
Wings (Make 2)
ROUND 1: 6 sc in MR, without joining. Leave one side flat for sewing.
18. Simple Cupcake Keychain
Base
ROUND 1: 6 sc in MR (6).
ROUND 2: 6 inc (12).
ROUND 3: (1 sc, inc) x 6 (18).
ROUND 4: (2 sc, inc) x 6 (24).
ROUND 5: In BLO, (3 sc, inc) x 6 (30).
ROUNDS 6 to 12: 30 sc (30). Fasten off.
Top (Cream)
ROUND 1: 6 sc in MR (6).
ROUND 2: 6 inc (12).
ROUND 3: (1 sc, inc) x 6 (18).
ROUND 4: (2 sc, inc) x 6 (24).
ROUND 5: (3 sc, inc) x 6 (30).
ROUNDS 6 to 8: 30 sc (30).
ROUND 9: Repeat (1 sl st, 3 hdc in the same st, skip 1 p). Fasten off.
19. Amigurumi Little Whale Keychain
ROUND 1: 6 sc in MR (6).
ROUND 2: 6 inc (12).
ROUND 3: (1 sc, inc) x 6 (18).
ROUND 4: (2 sc, inc) x 6 (24).
ROUNDS 5 to 7: 24 sc (24).
ROUND 8 (Tail): 1 sc, 5 ch, skip 2 ch, 1 dc in the 3 ch remaining, sl st at the base. 1 sc in the next st and repeat flipper.
ROUND 9: Change to white, 24 sc.
ROUND 10: (2 sc, dec) x 6 (18).
ROUND 11: (1 sc, dec) x 6 (12).
ROUND 12: 6 dec (6). Fasten off.
20. Amigurumi Star Keychain
Crochet 2 identical pieces and sew them together.
ROUND 1: 5 sc in MR (5).
ROUND 2: 5 inc (10).
ROUND 3: Repeat 5 times (3 sc in the next st, 1 sl st) (20).
ROUND 4: Repeat 5 times (1 sc, 3 sc in the next st, 1 sc, 1 sl st) (30).
ROUND 5: Repeat 5 times (skip 1 st, 1 sc, 5 sc in the next st, 1 sc, skip 1 st, 1 sl st) (40). Fasten off.
21. Amigurumi Donut Keychain
Donut
Make 20 ch and join into a circle.
ROUND 1: (1 sc, inc) x 10 (30).
ROUND 2: 30 sc (30).
ROUND 3: (2 sc, inc) x 10 (40).
ROUND 4: 40 sc (40).
ROUND 5: (3 sc, inc) x 10 (50).
ROUNDS 6 to 11: 50 sc (50).
ROUND 12: (3 sc, dec) x 10 (40).
ROUND 13: 40 sc (40).
ROUND 14: (2 sc, dec) x 10 (30).
ROUND 15: 30 sc (30).
ROUND 16: (1 sc, dec) x 10 (20). Stuff and sew the opening.
Glaze
ROUNDS 1 to 7: Crochet the same as the donut (up to 50 sc).
ROUND 8: Create «drips» with sequences of chains and stitches (hdc, dc).
22. Amigurumi Pineapple Keychain
Fruit
ROUND 1: 6 sc in MR (6).
ROUND 2: 6 inc (12).
ROUND 3: (1 sc, inc) x 6 (18).
ROUND 4: (2 sc, inc) x 6 (24).
ROUND 5: (3 sc, inc) x 6 (30).
ROUND 6: (4 sc, inc) x 6 (36).
ROUNDS 7 to 10: 36 sc (36).
ROUND 11: (4 sc, dec) x 6 (30).
ROUNDS 12 to 13: 30 sc (30).
ROUND 14: (3 sc, dec) x 6 (24).
ROUNDS 15 to 16: 24 sc (24).
ROUND 17: (2 sc, dec) x 6 (18).
ROUND 18: (1 sc, dec) x 6 (12).
ROUND 19: 6 dec (6). Fasten off.
Leaves
In an MR with 6 sc, work in each sc: 6 ch, return with hdc and dc, join with sl st.
23. Amigurumi Little Bird Keychain
Head
ROUND 1: 6 sc in MR (6).
ROUND 2: 6 inc (12).
ROUND 3: (1 sc, inc) x 6 (18).
ROUND 4: (2 sc, inc) x 6 (24).
ROUNDS 5 to 8: 24 sc (24).
ROUND 9: (2 sc, dec) x 6 (18).
ROUND 10: (1 sc, dec) x 6 (12).
ROUND 11: 6 dec (6). Fasten off.
Body
ROUND 1: 6 sc in MR (6).
ROUND 2: 6 inc (12).
ROUND 3: (1 sc, inc) x 6 (18).
ROUNDS 4 to 7: 18 sc (18).
ROUND 8: (1 sc, dec) x 6 (12). Fasten off.
24. Amigurumi Heart Keychain
Make 2 identical “cups”:
ROUND 1: 6 sc in MR (6).
ROUND 2: 6 inc (12).
ROUND 3: (1 sc, inc) x 6 (18).
ROUND 4: (2 sc, inc) x 6 (24).
ROUNDS 5 and 6: 24 sc (24).
Join the two cups:
ROUND 7: Join with sl st and crochet around, making dec at the joins (44-46 sc).
ROUNDS 8 to 16: Continue crocheting, making dec strategic to shape it. Stuff and fasten off.
25. Amigurumi Cherries Keychain
Cherries (Make 2)
ROUND 1: 6 sc in MR (6).
ROUND 2: 6 inc (12).
ROUND 3: (1 sc, inc) x 6 (18).
ROUNDS 4 to 6: 18 sc (18).
ROUND 7: (1 sc, dec) x 6 (12).
ROUND 8: 6 dec (6). Stuff and fasten off.
Leaves and Stem
From one cherry, join green yarn and crochet 18 ch. Repeat on the other one and join the chains with a leaf.
26. Amigurumi Carrot Keychain
Carrot
ROUND 1: 6 sc in MR (6).
ROUND 2: 6 inc (12).
ROUND 3: (1 sc, inc) x 6 (18).
ROUNDS 4 to 15: 18 sc (18).
ROUND 16: (1 sc, dec) x 6 (12).
ROUNDS 17 to 19: 12 sc (12).
ROUND 20: (1 sc, dec) x 4 (8).
ROUNDS 21 to 22: 8 sc (8).
ROUND 23: 4 dec (4). Fasten off.
Leaves (Make 2)
12 ch. Crochet 3 loops of 6 ch each at the end and work back with sc.
ROUND 20: Fold and close by crocheting 12 sc through both layers.
29. Amigurumi Ice Cream Keychain
Cream
ROUND 1: 8 sc in MR (8).
ROUND 2: 8 inc (16).
ROUND 3: (1 sc, inc) x 8 (24).
ROUNDS 4 to 7: 24 sc (24).
ROUND 8: In FLO, crochet waves with (sc, sl st) and (hdc, dc).
Cone
Work in the back loops of Round 8 of the cream section.
ROUND 9: 24 sc (24).
ROUND 10: (2 sc, dec) x 6 (18).
ROUNDS 11 to 13: 18 sc (18).
ROUND 14: (1 sc, dec) x 6 (12).
ROUNDS 15 to 17: 12 sc (12).
Stuff.
ROUND 18: 6 dec (6). Fasten off.
30. Amigurumi Goku Keychain
Crochet a small tribute to the legendary Super Saiyan, ready to accompany you in all your battles!
Legs, Body, and Head
Make 2 legs.
ROUND 1: In blue, 6 sc in MR (6).
ROUND 2: (1 inc, 1 sc) x 3 (9).
Change to orange.
ROUNDS 3 to 5: 9 sc (9). Fasten off the 1st leg.
Join the legs (18 sc total).
ROUNDS 6 to 7: 18 sc (18).
Change to blue.
ROUND 8: 18 sc (18).
Change to orange.
ROUNDS 9 to 10: 18 sc (18).
ROUND 11: (1 sc, dec) x 6 (12).
Stuff the body. Change to skin-tone yarn.
ROUND 12: 12 inc (24).
ROUND 13: (3 sc, inc) x 6 (30).
ROUND 14: (4 sc, inc) x 6 (36).
ROUNDS 15 to 22: 36 sc (36).
ROUND 23: (4 sc, dec) x 6 (30).
ROUND 24: (3 sc, dec) x 6 (24).
ROUND 25: (2 sc, dec) x 6 (18).
ROUND 26: (1 sc, dec) x 6 (12).
Finish stuffing.
ROUND 27: 6 dec (6). Fasten off.
Hair
In black.
ROUND 1: 6 sc in MR (6).
ROUND 2: 6 inc (12).
ROUND 3: (1 sc, inc) x 6 (18).
ROUND 4: (2 sc, inc) x 6 (24).
ROUND 5: (3 sc, inc) x 6 (30).
ROUND 6: (4 sc, inc) x 6 (36).
ROUNDS 7 to 14: 36 sc (36). Sew to the head and add hair spikes.
You have completed the 30 keychains guide!
Congratulations on exploring this wonderful collection! We hope you found plenty of inspiration. Every amigurumi keychain you create is not just an object; it is a small dose of joy, a handmade gift full of meaning and proof of your amazing talent. The world of crochet is endless, and these little treasures are the gateway to even bigger creations. Keep crocheting, keep creating, and above all, keep sharing your passion with the world.
Which of these 30 designs has become your favorite? We would love to know! Leave us a comment and share your creations on social media using the hashtag #PatternsAmigurumiTOP so the whole community can see your art.
My Experience Tip for Durable Keychains
As someone who has collected and shared countless keychain patterns, I have learned that the key to making them last is durability. My golden tip: use cotton yarn and a smaller hook than recommended. Cotton is resistant to friction and does not pill as easily as acrylic. By using a smaller hook, you create a very dense, tight fabric. This not only keeps the stuffing from showing or escaping with use, but also makes your amigurumi much firmer and more resistant to the daily wear of a keyring. A beautiful keychain should also be a strong keychain!
Design Credits
This is a collection of free patterns gathered from various internet sources to make access easier for the crochet community. Credit for each of these wonderful and creative designs belongs to their respective original authors. We thank all the talented designers who generously share their art, allowing the magic of amigurumi to reach more people.
Frequently Asked Questions (FAQ)
What difficulty level are these patterns?
The vast majority of these patterns are beginner to low-intermediate level. They are quick projects and use basic stitches, ideal for practicing, using up leftover yarn, or getting started in the world of amigurumi.
Can I use other colors or materials?
Of course! The magic of crochet is personalization. Feel free to change the colors, add details such as bows or embroidery, and experiment with different types of yarn. The result will be a completely unique crocheted doll.
How do I make my keychain nice and firm?
The secret lies in two things: crocheting with tight tension so no holes show, and using enough fiberfill stuffing. Stuff your amigurumi firmly and evenly so it does not lose its shape with daily use on your keys or bag.
This crocheted doll is one of those projects that wins you over with its little details: a small amigurumi toy with a rounded body, delicate beak, frog hat, and a clover neck tie. If you enjoy sweet patterns full of charm, this crochet step-by-step has many small pieces to enjoy and a very special final result.
In this free pattern, you will find the complete amigurumi organized by parts: head, beak, hat, hat eyes, wings, body, feet, hair tuft, clover neck tie, and final assembly. The charm of this design is in the color combination, the yarn changes, and the embroidered or glued details that give the character its expression.
The doll is called Clover in the original text, a word associated with the clover plant. That is why the neck accessory is not just a simple detail: it reinforces the sweet, spring-like, and slightly magical feeling of the character. Keep reading and crochet the complete pattern round by round.
Amigurumi Technical Sheet
Difficulty level: intermediate, due to the color changes, small pieces, and final assembly.
Estimated crochet time: approximately 5 to 8 hours, depending on your pace and experience.
Approximate final size: small to medium doll; it may vary depending on the yarn, hook, and tension.
Project type: decorative amigurumi doll with accessories.
Ideal for: gifting, decorating, collecting, or adapting with embroidered eyes if it will be used by small children.
Main technique: crochet in spiral rounds, oval base, color changes, decreases, increases, and sewing pieces together.
Materials
The original pattern does not include a separate materials list, but the visible instructions mention the following items:
Amigurumi yarn or thread in a light color, indicated as No. 03 in the pattern.
Yarn or thread in color No. 74 for the body color-change details.
Yarn or thread in color No. 76 or 72 for the body and legs.
Yarn or thread in color No. 29 for the green details on the wings and hat.
White yarn for the hat eyes.
Green yarn for the outer part of the hat eyes and the clover.
Orange or coral yarn for the beak and feet.
Light blue or purple yarn to decorate the eyes on the head.
Fiberfill for the head and the pieces indicated.
Eyes for the head.
Black half pearls, 1 cm in diameter, for the hat eyes.
Yarn needle for sewing the pieces.
Sewing pins to position the pieces before sewing.
Textile glue or silicone glue, if you prefer to glue some details.
Stitch marker, recommended for the body and pieces worked in spiral rounds.
Fold the edges of the piece together and crochet 4 sc to close.
Body and Legs
Right Leg
Crochet with yarn No. 76 or 72.
ROUND 1: 6 sc in MR (6).
ROUND 2: (1 sc, inc) x3 (9).
ROUND 3: 9 sc (9).
ROUND 4: inc, 8 sc (10).
ROUND 5: 5 sc, inc, 4 sc (11).
Fasten off.
Left Leg
Start crocheting with yarn No. 76 or 72.
ROUND 1: 6 sc in MR (6).
ROUND 2: (1 sc, inc) x3 (9).
ROUND 3: 9 sc (9).
ROUND 4: inc, 8 sc (10).
ROUND 5: 5 sc, inc, 4 sc (11).
ROUND 6: 11 sc (11).
Chain 5 and crochet to join the legs: 11 sc around the right leg, 5 sc along the joining chain, 11 sc around the left leg, and 5 sc along the joining chain. Place the marker to indicate the beginning of the round. There are 32 stitches in the round.
Body Continuation
ROUND 1: 32 sc (32).
ROUND 2: (3 sc, inc) x8 (40).
Change to color No. 74.
ROUND 3: (3 sc, 1 sc worked into the previous round) x10 (40).
Change to color No. 76 or 72.
ROUND 4: 40 sc (40).
ROUND 5: 40 sc (40).
ROUND 6: 40 sc (40).
Change to color No. 74.
ROUND 7: (3 sc, 1 sc worked into the previous round) x10 (40).
Change to color No. 76 or 72.
ROUND 8: 1 sc, dec, (8 sc, dec) x3, 7 sc (36).
ROUND 9: 5 sc, dec, (7 sc, dec) x3, 2 sc (32).
ROUND 10: 1 sc, dec, (6 sc, dec) x3, 5 sc (28).
Change to color No. 74.
ROUND 11: (3 sc, 1 sc worked into the previous round) x7 (28).
Change to color No. 76 or 72.
ROUND 12: 8 sc, dec, 12 sc, dec, 4 sc (26).
Change to color No. 03.
ROUND 13: Work through the bridge strand: 1 sc, dec, 11 sc, dec, 10 sc (24).
ROUND 14: 7 sc, dec, 10 sc, dec, 3 sc (22).
The wings are joined on ROUND 15.
ROUND 15: 6 sc, 4 sc crocheting through the wing, 7 sc, 4 sc crocheting through the wing, 1 sc (22).
ROUND 16: 1 sc, dec, 9 sc, dec, 8 sc (20).
ROUND 17: 6 sc, dec, 8 sc, dec, 2 sc (18).
Work an additional 7 sc, sl st, fasten off, and weave in the end.
Feet
Do not stuff the pieces.
Chain 7. Starting in the second ch from the hook, work:
ROUND 1: On one side: 6 sc; on the other side: 4 sc, inc (12).
ROUND 2: 12 sc (12).
ROUND 3: 5 sc, dec, 3 sc, dec (10).
ROUND 4: 10 sc (10).
ROUND 5: 4 sc, dec, 4 sc (9).
ROUND 6: dec, 7 sc (8).
Gather the opening closed.
Hair Tuft
Make a main chain of 4 ch. In the second ch from the hook, work: 1 sc, 5 ch. Then crochet the tuft toward the main chain. Starting in the second ch from the hook: 4 sc, 1 sl st at the base of the tuft. Work the same way two more times. Fasten off.
Clover Neck Tie
Crochet a neck tie in the shape of a clover.
It consists of two parts: a chain of 18 ch that is tied around the neck and the three-leaf clover.
Clover: in MR, work 2 ch, (dc) x2, 2 ch, sl st in MR. Repeat the same instructions for the next two petals. Then crochet the stem, which consists of 5 ch. Fasten off.
Assembly and Finishing
Step 1: Glue the eyes between rounds 12 and 13 of the head, leaving a distance of 7 sc. Decorate the eyes with light blue or purple yarn.
Step 2: Sew the beak between rounds 13 and 14 of the head.
Step 3: Assemble and finish the hat. Lightly stuff the hat eyes. Glue or sew the white part of the eye to the green part. Glue the black half pearls, 1 cm in diameter, to one side. Glue the eyes from round 1 to round 3 of the hat. Embroider the smile on rounds 3 and 4. Glue or sew the cheeks between rounds 3 and 5.
Step 4: Pin the head to the body with sewing pins and sew it in place.
Step 5: Sew or glue the feet as shown in the photo from the original pattern.
Step 6: Place the clover neck tie around the neck.
Step 7: Put on the hat. On the side, tuck the hair tuft under the hat. Secure the hair tuft and the hat with glue or sew them in place.
Our little Clover is ready!
My Experience and Tips for Crocheting This Amigurumi
While reviewing and organizing this pattern, the first thing I recommend is paying close attention to tension. The head and the hat have a similar oval base, and if one piece turns out too loose, it may lose its rounded shape or not fit properly during assembly.
It is also worth paying attention to the body color changes. The rounds with stitches worked into the previous round are what create the decorative detail, so it is better to crochet them slowly so the design looks even and visible.
The wings and feet are not stuffed, so it is important not to crochet them too loosely. If they are too soft, they may look misshapen when sewn on. For the feet, gathering the opening firmly helps the final shape look neater.
During assembly, my advice is not to glue anything right away. First, position the eyes, beak, hat, cheeks, and feet with pins. Look at the doll from the front and from above to make sure the expression is centered. A tiny shift in the beak or eyes can change the face a lot.
If this amigurumi will be used by a small child, it is better to embroider the eyes and decorations instead of using glued pieces or half pearls. This makes the doll safer and more resistant to handling.
Frequently Asked Questions
Can I crochet this amigurumi with another type of yarn?
Yes, you can use another yarn, but the final size will change. If you use thicker yarn, the doll will be larger; if you use thinner yarn, it will be smaller. The important thing is to choose a hook that creates a tight fabric so the stuffing does not show through.
What should I do if the hat does not fit well over the head?
Check the tension of both pieces. If the hat is too small, it was probably crocheted more tightly than the head. If it is too loose, you can adjust it better when securing it with sewing, always making sure the hat eyes remain symmetrical.
Can the eyes be embroidered instead of glued?
Yes. For a safer version, especially if the doll will be handled by children, you can embroider the eyes and smile with black thread. You can also embroider the hat details instead of using half pearls.
This jellyfish amigurumi is one of those sweet projects that wins you over at first sight: it has a soft shape, tentacles with lots of movement, and an embroidered little face that turns it into a delicate and safe amigurumi toy. If you love cute crocheted dolls, this free crochet pattern is a beautiful option for creating a light, colorful piece full of charm.
The design combines a rounded upper part, a crocheted base, and several types of tentacles, giving the finished piece texture and volume without losing its tenderness. Since the eyes are embroidered, this crocheted jellyfish can also be a safer option for small children, as long as it is made with firm seams and suitable materials.
Below you will find the complete step-by-step tutorial to crochet this jellyfish amigurumi, including materials, abbreviations, tips before starting, assembly, and finishing details.
Amigurumi technical details
Difficulty level: easy intermediate, mainly because of the variety of tentacles.
Estimated crochet time: approximately 3 to 5 hours, depending on your experience and crochet tension.
Approximate finished size: may vary depending on the yarn, hook size, and individual tension.
Project type: crocheted amigurumi toy.
Ideal for: children’s gifts, room decor, mobiles, large keychains, or soft toys.
Main technique: working in continuous rounds, increases, decreases, chains, slip stitches, and curled tentacles.
Materials
YarnArt Jeans yarn.
Colors for the first jellyfish: No. 48 + No. 69 + No. 62.
Colors for the second jellyfish: No. 67 + No. 62 + No. 07.
2.0 mm crochet hook.
Black thread for embroidering the eyes.
Polyester fiberfill, hollofiber, or a similar stuffing material suitable for amigurumi.
Optional or recommended: you can use a stitch marker, a yarn needle to hide the ends, and pins to position the pieces before joining them.
Read the full pattern before beginning, because the jellyfish is assembled by joining the upper part, the lower part, and several types of tentacles.
Keep an even tension so the head stays rounded and the stuffing does not show through the stitches.
Use a stitch marker on the upper part, since it is worked in continuous rounds and it is easy to lose the beginning of the round.
Do not overstuff: the jellyfish should be firm but soft, so the base can be joined correctly.
Since the eyes are embroidered, make sure the stitches are firm and neat, especially if the toy will be used by small children.
Complete jellyfish amigurumi pattern
Lower part
ROUND 1: 6 sc in MR (6).
ROUND 2: 6 inc (12).
ROUND 3: (1 sc, inc)*6 (18).
ROUND 4: (2 sc, inc)*6 (24).
ROUND 5: (3 sc, inc)*6 (30).
ROUND 6: (4 sc, inc)*6 (36).
ROUND 7: (5 sc, inc)*6 (42).
Make 1 sl st, cut the yarn, and fasten off.
Type 1 tentacles: 3 pieces
Ch 57. Turn your work and, starting from the third chain from the hook, work hdc increases in each stitch.
Type 2 tentacles: 6 pieces
Ch 65. Turn your work and make 1 sl st in each stitch to the end of the chain.
Type 3 tentacles: 6 pieces
Ch 61. Turn your work and, starting from the third chain from the hook, crochet: 2 sl st; ch 3, starting from the second chain from the hook make 2 sl st along these chains; 1 sl st along the main chain; ch 3, starting from the second chain from the hook make 2 sl st along these chains; 1 sl st along the main chain. Repeat this sequence to the end of the round.
Small ball: 1 piece
ROUND 1: 6 sc in MR (6).
ROUND 2: 6 inc (12).
ROUND 3: (1 sc, inc)*6 (18).
ROUND 4: 18 sc.
ROUND 5: (1 sc, dec)*6 (12).
ROUND 6: 6 dec (6).
Close the opening and leave a long enough yarn tail to crochet 35 ch.
This piece is attached to the center of the lower part.
Joining the tentacles to the lower part
Attach the rest of the tentacles to the lower part using the remaining yarn tails. Pull the tails to the wrong side of the piece and tie them with 2 or 3 firm knots on the inside.
The lower part of the jellyfish is now completely finished.
Upper part and edging
ROUND 1: 6 sc in MR (6).
ROUND 2: 6 inc (12).
ROUND 3: (1 sc, inc)*6 (18).
ROUND 4: (2 sc, inc)*6 (24).
ROUND 5: (3 sc, inc)*6 (30).
ROUND 6: (4 sc, inc)*6 (36).
ROUND 7: (5 sc, inc)*6 (42).
ROUND 8: (6 sc, inc)*6 (48).
ROUND 9: (7 sc, inc)*6 (54).
ROUNDS 10 TO 19: 54 sc for 10 rounds.
ROUND 20: (7 sc, dec)*6 (48).
ROUND 21: (6 sc, dec)*6 (42).
Do not cut the yarn. Join the upper part and the lower part together by crocheting around with sc.
Stuff the piece.
Then crochet around with 1 inc in each stitch. In the next round, work 1 hdc inc in each stitch.
Assembly and finishing
Once the lower part is ready, attach the central small ball and distribute the tentacles evenly around it. Secure each yarn tail on the wrong side with 2 or 3 knots, as indicated in the original pattern, so the pieces stay firmly in place.
When joining the upper part to the lower part, make sure the tentacles face outward and do not get trapped inside the crochet. Stuff before closing completely, taking care that the head keeps a rounded and soft shape.
Embroider the eyes between rounds 17 and 18, leaving a distance of 6 sc between one eye and the other.
For a neater finish, hide all yarn ends carefully with a yarn needle and arrange the tentacles with your fingers so they have a natural movement.
My experience and tips for crocheting this amigurumi
While reviewing and organizing this pattern, the most important thing I notice is that the beauty of the jellyfish is in the details: the head should be even, but the tentacles can have movement and small variations without affecting the final result. In fact, that mix of curled shapes and simpler strands helps the amigurumi look more lively and delicate.
To make the upper part look nice, I recommend working with consistent tension and not changing hook size halfway through the piece. If the crochet is too loose, the stuffing may show through; if it is too tight, the shape may become stiff and lose softness.
For the tentacles, it is best not to pull the starting chain too tightly. If the chain is too tight, the curls may become stiff or uneven. A slightly loose chain allows the tentacle to fall better and create a more natural shape.
Since the eyes are embroidered, this design is a good option when you want to avoid plastic safety eyes in toys for small children. Even so, it is important to embroider them with several firm stitches, fasten off securely on the inside, and check that there are no loose threads.
I also recommend arranging the tentacles before tying them permanently. Place them evenly around the base, look at the jellyfish from different angles, and only then secure the yarn tails. That small step helps a lot in making the finished toy look balanced.
Frequently asked questions
Can I use a yarn other than YarnArt Jeans?
Yes, you can use another yarn with a similar thickness. Keep in mind that the final size of the jellyfish will change depending on the material, hook size, and your crochet tension.
Is this jellyfish safe for small children?
The pattern uses embroidered eyes, which makes it safer than a piece with plastic eyes. Still, if it will be used by a small child, make sure to create firm seams, secure knots, and check that there are no loose pieces.
How can I prevent the stuffing from showing?
Work with even tension and use a hook size suitable for the yarn thickness. It is also best to add stuffing little by little, without forcing the piece too much, so the stitches do not open up.
If you want to crochet a different, symbolic piece full of soccer emotion, this crocheted Soccer World Cup doll is an ideal project. Here you will find a step-by-step amigurumi toy, with the complete pattern organized so you can create your own crocheted trophy.
The crocheted World Cup is an ideal project for anyone who loves soccer and crochet. Its trophy shape, golden color, and base make it a very eye-catching decorative piece, perfect for fans and celebrations.
ROUND 4: BLO, single crochet in each stitch for 1 round (18)
ROUND 5: single crochet in each stitch for 1 round (18)
ROUND 6: Change color to meadow green, single crochet in each stitch for 1 round (18)
ROUND 7: Change color to gold, (1 sc, 1 dec) x6. (12)
ROUND 8: single crochet in each stitch for 1 round (12)
ROUND 9: Change color to meadow green, single crochet in each stitch for 1 round (12)
ROUND 10: Change color to gold, single crochet in each stitch for 1 round (12)
ROUND 11: (1 sc, 1 inc) x6. (18)
Stuff as you go.
ROUND 12: (2 sc, 1 inc) x6. (24)
ROUNDS 13 TO 14: single crochet in each stitch for 2 rounds (24)
ROUND 15: In FLO (hdc, dc, picot, hdc), 3 sc… repeat until the end of the round; this forms the points.
FASTEN OFF AND CUT THE YARN
CENTER
ROUND 1: 6 sc in MR (6)
ROUND 2: (inc in each sc) x6. (12)
ROUND 3: (1 sc, 1 inc) x6. (18)
ROUND 4: (2 sc, 1 inc) x6. (24)
ROUNDS 5 TO 8: single crochet in each stitch for 4 rounds (24)
Stuff the shape as you go.
ROUND 9: (2 sc, 1 dec) x6. (18)
ROUND 10: (1 sc, 1 dec) x6. (12)
ROUND 11: (6 dec) x6. (6)
Finish closing and secure. Do not leave a long yarn tail.
ASSEMBLY
ASSEMBLY IS SUPER EASY. YOU ONLY NEED TO PLACE THE CENTER ON THE BASE AND GLUE IT 😀
Once you have finished crocheting and stuffing your amigurumi Soccer World Cup, you can add extra details such as embroidery to make it look more realistic. Don’t forget to share your creation on social media using the hashtag #CopaMundialAmigurumi.
We hope you enjoyed this free pattern and that your amigurumi World Cup is a complete success!
Crochet Tips and Experience
For a crocheted trophy, I would pay close attention to the firmness of the base and the stuffing of the body. If the trophy is nice and stable from the bottom, the final result looks better and stands up more easily.
Did you crochet it? Leave me a comment or share it on social media using #PatternsAmigurumi so I can see it.
Special thanks to STUDIOGURUMI for creating and sharing this design with the crochet and amigurumi-loving community.
🔖 Notice: This pattern is an original design by STUDIOGURUMI and is shared here translated into Spanish solely for educational and promotional purposes. All credit belongs to its creator.
Are you looking for a project that brings back nostalgia and sparks creativity? Crocheting the iconic Ninja Turtles (Leonardo, Donatello, Michelangelo, or Raphael) is a fantastic adventure. This free pattern will teach you step by step how to create your own crocheted doll inspired by these legendary heroes in a half shell who marked an entire generation since the 1980s. The Ninja Turtles are famous for their love of pizza and their ninja skills, and now you can have them as an amigurumi toy. Grab your crochet hook, choose the mask color of your favorite turtle, and get ready to bring an incredible, detail-filled amigurumi to life.
Materials
2.00 mm crochet hook.
YarnArt Jeans yarn (55% cotton, 45% acrylic, 50g/160m), in the following colors: green, blue (or the mask color you prefer), gray, brown, and light brown.
Place the safety eyes between rounds 14 and 15, with 8 stitches between them. Begin stuffing the head firmly.
ROUND 25: (3 sc, dec) x 6 (24)
ROUND 26: (2 sc, dec) x 6 (18)
ROUND 27: (4 sc, dec) x 3 (15)
Fasten off and cut the yarn.
Arms (Make 2)
Crochet with green yarn.
ROUND 1: 6 sc in MR (6)
ROUND 2: (2 sc, inc) x 2 (8)
ROUND 3: 8 sc (8)
ROUND 4: 8 sc (8)
ROUND 5: 8 sc (8)
ROUND 6: 8 sc (8)
ROUND 7: 8 sc (8)
Change to blue yarn (arm band).
ROUND 8: 8 sc (8)
ROUND 9: 8 sc (8)
Change to green yarn.
ROUND 10: 8 sc (8)
ROUND 11: 8 sc (8)
ROUND 12: 8 sc (8)
ROUND 13: 8 sc (8)
ROUND 14: 8 sc (8)
Do not stuff the arms. This way, the arm will not stick out too much after it is sewn to the body. Press the opening with your fingers, align 4 stitches on each side, and crochet 1 sc through both sides at the same time (4 sc). Fasten off and leave a long yarn tail for sewing.
Legs and Body
Stuff the legs, body, and head firmly, stuffing as you go.
Leg 1
Start with green yarn.
ROUND 1: 6 sc in MR (6)
ROUND 2: 6 inc (12)
ROUND 3: (1 sc, inc) x 6 (18)
ROUND 4: 18 sc (18)
ROUND 5: 6 sc, 4 dec, 4 sc (14)
ROUND 6: 6 sc, 2 dec, 4 sc (12)
ROUND 7: 12 sc (12)
Change to blue yarn (knee band).
ROUND 8: 12 sc (12)
ROUND 9: 12 sc (12)
Change to green yarn.
ROUND 10: 12 sc (12)
ROUND 11: Crochet 11 sc. Fasten off and cut the yarn.
Leg 2 and Body
Start with green yarn. Repeat the Leg 1 pattern from ROUND 1 to ROUND 10.
ROUND 11: 12 sc (12). Do not cut the yarn. Crochet 5 additional sc. Move the stitch marker to the last loop. Stuff the legs.
ROUND 12: Make 3 ch, join to the first leg by making 1 sc. Make 11 sc around that leg, 3 sc along the chain of 3, and 12 sc around the second leg (30). Note: The beginning of the rounds should be at the back of the doll.
ROUND 13: 9 sc, inc, 14 sc, inc, 5 sc (32). The increases should be positioned at the sides.
ROUND 14: 32 sc (32)
ROUND 15: 32 sc (32)
ROUND 16: 32 sc (32)
ROUND 17: 32 sc (32)
ROUND 18: 32 sc (32)
ROUND 19: 9 sc, dec, 14 sc, dec, 5 sc (30)
ROUND 20: 30 sc (30)
ROUND 21: 30 sc (30)
ROUND 22: 30 sc (30)
ROUND 23: 30 sc (30)
ROUND 24: 30 sc (30)
ROUND 25: (3 sc, dec) x 6 (24)
ROUND 26: (2 sc, dec) x 6 (18)
ROUND 27: (4 sc, dec) x 3 (15)
ROUND 28: 15 sc (15). Leave a long yarn tail for sewing. Stuff the body firmly.
Front Shell
Use light brown yarn.
ROW 1: 8 ch, start in the 2nd ch from the hook, 7 sc (7)
ROW 2: 1 ch, turn the work, 7 sc (7)
ROW 3: 1 ch, turn the work, 7 sc (7)
ROW 4: 1 ch, turn the work, 7 sc (7)
ROW 5: 1 ch, turn the work, 7 sc (7)
ROW 6: 1 ch, turn the work, 7 sc (7)
ROW 7: 1 ch, turn the work, 7 sc (7)
ROW 8: 1 ch, turn the work, dec, 3 sc, dec (5)
ROW 9: 1 ch, turn the work, dec, 1 sc, dec (3). Do not cut the yarn.
Crochet sc evenly around the entire edge of the front shell, working 2 sc into the corners to help turn. Fasten off and leave a long yarn tail for sewing.
Back Shell
Use dark brown yarn.
ROUND 1: 6 sc in MR (6)
ROUND 2: 6 inc (12)
ROUND 3: (3 sc, 3 inc) x 2 (18)
ROUND 4: (6 sc, 3 inc) x 2 (24)
ROUND 5: (9 sc, 3 inc) x 2 (30)
ROUND 6: (12 sc, 3 inc) x 2 (36)
ROUND 7: 36 sc (36)
ROUND 8: 36 sc (36)
Fasten off and leave a long yarn tail for sewing.
Belt Buckle
Use gray yarn.
ROUND 1: 6 sc in MR (6)
ROUND 2: 6 inc (12). Fasten off. Leave a long yarn tail for sewing.
With black embroidery thread, embroider a letter on the buckle (L, R, D, or M depending on the turtle) and tie the ends at the back. Sew the buckle to the front of the belt.
Belt
Use dark brown yarn.
Crochet as many chains as you need to wrap around your turtle. In the original pattern, 50 chains were needed in total.
ROW 1: 50 ch, start in the 2nd ch from the hook, 49 hdc (49)
Fasten off. Leave a long yarn tail for sewing.
Mask Ties
Use blue yarn (or the chosen mask color).
ROW 1: 55 ch, start in the 2nd ch from the hook, 54 sc (54)
ROW 2: 1 ch, turn the work, 54 sc (54)
ROW 3: 1 ch, turn the work, 54 sc (54)
Fasten off and leave a long yarn tail for sewing.
Assembly and Finishing
Sew the head to the body.
Sew the arms to the body symmetrically.
Sew the front shell to the body.
Sew the back shell to the back of the body.
Sew the belt around the turtle.
Cut a piece of yarn in the mask color and use it to sew the tie (the knot) to the back of the head.
My Tips and Experience
As a crocheter who is passionate about amigurumi, I have noticed that the secret to making these Ninja Turtles turn out perfectly is in the shell and the proportions. When I crochet the back shell, I like to make sure I do not overstuff it before sewing it on; just a little bit of fiberfill right in the center gives it that domed volume without making it look like a ball on the back.
Another essential tip: when making the color changes for the knee pads and elbow pads, make sure to complete the final yarn-over of the previous stitch with the new color. This will give you super clean transition lines. Also, when aligning the safety eyes, place them well centered within the blue mask band (and remember to attach the safety backs on the inside before closing the head!). Take your time pinning all the pieces in place (arms, shell, and belt) before making the first stitch; this will save you from having to undo sewing if something ends up crooked.
Original pattern credits: Design created by Tanyaasmile. If you publish your finished amigurumi, remember to tag her or use the hashtag #tssmile_dolls.
Did you dare to crochet it? Leave me a comment or share it on social media using #PatternsAmigurumi so I can see it.
This crochet zebra amigurumi is one of those projects that wins you over with its little details: the white body with black stripes, the gray hooves, the small mane, and a sweet little face that turns the finished piece into a true crocheted doll to keep, gift, or add to an animal collection.
In this free pattern, you will find the complete step-by-step instructions to crochet this amigurumi toy, with each part separated: head, body, legs, arms, muzzle, ears, mane, tail, and final assembly. It is an ideal design for practicing color changes in crochet and creating that striped effect that is so characteristic of zebras.
The zebra is a much-loved animal in amigurumi because it combines cuteness with strong visual contrast. Its stripes make each doll unique, even when following the same pattern, since some markings are worked irregularly or “chaotically,” as indicated in the original design.
Amigurumi Technical Details
Difficulty level: intermediate, because of the color changes, stripes, and assembly of several pieces.
Estimated crochet time: approximately 6 to 9 hours, depending on your pace and experience.
Approximate finished size: may vary depending on the yarn, hook, and tension. With YarnArt Jeans yarn and a 2.25 mm hook, it can turn out as a medium-sized handheld doll.
ROUND 12: White: 21 Sc, working black stripes irregularly. (21)
ROUND 13: White: 21 Sc, working black stripes irregularly. (21)
ROUND 14: White: 21 Sc, working black stripes irregularly. (21)
ROUND 15: White: 21 Sc, working black stripes irregularly. (21)
ROUND 16: White: 21 Sc, working black stripes irregularly. (21)
ROUND 17: White: 21 Sc, working black stripes irregularly. (21)
ROUND 18: White: 21 Sc, working black stripes irregularly. (21)
ROUND 19: White: 21 Sc, working black stripes irregularly. (21)
ROUND 20: White: 21 Sc, working black stripes irregularly. (21)
ROUND 21: White: 21 Sc, working black stripes irregularly. (21)
ROUND 22: White: 21 Sc, working black stripes irregularly. (21)
ROUND 23: White: 21 Sc, working black stripes irregularly. (21)
ROUND 24: White: 21 Sc, working black stripes irregularly. (21)
ROUND 25: White: (5 Sc, Dec)*3. (18) Fold the piece in half and crochet 8-9 Sc through both sides to close it. Fasten off and leave a long tail for sewing.
Finishing the Leg Hoof
Turn the piece upside down. Join the yarn to the front loops left free in ROUND 6 and crochet 30 Sl st. Fasten off and hide the yarn inside the piece.
Arms of the Zebra Amigurumi (make 2 pieces)
The piece is lightly stuffed, approximately up to the middle of the arm. Leave the upper part unstuffed. Start with gray.
ROUND 11: White: 15 Sc, working black stripes irregularly. (15)
ROUND 12: White: 15 Sc, working black stripes irregularly. (15)
ROUND 13: White: 15 Sc, working black stripes irregularly. (15)
ROUND 14: White: 15 Sc, working black stripes irregularly. (15)
ROUND 15: White: 15 Sc, working black stripes irregularly. (15)
ROUND 16: White: 15 Sc, working black stripes irregularly. (15)
ROUND 17: White: 15 Sc, working black stripes irregularly. (15)
ROUND 18: White: 15 Sc, working black stripes irregularly. (15)
ROUND 19: White: 15 Sc, working black stripes irregularly. (15)
ROUND 20: White: 15 Sc, working black stripes irregularly. (15)
ROUND 21: White: 15 Sc, working black stripes irregularly. (15)
ROUND 22: White: (3 Sc, Dec)*3. (12) Fold the piece in half and crochet 5-6 Sc through both sides to close it. Fasten off and leave a long tail for sewing.
Finishing the Arm Hoof
Turn the piece upside down. Join the yarn to the front loops left free in ROUND 5 and crochet 24 Sl st. Fasten off and hide the yarn inside the piece.
Make a chain of 32 Ch. Starting from the third chain from the hook, crochet:
ROUND 1: (Dc Inc, Dc)*15, 2 Ch and turn.
ROUND 2: 45 Dc.
Fasten off and leave a long tail for sewing.
Ears
Crochet 4 pieces in total: 2 gray pieces and 2 white pieces. On the gray pieces, fasten off and cut the yarn. On the white pieces, do not cut the yarn, because it will be used to join the two parts of each ear.
ROUND 1: 6 Sc in MR.
ROUND 2: 6 Inc. (12)
ROUND 3: (1 Sc, Inc)*6. (18)
ROUND 4: 1 Sc, Inc, (2 Sc, Inc)*5, 1 Sc. (24)
ROUND 5: (3 Sc, Inc)*6. (30)
Place two pieces together, one gray and one white, with wrong sides facing each other. On the right side, join them by taking the loops of both pieces and crochet 30 Sc around. Fasten off and leave a long tail for sewing.
With white yarn, make 10 Ch. Starting from the second chain from the hook, crochet 9 Sc. Fasten off and leave a long tail for sewing.
Prepare 3 strands of black yarn approximately 10 cm long. Fold them in half and pass them through the tip of the tail. Trim the excess.
Assembly and Finishing
Assembling the Doll
Sew the head to the body.
Sew the arms to the body, leaving 2 rounds of space from the head.
Sew the legs between ROUNDS 13 and 14 of the body. The legs should be aligned under the arms.
Sew the tail between ROUNDS 12 and 13 of the body.
Shaping and Decorating the Head
Eye Sculpting
Insert the needle with yarn into the bottom of the head and bring it out through the inner lower corner of the eye. Insert the needle into the inner upper corner and bring it back out through the bottom of the head, at the same point where it was first inserted.
Move 1 Sc away, insert the needle again, and bring it out through the outer lower corner of the eye. Insert the needle into the outer upper corner of the eye and bring it back out through the bottom of the head, at the initial point. Pull the yarn gently, make a knot, and hide it.
Repeat the same process with the second eye.
Muzzle, Embroidery, Ears, and Mane
Sew the muzzle to the head between ROUNDS 17 and 26, stuffing it lightly.
With black yarn, embroider the nostrils on the muzzle.
Embroider the eyelashes and eyebrows.
Fold the ears in half and sew them to the head on ROUND 7. The ears should stand upright; secure them with a couple of stitches by taking the loops from ROUNDS 4-5.
Sew the mane in a line: the first piece in the center and the other two on each side of the first one, spaced approximately 2 Sc apart.
My Experience and Tips for Crocheting This Amigurumi
Reviewed and organized by Patterns Amigurumis. This pattern was edited to improve readability, preserve the complete rounds, and make the step-by-step crochet process easier to follow.
When reviewing this pattern, the most important thing is to respect the tension and color changes, because the zebra’s personality is found precisely in its stripes. In the areas where the design indicates working black stripes irregularly, it is best not to obsess over making both sides identical: a slightly uneven look helps the doll appear more natural.
I also recommend stuffing the arms and legs softly, without filling them all the way to the top. This allows the pieces to sit more comfortably when sewn to the body and prevents them from opening or sticking out too much. For the body and head, however, it is better to stuff evenly, adding small portions of fiberfill so lumps do not form.
Before sewing everything permanently, place the ears, arms, legs, tail, and muzzle with pins. In this type of amigurumi, a small change in the position of the muzzle or eyes can greatly affect the expression. If the doll is intended for a small child, replace the safety eyes with embroidered eyes for extra peace of mind.
The mane and tail are small details, but they help a lot in making the zebra instantly recognizable. Comb and arrange the strands before cutting, and make sure the knots are firm and hidden for a neater finish.
This pattern was organized and reviewed so you can follow it round by round without losing any part of the original design.
Frequently Asked Questions
Can I crochet this zebra with another yarn?
Yes, you can use another yarn of similar thickness. Keep in mind that the final size will change depending on the material, hook, and your tension. If you use thicker yarn, the doll will turn out larger.
How do I prevent the stuffing from showing between the stitches?
Use a crochet hook suitable for your yarn and try to keep firm tension. If the stitches are too open, go down half a hook size or stuff with small portions so you do not stretch the fabric.
What should I do if the legs or arms are not symmetrical?
Before sewing, hold the pieces in place with pins and look at the doll from the front, side, and top. Adjust the placement until the arms and legs look balanced, especially because the stripes can visually trick the eye.
Pattern Credits
The original pattern appears with the visible watermark SWEET_BEAR_TOYS. This mention is preserved as credit to the original source visible in the images.
Did you crochet it? Leave me a comment or share it on social media using #PatternsAmigurumi so I can see it.