
This crochet zebra amigurumi is one of those projects that wins you over with its little details: the white body with black stripes, the gray hooves, the small mane, and a sweet little face that turns the finished piece into a true crocheted doll to keep, gift, or add to an animal collection.
In this free pattern, you will find the complete step-by-step instructions to crochet this amigurumi toy, with each part separated: head, body, legs, arms, muzzle, ears, mane, tail, and final assembly. It is an ideal design for practicing color changes in crochet and creating that striped effect that is so characteristic of zebras.
The zebra is a much-loved animal in amigurumi because it combines cuteness with strong visual contrast. Its stripes make each doll unique, even when following the same pattern, since some markings are worked irregularly or “chaotically,” as indicated in the original design.
Amigurumi Technical Details
- Difficulty level: intermediate, because of the color changes, stripes, and assembly of several pieces.
- Estimated crochet time: approximately 6 to 9 hours, depending on your pace and experience.
- Approximate finished size: may vary depending on the yarn, hook, and tension. With YarnArt Jeans yarn and a 2.25 mm hook, it can turn out as a medium-sized handheld doll.
- Project type: crocheted doll / animal amigurumi.
- Ideal for: gifts, nursery decor, crocheted animal collections, or handmade sales.
- Main technique: spiral crochet with increases, decreases, color changes, and sewing pieces together.
Materials
- YarnArt Jeans yarn in white.
- YarnArt Jeans yarn in black or graphite.
- YarnArt Jeans yarn in gray.
- 2.25 mm Clovercrochet hook.
Advertisement / affiliate link. As an Amazon Associate, I earn from qualifying purchases.
- 12 mm safety eyes.
- Amigurumi stuffing.
- Yarn needle for sewing the pieces together.
Optional or recommended: stitch marker, pins to position the pieces before sewing, and small scissors to trim the tail threads neatly.
If you have questions about yarns or tools, check our: complete guide to amigurumi materials
If you need help with color changes, you can see our step-by-step guide to changing color in amigurumi.
Abbreviations
- R: round.
- Ch: chain.
- MR: magic ring.
- Sc: single crochet.
- Dc: double crochet.
- Sl st: slip stitch.
- Inc: increase.
- Dec: decrease.
- BLO: crochet through the back loop only.
- White: white color from the original pattern.
- Black: black or graphite color from the original pattern.
- Gray: gray color.
- (…)*x: repeat the instructions inside the parentheses the indicated number of times.
You can review all the techniques in our guide to crochet abbreviations for amigurumi
Before You Start
- Read the full pattern before beginning, because the black stripes appear in several parts and it is helpful to understand the overall distribution.
- Use a stitch marker, especially on the head and body, where there are many color changes.
- Do not overstuff the arms and legs: the pattern indicates leaving the upper part unstuffed so they can be sewn more neatly to the body.
- For the irregular black stripes on the arms and legs, try not to align them all in the same place so the zebra looks more natural.
- Before sewing, position the head, arms, legs, and tail with pins to check symmetry.
Complete Step-by-Step Pattern
Legs of the Zebra Amigurumi (make 2 pieces)
The piece is lightly stuffed, approximately up to the middle of the leg. Leave the upper part unstuffed. Start with gray.
ROUND 1: Gray: 6 Sc in MR.
ROUND 2: Gray: 6 Inc. (12)
ROUND 3: Gray: (1 Sc, Inc)*6. (18)
ROUND 4: Gray: 1 Sc, Inc, (2 Sc, Inc)*5, 1 Sc. (24)
ROUND 5: Gray: (3 Sc, Inc)*6. (30)
ROUND 6: Gray: in BLO, 30 Sc. (30)
ROUND 7: Gray: 30 Sc. (30)
ROUND 8: Gray: 30 Sc. (30)
ROUND 9: Gray: (8 Sc, Dec)*3. (27)
ROUND 10: Gray: 3 Sc, Dec, (7 Sc, Dec)*2, 4 Sc. (24)
ROUND 11: Change to white: (6 Sc, Dec)*3. (21)
ROUND 12: White: 21 Sc, working black stripes irregularly. (21)
ROUND 13: White: 21 Sc, working black stripes irregularly. (21)
ROUND 14: White: 21 Sc, working black stripes irregularly. (21)
ROUND 15: White: 21 Sc, working black stripes irregularly. (21)
ROUND 16: White: 21 Sc, working black stripes irregularly. (21)
ROUND 17: White: 21 Sc, working black stripes irregularly. (21)
ROUND 18: White: 21 Sc, working black stripes irregularly. (21)
ROUND 19: White: 21 Sc, working black stripes irregularly. (21)
ROUND 20: White: 21 Sc, working black stripes irregularly. (21)
ROUND 21: White: 21 Sc, working black stripes irregularly. (21)
ROUND 22: White: 21 Sc, working black stripes irregularly. (21)
ROUND 23: White: 21 Sc, working black stripes irregularly. (21)
ROUND 24: White: 21 Sc, working black stripes irregularly. (21)
ROUND 25: White: (5 Sc, Dec)*3. (18) Fold the piece in half and crochet 8-9 Sc through both sides to close it. Fasten off and leave a long tail for sewing.
Finishing the Leg Hoof
Turn the piece upside down. Join the yarn to the front loops left free in ROUND 6 and crochet 30 Sl st. Fasten off and hide the yarn inside the piece.
Arms of the Zebra Amigurumi (make 2 pieces)
The piece is lightly stuffed, approximately up to the middle of the arm. Leave the upper part unstuffed. Start with gray.
ROUND 1: Gray: 6 Sc in MR.
ROUND 2: Gray: 6 Inc. (12)
ROUND 3: Gray: (1 Sc, Inc)*6. (18)
ROUND 4: Gray: 1 Sc, Inc, (2 Sc, Inc)*5, 1 Sc. (24)
ROUND 5: Gray: in BLO, 24 Sc. (24)
ROUND 6: Gray: 24 Sc. (24)
ROUND 7: Gray: 24 Sc. (24)
ROUND 8: Gray: (6 Sc, Dec)*3. (21)
ROUND 9: Gray: 2 Sc, Dec, (5 Sc, Dec)*2, 3 Sc. (18)
ROUND 10: Change to white: (4 Sc, Dec)*3. (15)
ROUND 11: White: 15 Sc, working black stripes irregularly. (15)
ROUND 12: White: 15 Sc, working black stripes irregularly. (15)
ROUND 13: White: 15 Sc, working black stripes irregularly. (15)
ROUND 14: White: 15 Sc, working black stripes irregularly. (15)
ROUND 15: White: 15 Sc, working black stripes irregularly. (15)
ROUND 16: White: 15 Sc, working black stripes irregularly. (15)
ROUND 17: White: 15 Sc, working black stripes irregularly. (15)
ROUND 18: White: 15 Sc, working black stripes irregularly. (15)
ROUND 19: White: 15 Sc, working black stripes irregularly. (15)
ROUND 20: White: 15 Sc, working black stripes irregularly. (15)
ROUND 21: White: 15 Sc, working black stripes irregularly. (15)
ROUND 22: White: (3 Sc, Dec)*3. (12) Fold the piece in half and crochet 5-6 Sc through both sides to close it. Fasten off and leave a long tail for sewing.
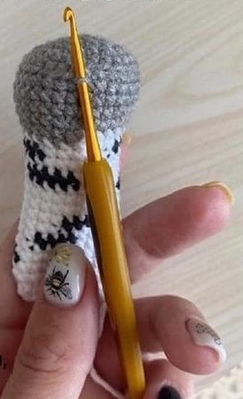
Finishing the Arm Hoof
Turn the piece upside down. Join the yarn to the front loops left free in ROUND 5 and crochet 24 Sl st. Fasten off and hide the yarn inside the piece.
[Reference image for finishing the hoof]
Muzzle
Crochet with gray yarn.
ROUND 1: Gray: 6 Sc in MR.
ROUND 2: Gray: 6 Inc. (12)
ROUND 3: Gray: (1 Sc, Inc)*6. (18)
ROUND 4: Gray: 1 Sc, Inc, (2 Sc, Inc)*5, 1 Sc. (24)
ROUND 5: Gray: (3 Sc, Inc)*6. (30)
ROUND 6: Gray: 30 Sc. (30)
Fasten off and leave a long tail for sewing.
Mane
Crochet with black yarn. Make 3 identical pieces.
Make a chain of 32 Ch. Starting from the third chain from the hook, crochet:
ROUND 1: (Dc Inc, Dc)*15, 2 Ch and turn.
ROUND 2: 45 Dc.
Fasten off and leave a long tail for sewing.
Ears
Crochet 4 pieces in total: 2 gray pieces and 2 white pieces. On the gray pieces, fasten off and cut the yarn. On the white pieces, do not cut the yarn, because it will be used to join the two parts of each ear.
ROUND 1: 6 Sc in MR.
ROUND 2: 6 Inc. (12)
ROUND 3: (1 Sc, Inc)*6. (18)
ROUND 4: 1 Sc, Inc, (2 Sc, Inc)*5, 1 Sc. (24)
ROUND 5: (3 Sc, Inc)*6. (30)
Place two pieces together, one gray and one white, with wrong sides facing each other. On the right side, join them by taking the loops of both pieces and crochet 30 Sc around. Fasten off and leave a long tail for sewing.
Body
ROUND 1: White: 6 Sc in MR.
ROUND 2: White: 6 Inc. (12)
ROUND 3: White: (1 Sc, Inc)*6. (18)
ROUND 4: White: 1 Sc, Inc, (2 Sc, Inc)*5, 1 Sc. (24)
ROUND 5: White: (3 Sc, Inc)*6. (30)
ROUND 6: White: 2 Sc, Inc, (4 Sc, Inc)*5, 2 Sc. (36)
ROUND 7: White: 5 Sc, Inc. Black: 5 Sc. White: Inc, 5 Sc, Inc. Black: 5 Sc. White: Inc, 5 Sc, Inc. Black: 5 Sc. White: Inc. (42)
ROUND 8: White: 3 Sc, Inc, (6 Sc, Inc)*5, 3 Sc. (48)
ROUND 9: White: 7 Sc, Inc, 6 Sc. Black: 1 Sc, Inc, 3 Sc. White: 4 Sc, Inc, 7 Sc, Inc, 2 Sc. Black: 5 Sc, Inc. White: 7 Sc, Inc. (54)
ROUND 10: White: 2 Sc. Black: 2 Sc, Inc, 1 Sc. White: 7 Sc, Inc, (8 Sc, Inc)*4, 4 Sc. (60)
ROUND 11: White: 28 Sc. Black: 6 Sc. White: 26 Sc. (60)
ROUND 12: White: 60 Sc. (60)
ROUND 13: White: 5 Sc. Black: 6 Sc. White: 4 Sc. Black: 6 Sc. White: 12 Sc. Black: 6 Sc. White: 15 Sc. Black: 6 Sc. (60)
ROUND 14: White: 43 Sc. Black: 5 Sc. White: 12 Sc. (60)
ROUND 15: White: 60 Sc. (60)
ROUND 16: White: 10 Sc. Black: 7 Sc. White: 6 Sc. Black: 4 Sc. White: 22 Sc. Black: 6 Sc. White: 5 Sc. (60)
ROUND 17: White: 4 Sc, Dec, 8 Sc, Dec, 3 Sc. Black: 5 Sc. White: Dec, 6 Sc. Black: 2 Sc, Dec, 2 Sc. White: 6 Sc, Dec, 8 Sc, Dec. Black: 4 Sc. (54)
ROUND 18: Black: 2 Sc. White: 52 Sc. (54)
ROUND 19: White: 6 Sc. Black: 3 Sc. White: 27 Sc. Black: 6 Sc. White: 12 Sc. (54)
ROUND 20: White: (7 Sc, Dec)*6. (48)
ROUND 21: White: 11 Sc. Black: 5 Sc. White: 6 Sc. Black: 4 Sc. White: 15 Sc. Black: 5 Sc. White: 2 Sc. (48)
ROUND 22: White: 3 Sc, Dec, (6 Sc, Dec)*5, 3 Sc. (42)
ROUND 23: White: 32 Sc. Black: 5 Sc. White: 5 Sc. (42)
ROUND 24: White: 6 Sc. Black: 5 Sc. White: 31 Sc. (42)
ROUND 25: White: (5 Sc, Dec)*6. (36)
ROUND 26: White: 1 Sc. Black: 4 Sc. White: 7 Sc. Black: 5 Sc. White: 6 Sc. Black: 3 Sc. White: 9 Sc. (36)
ROUND 27: White: 36 Sc. (36)
ROUND 28: White: 2 Sc, Dec, (4 Sc, Dec)*5, 2 Sc. (30)
ROUND 29: White: 8 Sc. Black: 4 Sc. White: 4 Sc. Black: 5 Sc. White: 5 Sc. Black: 4 Sc. (30)
ROUND 30: White: 4 Sc. Black: 5 Sc. White: 21 Sc. (30)
ROUND 31: White: (3 Sc, Dec)*6. (24)
ROUND 32: White: 24 Sc. (24)
ROUND 33: White: 24 Sc. (24)
Fasten off and hide the yarn inside the piece.
Head
ROUND 1: White: 6 Sc in MR.
ROUND 2: White: 6 Inc. (12)
ROUND 3: White: (1 Sc, Inc)*6. (18)
ROUND 4: White: 1 Sc, Inc, (2 Sc, Inc)*5, 1 Sc. (24)
ROUND 5: White: (3 Sc, Inc)*6. (30)
ROUND 6: White: 2 Sc, Inc. Black: 4 Sc. White: Inc, (4 Sc, Inc)*2. Black: 4 Sc. White: Inc, 4 Sc, Inc, 2 Sc. (36)
ROUND 7: White: (5 Sc, Inc)*6. (42)
ROUND 8: White: 3 Sc, Inc. Black: 6 Sc. White: (Inc, 6 Sc)*2, Inc. Black: 6 Sc. White: Inc, 6 Sc, Inc, 3 Sc. (48)
ROUND 9: White: 17 Sc. Black: 5 Sc. White: 26 Sc. (48)
ROUND 10: White: 48 Sc. (48)
ROUND 11: White: (15 Sc, Inc)*3. (51)
ROUND 12: White: 10 Sc. Black: 4 Sc. White: 13 Sc. Black: 4 Sc. White: 20 Sc. (51)
ROUND 13: White: 8 Sc, Inc, (16 Sc, Inc)*2, 8 Sc. (54)
ROUND 14: White: 54 Sc. (54)
ROUND 15: White: 3 Sc. Black: 5 Sc. White: 28 Sc. Black: 5 Sc. White: 13 Sc. (54)
ROUND 16: White: 54 Sc. (54)
ROUND 17: White: (8 Sc, Inc)*6. (60)
ROUND 18: White: 10 Sc. Black: 4 Sc. White: 20 Sc. Black: 4 Sc. White: 22 Sc. (60)
Insert the safety eyes between ROUNDS 17 and 18, with a space of 8-9 Sc between them.
ROUND 19: White: (9 Sc, Inc)*6. (66)
ROUND 20: White: 66 Sc. (66)
ROUND 21: White: 5 Sc. Black: 5 Sc. White: 33 Sc. Black: 5 Sc. White: 18 Sc. (66)
ROUND 22: White: 66 Sc. (66)
ROUND 23: White: 13 Sc. Black: 5 Sc. White: 16 Sc. Black: 5 Sc. White: 27 Sc. (66)
ROUND 24: White: 66 Sc. (66)
ROUND 25: White: 9 Sc. Black: 5 Sc. White: 25 Sc. Black: 5 Sc. White: 22 Sc. (66)
ROUND 26: White: (9 Sc, Dec)*6. (60)
ROUND 27: White: 4 Sc, Dec, (8 Sc, Dec)*5, 4 Sc. (54)
ROUND 28: White: (7 Sc, Dec)*6. (48)
ROUND 29: White: 24 Dec. (24)
Fasten off and leave a long tail for sewing.
Tail
With white yarn, make 10 Ch. Starting from the second chain from the hook, crochet 9 Sc. Fasten off and leave a long tail for sewing.
Prepare 3 strands of black yarn approximately 10 cm long. Fold them in half and pass them through the tip of the tail. Trim the excess.
Assembly and Finishing
Assembling the Doll
- Sew the head to the body.
- Sew the arms to the body, leaving 2 rounds of space from the head.
- Sew the legs between ROUNDS 13 and 14 of the body. The legs should be aligned under the arms.
- Sew the tail between ROUNDS 12 and 13 of the body.
Shaping and Decorating the Head
Eye Sculpting
Insert the needle with yarn into the bottom of the head and bring it out through the inner lower corner of the eye. Insert the needle into the inner upper corner and bring it back out through the bottom of the head, at the same point where it was first inserted.
Move 1 Sc away, insert the needle again, and bring it out through the outer lower corner of the eye. Insert the needle into the outer upper corner of the eye and bring it back out through the bottom of the head, at the initial point. Pull the yarn gently, make a knot, and hide it.
Repeat the same process with the second eye.
Muzzle, Embroidery, Ears, and Mane
- Sew the muzzle to the head between ROUNDS 17 and 26, stuffing it lightly.
- With black yarn, embroider the nostrils on the muzzle.
- Embroider the eyelashes and eyebrows.
- Fold the ears in half and sew them to the head on ROUND 7. The ears should stand upright; secure them with a couple of stitches by taking the loops from ROUNDS 4-5.
- Sew the mane in a line: the first piece in the center and the other two on each side of the first one, spaced approximately 2 Sc apart.
My Experience and Tips for Crocheting This Amigurumi
Reviewed and organized by Patterns Amigurumis. This pattern was edited to improve readability, preserve the complete rounds, and make the step-by-step crochet process easier to follow.
When reviewing this pattern, the most important thing is to respect the tension and color changes, because the zebra’s personality is found precisely in its stripes. In the areas where the design indicates working black stripes irregularly, it is best not to obsess over making both sides identical: a slightly uneven look helps the doll appear more natural.
I also recommend stuffing the arms and legs softly, without filling them all the way to the top. This allows the pieces to sit more comfortably when sewn to the body and prevents them from opening or sticking out too much. For the body and head, however, it is better to stuff evenly, adding small portions of fiberfill so lumps do not form.
Before sewing everything permanently, place the ears, arms, legs, tail, and muzzle with pins. In this type of amigurumi, a small change in the position of the muzzle or eyes can greatly affect the expression. If the doll is intended for a small child, replace the safety eyes with embroidered eyes for extra peace of mind.
The mane and tail are small details, but they help a lot in making the zebra instantly recognizable. Comb and arrange the strands before cutting, and make sure the knots are firm and hidden for a neater finish.
This pattern was organized and reviewed so you can follow it round by round without losing any part of the original design.
Frequently Asked Questions
Can I crochet this zebra with another yarn?
Yes, you can use another yarn of similar thickness. Keep in mind that the final size will change depending on the material, hook, and your tension. If you use thicker yarn, the doll will turn out larger.
How do I prevent the stuffing from showing between the stitches?
Use a crochet hook suitable for your yarn and try to keep firm tension. If the stitches are too open, go down half a hook size or stuff with small portions so you do not stretch the fabric.
What should I do if the legs or arms are not symmetrical?
Before sewing, hold the pieces in place with pins and look at the doll from the front, side, and top. Adjust the placement until the arms and legs look balanced, especially because the stripes can visually trick the eye.
Pattern Credits
The original pattern appears with the visible watermark SWEET_BEAR_TOYS. This mention is preserved as credit to the original source visible in the images.
Did you crochet it? Leave me a comment or share it on social media using #PatternsAmigurumi so I can see it.
Before you start: useful supplies for this amigurumi
Check yarn, eyes, stuffing, and accessories before crocheting so you do not get stuck halfway through the project.
- Safety eyesAdds a clean, even expression to the doll.View options
- Yarn needleEssential for sewing pieces and hiding ends.View options
- Crochet hookThe right size keeps stitches firm and neat.View options
- small scissorsA practical way to gather supplies quickly.View options
- PinsUseful for positioning pieces before sewing.View options
- Safety noseA small detail that improves the finish.View options
Links open Amazon searches related to each material.
Leave a reply