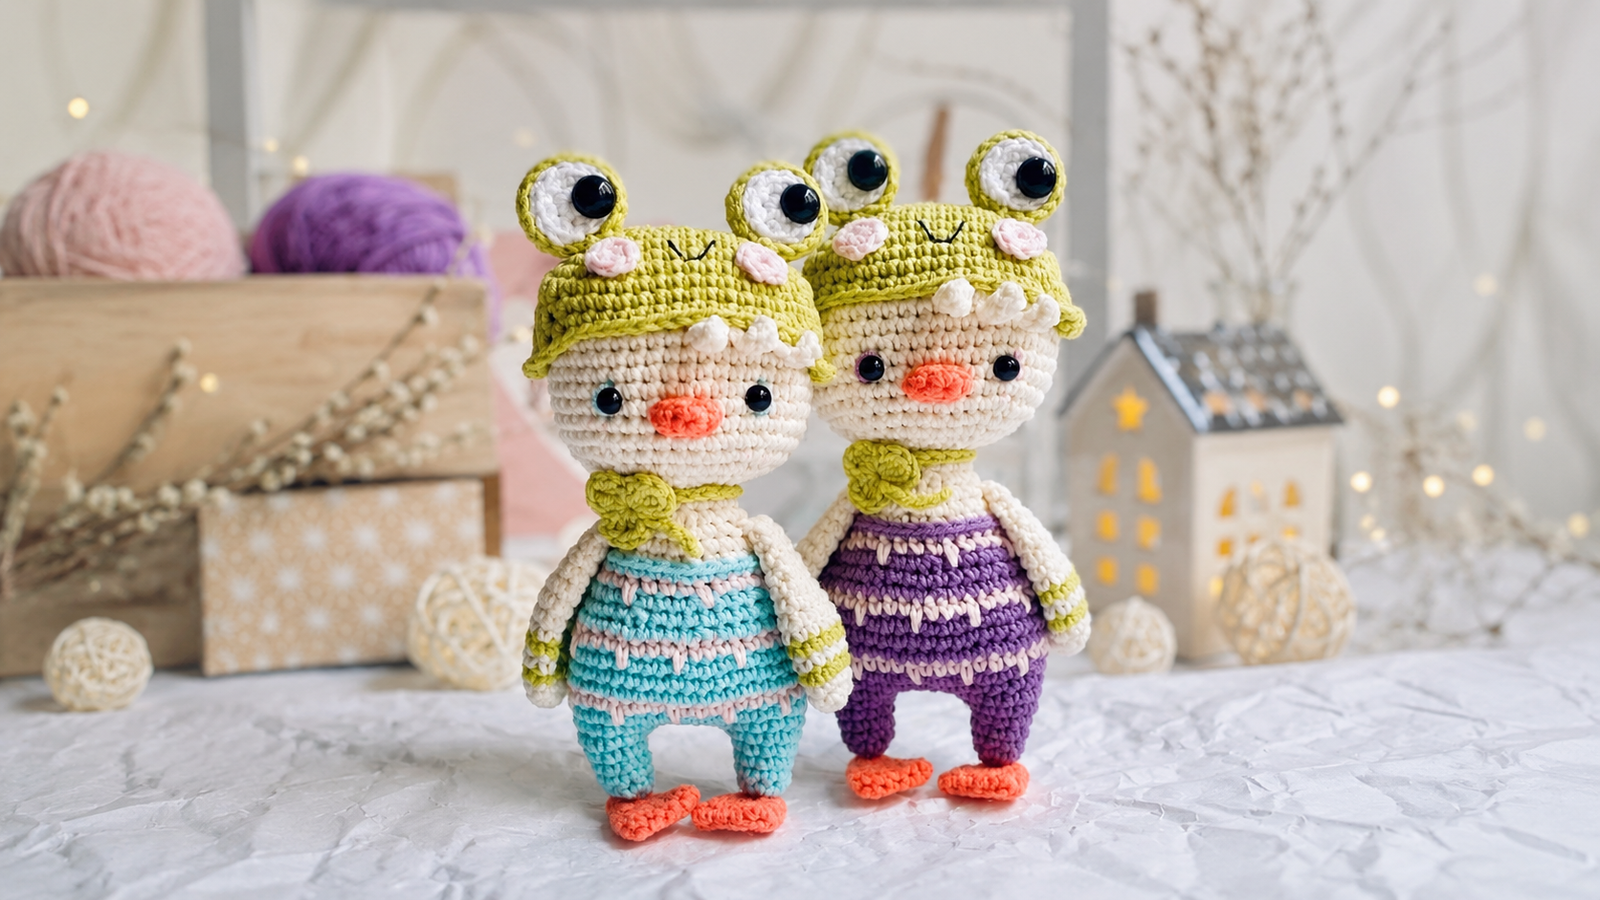
Clover Amigurumi Doll with Frog Hat
This crocheted doll is one of those projects that wins you over with its little details: a small amigurumi toy with a rounded body, delicate beak, frog hat, and a clover neck tie. If you enjoy sweet patterns full of charm, this crochet step-by-step has many small pieces to enjoy and a very special final result.
In this free pattern, you will find the complete amigurumi organized by parts: head, beak, hat, hat eyes, wings, body, feet, hair tuft, clover neck tie, and final assembly. The charm of this design is in the color combination, the yarn changes, and the embroidered or glued details that give the character its expression.
The doll is called Clover in the original text, a word associated with the clover plant. That is why the neck accessory is not just a simple detail: it reinforces the sweet, spring-like, and slightly magical feeling of the character. Keep reading and crochet the complete pattern round by round.
Amigurumi Technical Sheet
- Difficulty level: intermediate, due to the color changes, small pieces, and final assembly.
- Estimated crochet time: approximately 5 to 8 hours, depending on your pace and experience.
- Approximate final size: small to medium doll; it may vary depending on the yarn, hook, and tension.
- Project type: decorative amigurumi doll with accessories.
- Ideal for: gifting, decorating, collecting, or adapting with embroidered eyes if it will be used by small children.
- Main technique: crochet in spiral rounds, oval base, color changes, decreases, increases, and sewing pieces together.
Materials
The original pattern does not include a separate materials list, but the visible instructions mention the following items:
- Amigurumi yarn or thread in a light color, indicated as No. 03 in the pattern.
Advertisement / affiliate link. As an Amazon Associate, I earn from qualifying purchases.
- Yarn or thread in color No. 74 for the body color-change details.
- Yarn or thread in color No. 76 or 72 for the body and legs.
- Yarn or thread in color No. 29 for the green details on the wings and hat.
- White yarn for the hat eyes.
- Green yarn for the outer part of the hat eyes and the clover.
- Orange or coral yarn for the beak and feet.
- Light blue or purple yarn to decorate the eyes on the head.
- Fiberfill for the head and the pieces indicated.
- Eyes for the head.
- Black half pearls, 1 cm in diameter, for the hat eyes.
- Yarn needle for sewing the pieces.
- Sewing pins to position the pieces before sewing.
- Textile glue or silicone glue, if you prefer to glue some details.
- Stitch marker, recommended for the body and pieces worked in spiral rounds.
- Scissors.
Before you start: useful supplies for this amigurumi
Check yarn, eyes, stuffing, and accessories before crocheting so you do not get stuck halfway through the project.
- Cotton yarnPick similar colors before you start.View options
- Yarn needleEssential for sewing pieces and hiding ends.View options
- PinsUseful for positioning pieces before sewing.View options
- Safety noseA small detail that improves the finish.View options
- Safety eyesAdds a clean, even expression to the doll.View options
- amigurumi eyesA practical way to gather supplies quickly.View options
Links open Amazon searches related to each material.
If you have questions about yarns or tools, check our: complete guide to amigurumi materials
If you need help with color changes, you can see our step-by-step guide for changing color in amigurumi.
Abbreviations
- ROUND: round.
- ch: chain.
- MR: magic ring.
- sc: single crochet.
- sl st: slip stitch.
- hdc: half double crochet.
- dc: double crochet.
- tr: treble crochet.
- inc: increase.
- dec: decrease.
- x: repeat the instruction the indicated number of times.
You can review all the techniques in our guide to crochet abbreviations for amigurumi
Before You Start
- Read the entire pattern before beginning, because several pieces are added later during assembly.
- Use a stitch marker especially on the legs and body, since the joining point must be well centered.
- Do not stuff the wings or the feet, because the original pattern indicates that these pieces remain unstuffed.
- For the head, stuff as you crochet to keep the rounded shape and prevent the neck area from becoming loose.
- Before gluing or sewing the eyes, beak, hat, and cheeks, pin everything in place to check the symmetry.
Complete Step-by-Step Pattern
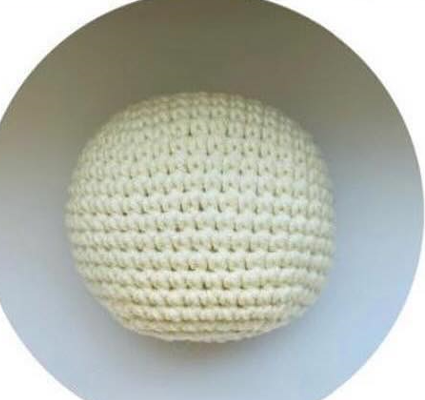
Head
Use yarn No. 03. Stuff the piece as you crochet.
Chain 9. Starting in the second ch from the hook, work:
ROUND 1: 7 sc, 3 sc in the same stitch, 6 sc, inc (18).
ROUND 2: inc, 6 sc, (inc) x3, 6 sc, (inc) x2 (24).
ROUND 3: 1 sc, inc, 6 sc, (1 sc, inc) x3, 6 sc, (1 sc, inc) x2 (30).
ROUND 4: 2 sc, inc, 6 sc, (2 sc, inc) x3, 6 sc, (2 sc, inc) x2 (36).
ROUND 5: 3 sc, inc, 6 sc, (3 sc, inc) x3, 6 sc, (3 sc, inc) x2 (42).
ROUND 6: 42 sc (42).
ROUND 7: 42 sc (42).
ROUND 8: 42 sc (42).
ROUND 9: 42 sc (42).
ROUND 10: 42 sc (42).
ROUND 11: 42 sc (42).
ROUND 12: 42 sc (42).
ROUND 13: 42 sc (42).
ROUND 14: 42 sc (42).
ROUND 15: 3 sc, dec, 6 sc, (3 sc, dec) x3, 6 sc, (3 sc, dec) x2 (36).
ROUND 16: 2 sc, dec, 6 sc, (2 sc, dec) x3, 6 sc, (2 sc, dec) x2 (30).
ROUND 17: 1 sc, dec, 6 sc, (1 sc, dec) x3, 6 sc, (1 sc, dec) x2 (24).
ROUND 18: dec, 6 sc, (dec) x3, 6 sc, (dec) x2 (18).
ROUND 19: (dec) x9 (9).
Leave a yarn tail to close the opening.
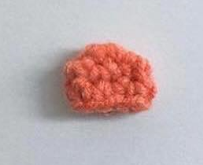
Beak
ROUND 1: 6 sc in MR (6).
ROUND 2: (2 sc, inc) x2 (9).
ROUND 3: 9 sc (9).
Work sl st, fasten off, and weave in the end.
Hat: Main Part
The original pattern presents the first round directly as follows:
ROUND 1: 7 sc, 3 sc in the same stitch, 6 sc, inc (18).
ROUND 2: inc, 6 sc, (inc) x3, 6 sc, (inc) x2 (24).
ROUND 3: 1 sc, inc, 6 sc, (1 sc, inc) x3, 6 sc, (1 sc, inc) x2 (30).
ROUND 4: 2 sc, inc, 6 sc, (2 sc, inc) x3, 6 sc, (2 sc, inc) x2 (36).
ROUND 5: 3 sc, inc, 6 sc, (3 sc, inc) x3, 6 sc, (3 sc, inc) x2 (42).
ROUND 6: 14 sc, 1 hdc, (dc) x6, 1 hdc, 13 sc, 1 hdc, (dc) x6 (42).
ROUND 7: 1 hdc, 13 sc, 1 hdc, (dc) x2, (tr) x2, (dc) x2, 1 hdc, 13 sc, 1 hdc, (dc) x2, (tr) x2, (dc) x2 (42).
ROUND 8: 1 hdc, 14 sc, 1 hdc, (dc) x2, tr inc, (dc) x2, 1 hdc, 14 sc, 1 hdc, (dc) x2, tr inc, (dc) x2 (44).
Work an additional hdc and sl st. Fasten off.

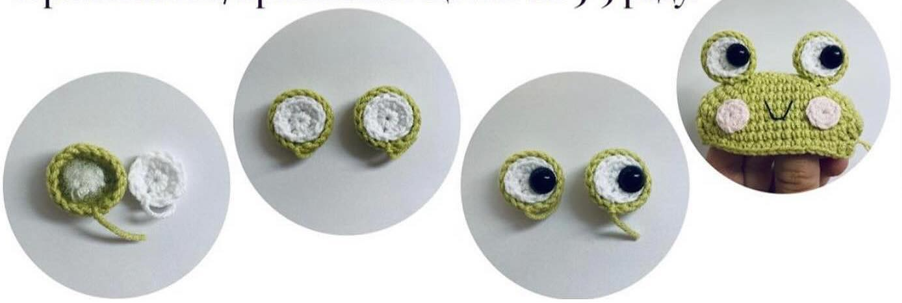
Hat Eyes
White Part
ROUND 1: 6 sc in MR (6).
ROUND 2: 6 inc (12).
Work sl st and fasten off.
Green Part
ROUND 1: 6 sc in MR (6).
ROUND 2: 6 inc (12).
ROUND 3: (1 sc, inc) x6 (18).
ROUND 4: 18 sc (18).
Work sl st and fasten off.
Cheeks
ROUND 1: 7 sc in MR (7).
Wings
Do not stuff the pieces.
Start crocheting with yarn No. 03.
ROUND 1: 6 sc in MR (6).
ROUND 2: 6 inc (12).
ROUND 3: 12 sc (12).
Change to color No. 29.
ROUND 4: (1 sc, inc) x6 (18).
Change to color No. 03.
ROUND 5: 18 sc (18).
Change to color No. 29.
ROUND 6: 18 sc (18).
Change to color No. 03.
ROUND 7: 18 sc (18).
ROUND 8: 18 sc (18).
ROUND 9: 18 sc (18).
ROUND 10: 18 sc (18).
ROUND 11: (1 sc, dec) x6 (12).
ROUND 12: 12 sc (12).
ROUND 13: (2 sc, dec) x3 (9).
ROUND 14: 9 sc (9).
Fold the edges of the piece together and crochet 4 sc to close.
Body and Legs
Right Leg
Crochet with yarn No. 76 or 72.
ROUND 1: 6 sc in MR (6).
ROUND 2: (1 sc, inc) x3 (9).
ROUND 3: 9 sc (9).
ROUND 4: inc, 8 sc (10).
ROUND 5: 5 sc, inc, 4 sc (11).
Fasten off.
Left Leg
Start crocheting with yarn No. 76 or 72.
ROUND 1: 6 sc in MR (6).
ROUND 2: (1 sc, inc) x3 (9).
ROUND 3: 9 sc (9).
ROUND 4: inc, 8 sc (10).
ROUND 5: 5 sc, inc, 4 sc (11).
ROUND 6: 11 sc (11).
Chain 5 and crochet to join the legs: 11 sc around the right leg, 5 sc along the joining chain, 11 sc around the left leg, and 5 sc along the joining chain. Place the marker to indicate the beginning of the round. There are 32 stitches in the round.
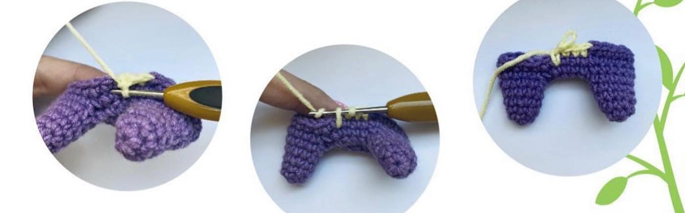
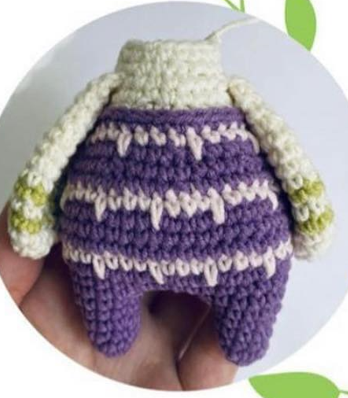
Body Continuation
ROUND 1: 32 sc (32).
ROUND 2: (3 sc, inc) x8 (40).
Change to color No. 74.
ROUND 3: (3 sc, 1 sc worked into the previous round) x10 (40).
Change to color No. 76 or 72.
ROUND 4: 40 sc (40).
ROUND 5: 40 sc (40).
ROUND 6: 40 sc (40).
Change to color No. 74.
ROUND 7: (3 sc, 1 sc worked into the previous round) x10 (40).
Change to color No. 76 or 72.
ROUND 8: 1 sc, dec, (8 sc, dec) x3, 7 sc (36).
ROUND 9: 5 sc, dec, (7 sc, dec) x3, 2 sc (32).
ROUND 10: 1 sc, dec, (6 sc, dec) x3, 5 sc (28).
Change to color No. 74.
ROUND 11: (3 sc, 1 sc worked into the previous round) x7 (28).
Change to color No. 76 or 72.
ROUND 12: 8 sc, dec, 12 sc, dec, 4 sc (26).
Change to color No. 03.
ROUND 13: Work through the bridge strand: 1 sc, dec, 11 sc, dec, 10 sc (24).
ROUND 14: 7 sc, dec, 10 sc, dec, 3 sc (22).
The wings are joined on ROUND 15.
ROUND 15: 6 sc, 4 sc crocheting through the wing, 7 sc, 4 sc crocheting through the wing, 1 sc (22).
ROUND 16: 1 sc, dec, 9 sc, dec, 8 sc (20).
ROUND 17: 6 sc, dec, 8 sc, dec, 2 sc (18).
Work an additional 7 sc, sl st, fasten off, and weave in the end.
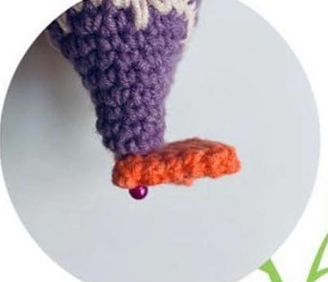
Feet
Do not stuff the pieces.
Chain 7. Starting in the second ch from the hook, work:
ROUND 1: On one side: 6 sc; on the other side: 4 sc, inc (12).
ROUND 2: 12 sc (12).
ROUND 3: 5 sc, dec, 3 sc, dec (10).
ROUND 4: 10 sc (10).
ROUND 5: 4 sc, dec, 4 sc (9).
ROUND 6: dec, 7 sc (8).
Gather the opening closed.
Hair Tuft
Make a main chain of 4 ch. In the second ch from the hook, work: 1 sc, 5 ch. Then crochet the tuft toward the main chain. Starting in the second ch from the hook: 4 sc, 1 sl st at the base of the tuft. Work the same way two more times. Fasten off.
Clover Neck Tie
Crochet a neck tie in the shape of a clover.
It consists of two parts: a chain of 18 ch that is tied around the neck and the three-leaf clover.
Clover: in MR, work 2 ch, (dc) x2, 2 ch, sl st in MR. Repeat the same instructions for the next two petals. Then crochet the stem, which consists of 5 ch. Fasten off.
Assembly and Finishing
Step 1: Glue the eyes between rounds 12 and 13 of the head, leaving a distance of 7 sc. Decorate the eyes with light blue or purple yarn.
Step 2: Sew the beak between rounds 13 and 14 of the head.
Step 3: Assemble and finish the hat. Lightly stuff the hat eyes. Glue or sew the white part of the eye to the green part. Glue the black half pearls, 1 cm in diameter, to one side. Glue the eyes from round 1 to round 3 of the hat. Embroider the smile on rounds 3 and 4. Glue or sew the cheeks between rounds 3 and 5.
Step 4: Pin the head to the body with sewing pins and sew it in place.
Step 5: Sew or glue the feet as shown in the photo from the original pattern.
Step 6: Place the clover neck tie around the neck.
Step 7: Put on the hat. On the side, tuck the hair tuft under the hat. Secure the hair tuft and the hat with glue or sew them in place.
Our little Clover is ready!
My Experience and Tips for Crocheting This Amigurumi
While reviewing and organizing this pattern, the first thing I recommend is paying close attention to tension. The head and the hat have a similar oval base, and if one piece turns out too loose, it may lose its rounded shape or not fit properly during assembly.
It is also worth paying attention to the body color changes. The rounds with stitches worked into the previous round are what create the decorative detail, so it is better to crochet them slowly so the design looks even and visible.
The wings and feet are not stuffed, so it is important not to crochet them too loosely. If they are too soft, they may look misshapen when sewn on. For the feet, gathering the opening firmly helps the final shape look neater.
During assembly, my advice is not to glue anything right away. First, position the eyes, beak, hat, cheeks, and feet with pins. Look at the doll from the front and from above to make sure the expression is centered. A tiny shift in the beak or eyes can change the face a lot.
If this amigurumi will be used by a small child, it is better to embroider the eyes and decorations instead of using glued pieces or half pearls. This makes the doll safer and more resistant to handling.
Frequently Asked Questions
Can I crochet this amigurumi with another type of yarn?
Yes, you can use another yarn, but the final size will change. If you use thicker yarn, the doll will be larger; if you use thinner yarn, it will be smaller. The important thing is to choose a hook that creates a tight fabric so the stuffing does not show through.
What should I do if the hat does not fit well over the head?
Check the tension of both pieces. If the hat is too small, it was probably crocheted more tightly than the head. If it is too loose, you can adjust it better when securing it with sewing, always making sure the hat eyes remain symmetrical.
Can the eyes be embroidered instead of glued?
Yes. For a safer version, especially if the doll will be handled by children, you can embroider the eyes and smile with black thread. You can also embroider the hat details instead of using half pearls.
Pattern Credits
Original pattern: CROCHET BY BЁLOUSOVA.
Did you make it? Leave me a comment or share it on social media using #PatternsAmigurumi so I can see it.
Leave a reply