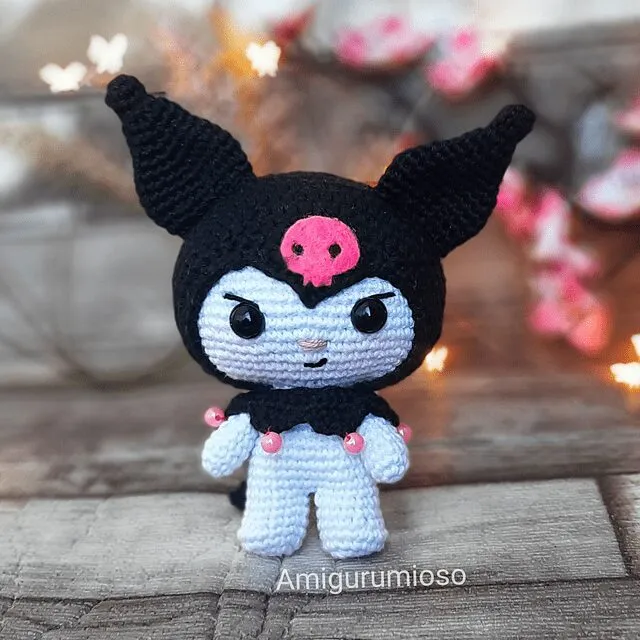
If you are looking for a crochet project with attitude, this Kuromi amigurumi pattern is full of personality. The design captures the black jester hood, pink skull detail and mischievous kawaii style of the Sanrio character.
This free pattern is by @amigurumioso. Please follow the creator and tag the author when sharing your finished doll.
Materials
- Very fine 100%cotton yarn in white and black. With 2.0 mm hook, the finished Kuromi measures about 14 cm.
Advertisement / affiliate link. As an Amazon Associate, I earn from qualifying purchases.
- 2.0 mm metal crochet hook.
- Pink or fuchsia felt for the skull, black felt for the eyes and pink felt for the nose.
- Optional 10 mm safety eyes and pink safety nose.
- 6 pink or fuchsia beads for the collar.
- Pink or fuchsia sewing thread.
- Fiberfill stuffing.
- Scissors, pins, glue, yarn needle and sewing needle.
Before you start: useful supplies for this amigurumi
Check yarn, eyes, stuffing, and accessories before crocheting so you do not get stuck halfway through the project.
- Safety noseA small detail that improves the finish.View options
- Safety eyesAdds a clean, even expression to the doll.View options
- Cotton yarnPick similar colors before you start.View options
- Yarn needleEssential for sewing pieces and hiding ends.View options
- Crochet hookThe right size keeps stitches firm and neat.View options
- PinsUseful for positioning pieces before sewing.View options
Links open Amazon searches related to each material.
For yarn and tool basics, see the amigurumi materials guide.
Abbreviations
- Rnd: round
- ch: chain
- MR: magic ring
- sc: single crochet
- hdc: half double crochet
- sl st: slip stitch
- dc: double crochet
- inc: increase
- dec: decrease
- BLO: back loop only
- FLO: front loop only
- triple dec: take 3 stitches and close them as 1
- triple inc: 3 stitches in the same stitch
You can review the terms in the crochet abbreviations guide for amigurumi.
Kuromi amigurumi pattern
Head, white
The head is worked from bottom to top in joined rounds. Close each round with sl st in the first stitch, chain 1 and start the new round in the same stitch.
Rnd 1: ch 16; from the 2nd ch work inc, 13 sc, 2 inc in the last ch. On the other side of the chain: 13 sc, inc. [34]
Rnd 2: 1 sc, inc, 14 sc, inc, 1 sc, inc, 14 sc, inc. [38]
Rnd 3: 2 sc, inc, 15 sc, inc, 2 sc, inc, 15 sc, inc. [42]
Rnd 4: 3 sc, inc, (6 sc, inc) x5, 3 sc. [48]
Rnd 5: (7 sc, inc) x6. [54]
Rnd 6: 4 sc, inc, (8 sc, inc) x5, 4 sc. [60]
Rnd 7: (9 sc, inc) x6. [66]
Rnd 8-13: 66 sc. [66]
Rnd 14: (9 sc, dec) x6. [60]
Rnd 15: 60 sc. [60]
Rnd 16: 4 sc, dec, (8 sc, dec) x5, 4 sc. [54]
Rnd 17: 54 sc. [54]
Place 10 mm safety eyes between rounds 7 and 8, with 8 visible stitches between them. You can also embroider the eyes or use felt.
Rnd 18: (7 sc, dec) x6. [48]
Rnd 19: 48 sc. [48]
Rnd 20: 3 sc, dec, (6 sc, dec) x5, 3 sc. [42]
Rnd 21: (5 sc, dec) x6. [36]
Rnd 22: 2 sc, dec, (4 sc, dec) x5, 2 sc. [30]
Stuff firmly.
Rnd 23: (3 sc, dec) x6. [24]
Rnd 24: 1 sc, dec, (2 sc, dec) x5, 1 sc. [18]
Rnd 25: (1 sc, dec) x6. [12]
Rnd 26: 6 dec. [6]
Close with the yarn needle through the front loops of the 6 stitches, pull tight and fasten off.
Hood, black
Work in joined rounds using hdc.
Rnd 1: MR with 8 hdc. [8]
Rnd 2: 8 hdc inc. [16]
Rnd 3: (1 hdc, hdc inc) x8. [24]
Rnd 4: (2 hdc, hdc inc) x8. [32]
Rnd 5: (3 hdc, hdc inc) x8. [40]
Rnd 6: (4 hdc, hdc inc) x8. [48]
Rnd 7: (5 hdc, hdc inc) x8. [56]
Rnd 8: (6 hdc, hdc inc) x8. [64]
Rnd 9-12: 64 hdc. [64]
Rnd 13: (6 hdc, hdc dec) x8. [56]
Rnd 14: (5 hdc, hdc dec) x8. [48]
Rnd 15: (4 hdc, hdc dec) x8. [40]
Fasten off. Leave the join at the base and mark 7 stitches at the top center for the hood point.
Hood point
Attach black yarn and work in rows, chaining and turning.
Row 1: 7 hdc. [7]
Row 2: hdc triple dec, 1 hdc, hdc triple dec. [3]
Row 3: hdc triple dec. [1]
Finish with a chain and crochet sc around the hood edge, about 45 sc. Leave a long tail to sew the hood to the face.
Ears, make 2
Rnd 1: MR with 6 sc. [6]
Rnd 2: (1 sc, inc) x3. [9]
Rnd 3: 1 sc, 4 dec. [5]
Rnd 4: 5 inc. [10]
Rnd 5: 10 sc.
Rnd 6: inc, 9 sc. [11]
Rnd 7: inc, 10 sc. [12]
Rnd 8: (2 sc, inc) x4. [16]
Rnd 9: (3 sc, inc) x4. [20]
Rnd 10: 20 sc.
Rnd 11: (4 sc, inc) x4. [24]
Rnd 12: 24 sc.
Rnd 13: (2 sc, dec) x6. [18]
Rnd 14: 18 sc.
Close and leave a long tail. Sew without stuffing.
Legs and body
Use white yarn and joined rounds.
Rnd 1: MR with 6 sc. [6]
Rnd 2: 6 inc. [12]
Rnd 3: 4 sc, 4 inc, 4 sc. [16]
Rnd 4: 16 sc.
Rnd 5: 4 sc, 4 dec, 4 sc. [12]
Rnd 6-7: 12 sc. [12]
Join the legs with 1 ch. The right leg should be the last one made so the join stays at the back.
Rnd 8: 12 sc around the first leg, inc in the chain, 12 sc around the second leg, inc on the other side of the chain. [28]
Rnd 9-11: 28 sc. [28]
Rnd 12: (12 sc, dec) x2. [26]
Rnd 13-15: 26 sc. [26]
Rnd 16: (11 sc, dec) x2. [24]
Rnd 17: 24 sc.
Arms, make 2
Rnd 1: MR with 6 sc. [6]
Rnd 2: (1 sc, inc) x3. [9]
Rnd 3: 9 sc.
Rnd 4: dec, 7 sc. [8]
Rnd 5-7: 8 sc. [8]
Collar and final details
With black yarn, work in rows.
Row 1: ch 28; from the 2nd chain work (8 sc, inc) x3. [30]
Row 2: 5 sc, turn.
Row 3: dec, 1 sc, dec. [3], turn.
Row 4: triple dec. [1]
Row 4A: Go down the side with sc to repeat the process and form the 6 points.
Tail
Rows 1-7: 2 sc over the initial 3 chains, for 6 rows.
Rows 8-11: form the arrow tip with triple increases and triple decreases following the original instructions.
Assembly
Sew all pieces. Cut the pink felt skull and glue it to the forehead. Embroider eyelashes, mouth and nose. Add blush to the cheeks for the final kawaii touch.
Experience and tips
The key to a neat Kuromi is the hood tension. Hdc fabric is more elastic than sc, so keep a firm tension so the hood does not sit loosely over the white head. Pin the hood point exactly between the eyes before sewing. For the cheeks, a little dry blush or eye shadow applied with a soft brush gives a very sweet finish.
Frequently asked questions
What materials do I need for Kuromi?
You need fine cotton yarn in white and black, a 2.0 mm hook, stuffing, felt for details, a yarn needle and scissors. Safety eyes and a safety nose are optional.
What skill level is this project?
It is best for intermediate crocheters because it uses precise increases, decreases and joined rounds. If you know the magic ring and basic stitches, you can follow it step by step.
How tall is the finished doll?
With very fine cotton yarn and a 2.0 mm hook, Kuromi measures about 14 cm. Size may vary with yarn, hook and tension.
Where should I place the safety eyes?
Place 10 mm eyes between rounds 7 and 8 of the head, with 8 visible stitches between them. Secure them before closing the head.
Do the ears need stuffing?
No. The ears are designed to keep their shape without stuffing and should be sewn directly to the head.
Notice: This pattern is an original design by @amigurumioso and is shared here for educational and creative purposes. All credit belongs to the creator.

Leave a reply