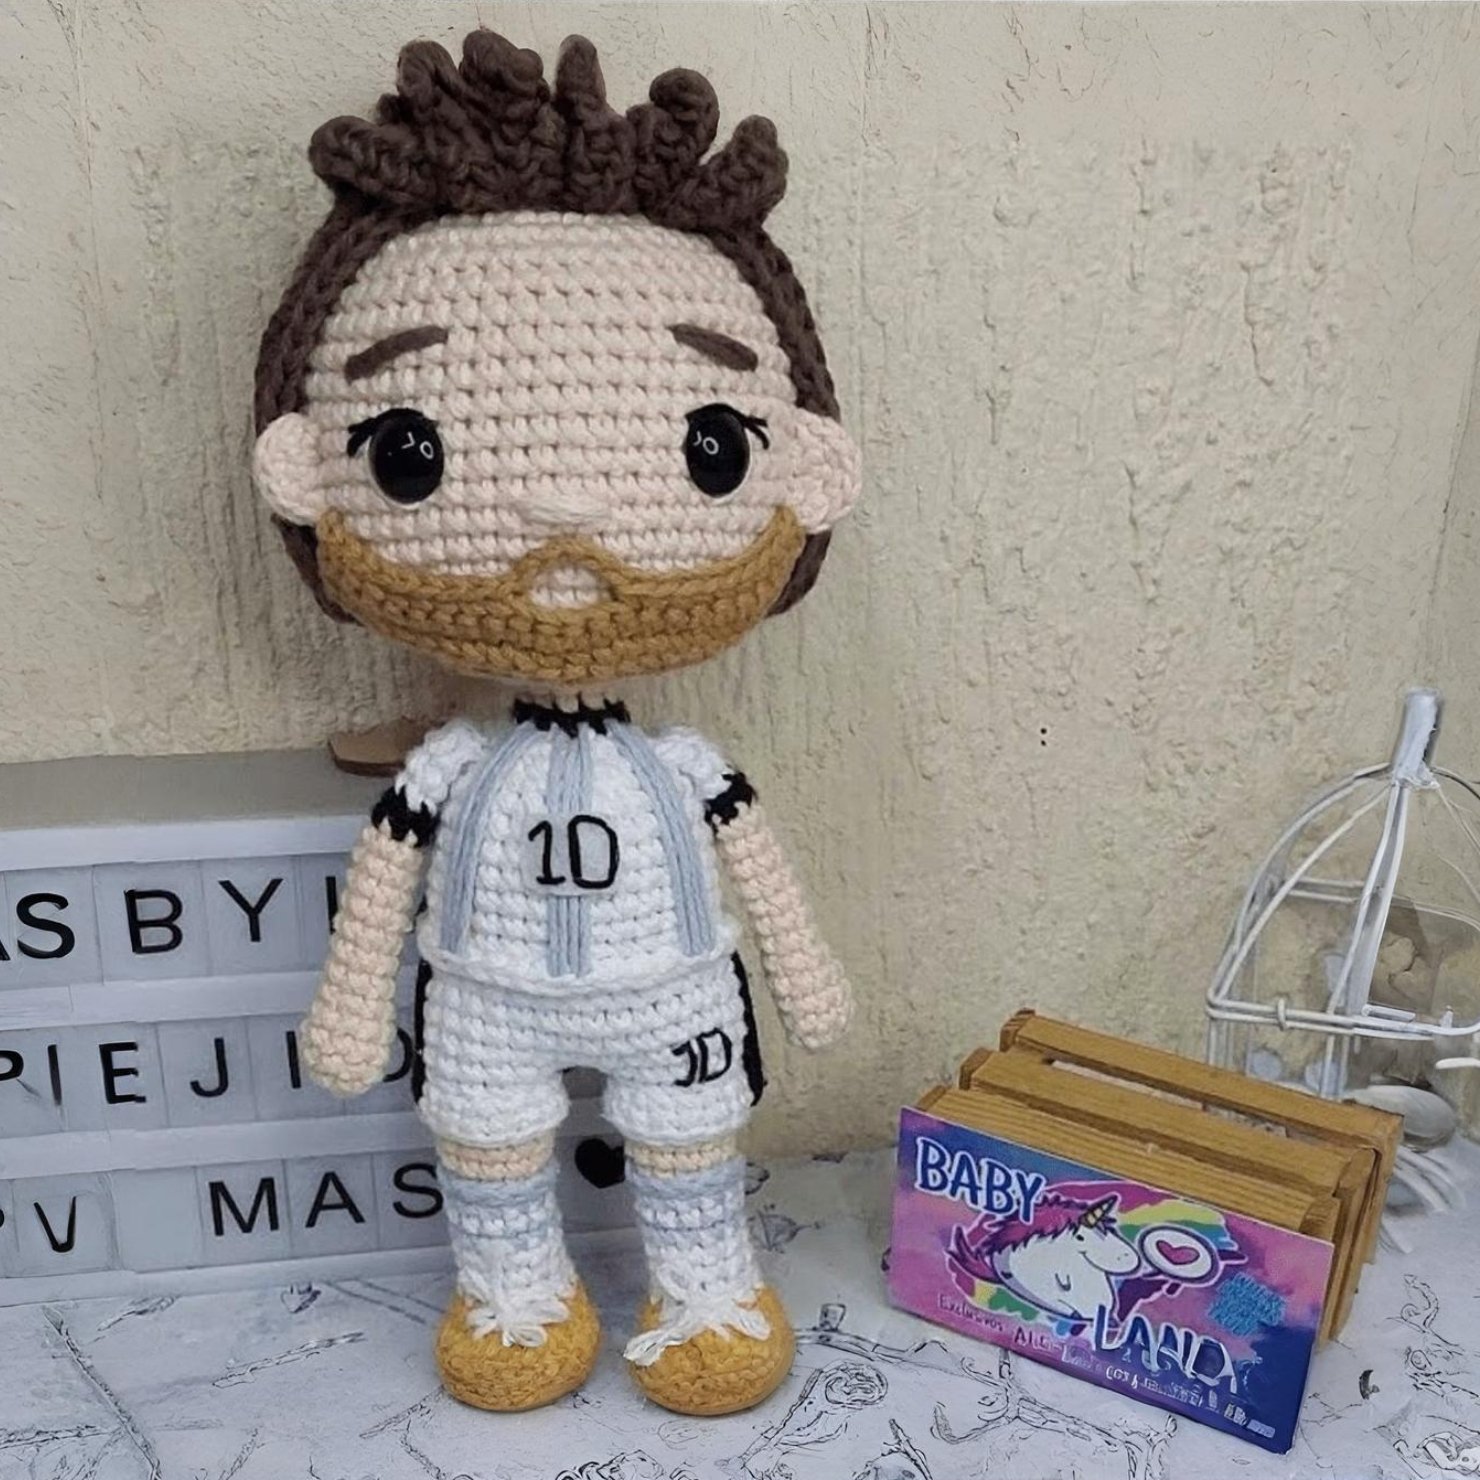
If you are a football fan and love handmade projects, this crocheted doll will delight you. Here you will find a Lionel Messi amigurumi toy explained step by step, with all its rounds included so you can crochet it without missing any important part of the original pattern. It is a great project for anyone who enjoys making recognizable characters full of personality in crochet.
Lionel Messi is one of the most admired football players in the world, loved for his talent, his story and his huge impact on the sport. That is why this amigurumi design is so special: it combines the details of his uniform, beard, hairstyle and features to create a very charming and easy-to-recognize crocheted version.
This pattern is a design by BABYLAND TEJIDOS ESCLUSIVOS.
Materials
- Hilaza Abuelita yarn in mustard, white, blue, sky blue, skin tone, black, coffee brown and tobacco brown.
- 14 mmsafety eyes.
Advertisement / affiliate link. As an Amazon Associate, I earn from qualifying purchases.
- Black and white embroidery thread.
- 3 mm crochet hook.
- Silicone fiberfill.
Before you start: useful supplies for this amigurumi
Check yarn, eyes, stuffing, and accessories before crocheting so you do not get stuck halfway through the project.
- Safety eyesAdds a clean, even expression to the doll.View options
- Crochet hookThe right size keeps stitches firm and neat.View options
- embroidery threadA practical way to gather supplies quickly.View options
- Safety noseA small detail that improves the finish.View options
- amigurumi eyesA practical way to gather supplies quickly.View options
- plastic eyesA practical way to gather supplies quickly.View options
Links open Amazon searches related to each material.
If you have questions about yarns or tools, see our complete amigurumi materials guide.
Abbreviations
- V: Round
- Cad: Chain
- Am: Magic ring
- Pb: Single crochet
- Pm: Half stitch
- Pd: Slip stitch
- Pa: Double crochet
- Pma: Half double crochet
- Aum: Increase
- Dis: Decrease
- BLO: back loop only
- FLO: front loop only
The original pattern also uses “Cd”, which is standardized here as Cad.
You can review all the techniques in our crochet abbreviations guide for amigurumi.
Pattern
Start with the feet using mustard yarn and the 3 mm hook.
ROUND 1: Make 6 Cad. Starting from the second chain, make Pb in each chain until you have 4 Pb; then make 3 Aum together, work along the other side with 3 Pb, and in the last chain make 1 Aum. Total: 12 Pb.
ROUND 2: 1 Aum, 3 Pb, 3 Aum, 3 Pb, 2 Aum (18 Pb).
ROUND 3: 2 Pb, 2 Aum, 3 Pb, 3 Aum, 3 Pb, 2 Pb, 2 Aum (24 Pb).
ROUND 4: BLO 24 Pb.
ROUNDS 5-6: 24 Pb.
Cut a cardboard or plastic template the size of the sole and glue it with hot silicone.
ROUND 7: 4 Pb, 8 Dis, 4 Pb (16 Pb).
In the last stitch, change to white.
ROUND 8: 4 Pb, 3 Dis, 4 Pb, 1 Dis (12 Pb).
ROUND 9: BLO 12 Pb.
Stuff as you continue working.
ROUNDS 10-11: 12 Pb.
Change to sky blue.
ROUND 12: 12 Pb.
In the last stitch, change again to white.
ROUND 13: 12 Pb.
In the last stitch, change again to sky blue.
ROUND 14: 12 Pb.
In the last stitch, change to skin tone.
ROUND 15: BLO 12 Pb.
ROUNDS 16-17: 12 Pb.
For the sock detail, take the blue yarn and work 12 Pd on round 14. Leave a long tail so you can hide it with a needle.
ROUND 18: 1 Aum, 11 Pb (13 Pb).
In the last stitch, change to white.
ROUND 19: 13 Pb.
Cut the yarn. Make the other little leg the same way. On the second leg, do not cut the yarn.
Now make the shorts detail: take the back side of the leg with white yarn and make 8 Pb, 1 Aum, then continue with Pb until the end of the round (14 Pb), close with Pd. Lift 1 Cad and make 14 Pb, close with Pd. Lift 1 Cad and make 14 Pb, close with Pd. Leave a long tail so you can hide it with a needle.
Continue on the right leg from the tail you left. Make 5 Pd, make 3 Cad and join to the other leg.
ROUND 20: Work stitch over stitch, 32 Pb, all the way around.
ROUNDS 21-24: 32 Pb.
ROUND 25: 14 Pb, 1 Dis, 14 Pb, 1 Dis (30 Pb).
ROUND 26: BLO 30 Pb.
Make the shorts details with black yarn, working 3 lines along the side of the shorts, and embroider the number 10 with embroidery thread.
With a small piece of white yarn, make the shoelace.
ROUND 27: FLO 14 Pb, 1 Aum, 14 Pb, 1 Aum (32 Pb). Close with Pd.
Leave a long tail and hide the yarn with a needle.
ROUNDS 28-32: 32 Pb.
ROUND 33: 13 Pb, 1 Dis, 13 Pb, 1 Dis (28 Pb).
ROUND 34: 5 Pb, 1 Dis x 4 times (24 Pb).
ROUND 35: 4 Pb, 1 Dis x 4 times (20 Pb).
ROUND 36: 3 Pb, 1 Dis x 4 times (16 Pb).
In the last stitch, change to black.
ROUND 37: 2 Pb, 1 Dis x 4 times (12 Pb).
In the last stitch, change to skin tone.
ROUND 38: BLO 12 Pb.
ROUND 39: 12 Pb.
ROUND 40: 12 Aum (24 Pb).
Before continuing with the head, mark the shirt details. Each side is separated by 4 stitches. Mark them with sky blue yarn.
ROUND 41: 3 Pb, 1 Aum x 6 times (30 Pb).
ROUND 42: 4 Pb, 1 Aum x 6 times (36 Pb).
ROUND 43: 5 Pb, 1 Aum x 6 times (42 Pb).
ROUND 44: 6 Pb, 1 Aum x 6 times (48 Pb).
ROUND 45: 7 Pb, 1 Aum x 6 times (54 Pb).
ROUNDS 46-58: 54 Pb, stitch over stitch.
Place the eyes on round 50, with 10 stitches between them. On round 48, place the nose with a length of 3 stitches. Take the 3 center stitches and pass the yarn around 4 or 5 times. Mark the eyelashes with black embroidery thread and pass white embroidery thread through the outer half of each eye. For the eyebrows, embroider them in coffee brown, going up 3 rounds from the eye and taking 4 stitches in length.
ROUND 59: 4 Pb, 1 Dis x 9 times (45 Pb).
ROUND 60: 3 Pb, 1 Dis x 9 times (36 Pb).
ROUND 61: 2 Pb, 1 Dis x 9 times (27 Pb).
Stuff the head very well.
ROUND 62: 1 Pb, 1 Dis x 9 times (18 Pb).
ROUND 63: 1 Pb, 1 Dis x 6 times (12 Pb).
ROUND 64: 6 Dis (6 Pb).
Finish closing with a needle.
Arms: skin tone x 2
ROUND 1: Am 5 Pb.
ROUND 2: 5 Aum (10 Pb).
ROUNDS 3-5: 10 Pb.
ROUND 6: 3 Pb, 1 Dis, 3 Pb, 1 Dis (8 Pb).
ROUNDS 7-13: 8 Pb.
In the last stitch, change to black.
ROUND 14: 8 Pb.
In the last stitch, change to white.
ROUND 15: BLO 8 Pb.
ROUNDS 16-17: 8 Pb.
They are not stuffed.
ROUND 18: Fold in half and close with 4 Pb.
Leave a long tail to sew it to the body.
Ears: skin tone x 2
ROUND 1: Am 4 Pb.
ROUND 2: 4 Aum (8 Pb).
Leave a long tail to sew it to the body.
Beard: tobacco brown
ROUND 1: 25 Cad.
ROUND 2: Starting from the second chain, make 24 Pb, turn.
ROUND 3: Turn and make 24 Pb.
ROUND 4: Turn, make 1 Cad and skip the first stitch, make 1 Dis, continue with Pb (22 Pb).
ROUND 5: Turn and make 9 Pb, 6 Cad, skip 4 base stitches and continue with 9 Pb.
Leave a long tail to sew it to the body.
Hair: coffee brown
ROUND 1: Am 6 Pb.
ROUND 2: 6 Aum (12 Pb).
ROUND 3: 1 Pb, 1 Aum x 6 times (18 Pb).
ROUND 4: 2 Pb, 1 Aum x 6 times (24 Pb), close with a Pd.
ROUND 5: 18 Cad. Starting from the third chain, make 16 Pma.
ROUND 6: 18 Cad and return from the third chain, again making 16 Pma.
Continue this way until you have 24 strands of 16 Pma and close with a Pd.
Sew or glue it to the head; see the video tutorial.
Now make the final detail on a small piece of white felt and embroider the number 10 with black embroidery thread. Cut it out and glue it to the center of the chest.
And there you have it: your own handmade Lionel Messi amigurumi. This project is not only fun, it is also a great way to show your love for football and handmade crafts. We hope you enjoy making your Lionel Messi amigurumi step by step with this free pattern. Do not forget to share your creations with us.
Video tutorial
https://www.youtube.com/watch?v=3a1P7_pKY8I
Crochet tips and experience
When I crochet characters like Messi, I like to pay close attention to the color changes in the uniform and to the facial details, because those are what make the character recognizable right away. In my experience, it is best to stuff the legs, body and head gradually so the doll keeps a firm shape without deforming. I also recommend marking the placement of the beard, hair and ears before sewing or gluing them permanently, because that helps a lot with a more natural expression. In a design with so many embroidered details, taking your time with the shorts lines, the number 10 and the eyebrows makes a big difference in the final finish.
Frequently asked questions
Is this Messi amigurumi pattern suitable for beginners?
It has several color changes, embroidery details and assembly steps, so it is more comfortable for crocheters who already have a basic amigurumi foundation. Even so, if you follow each round calmly, it can be crocheted very well.
Is it crocheted in one piece?
Yes. The pattern itself indicates that it is crocheted from the feet to the head in one piece, and then the arms, ears, beard and hair are added separately.
Which part needs the most care?
The uniform color changes, the shorts details and the face usually require the most attention. I recommend working those parts slowly for a neat finish.
Is the hair sewn or glued?
The pattern allows either option. You can sew it or glue it, depending on what feels more comfortable or the finish you prefer.
How do I make the doll firm?
The key is to stuff gradually and evenly, especially in the feet, body and head, so the figure keeps a good posture without losing shape.
Did you crochet it? Leave a comment or share it on social media using #PatternsAmigurumi so I can see it.
Special thanks to BABYLAND TEJIDOS ESCLUSIVOS for creating and sharing this beautiful Lionel Messi design with the crochet and amigurumi community.
Notice: This pattern is an original design by BABYLAND TEJIDOS ESCLUSIVOS and is shared here as a translation for educational and reference purposes only. All credit belongs to the creator.

Leave a reply