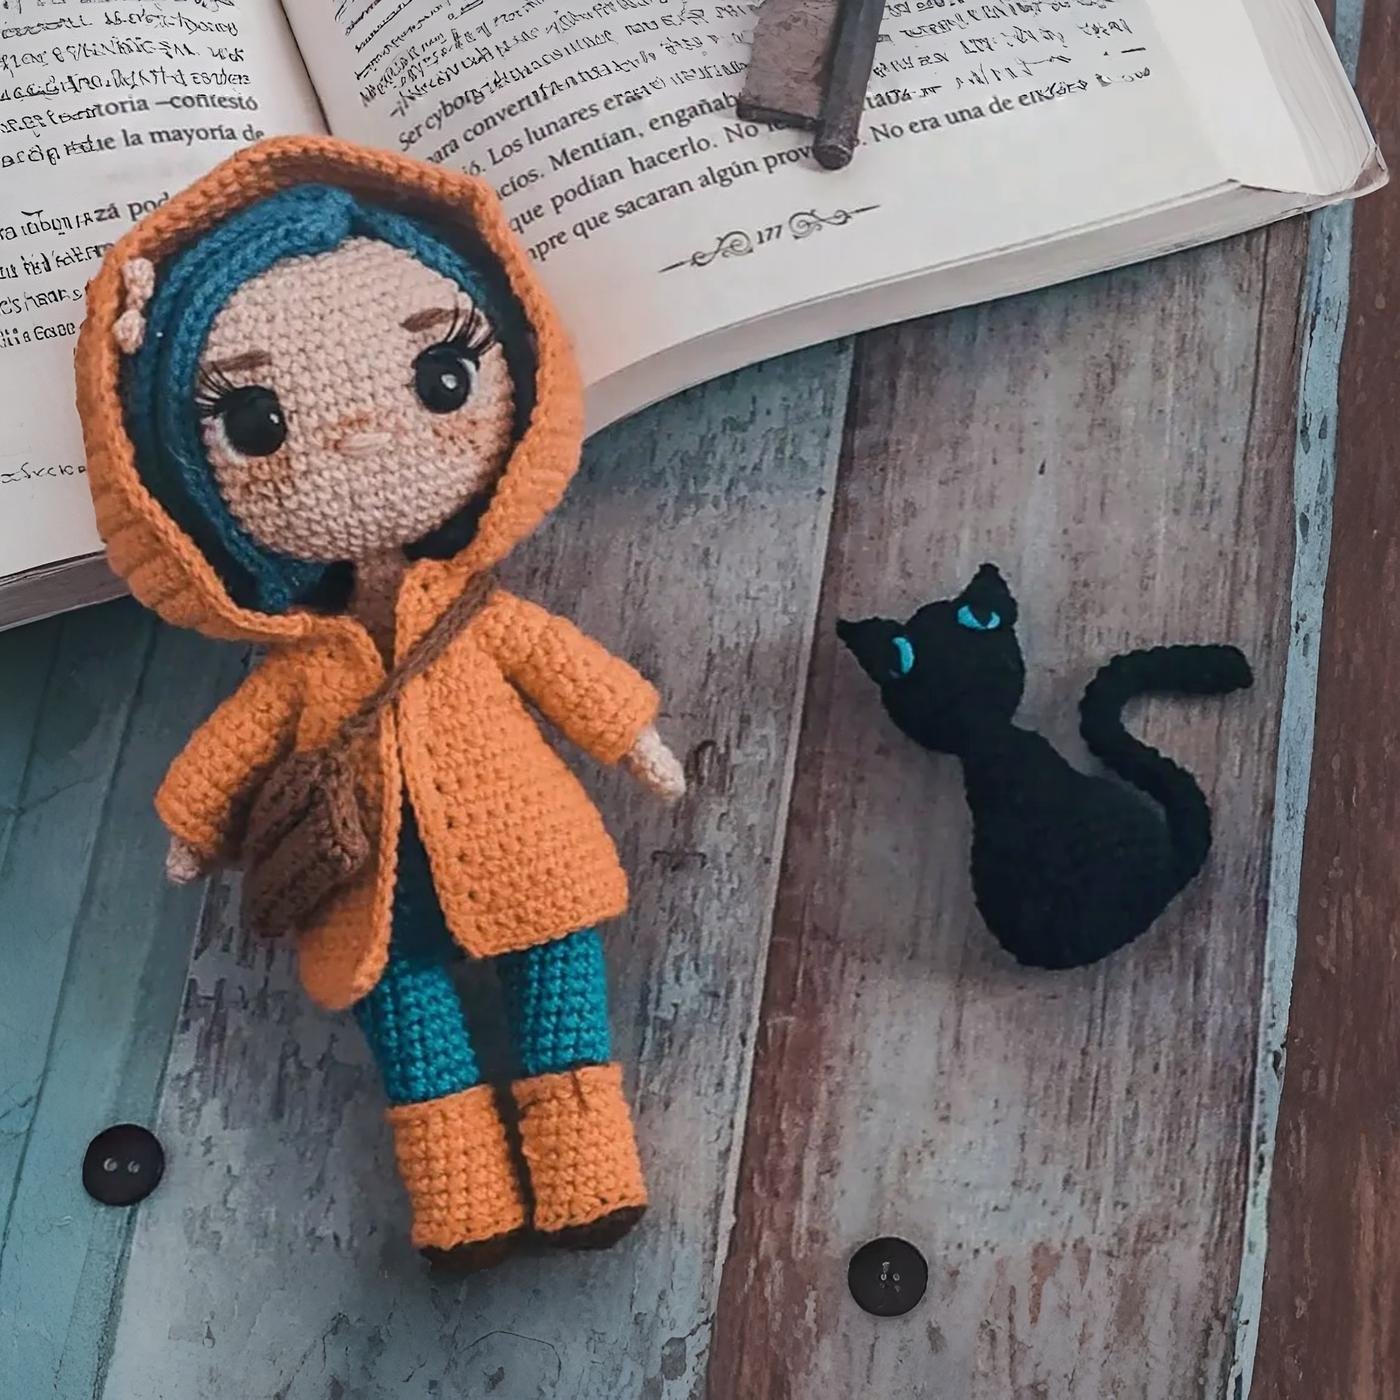
这份免费的 Coraline 阿米古鲁米图解,把黄色雨衣、蓝色头发和小配件整理成清晰的步骤。
原设计来自 @calypso.boutiquee。可以制作并分享成品,但不要出售图解,并请保留设计师署名。
材料
- 细款 100%棉线:奶油色、深蓝、靛蓝、黄色、橙色、粉色、浅棕和深棕
广告 / 联盟链接。作为 Amazon Associate,我可能会从符合条件的购买中获得佣金。
- 1.2 mm 钩针
- 8 mm 安全眼
- 软铁丝或毛根,可选
- 填充棉
- 假睫毛
- 腮红或粉彩
- 缝合针、剪刀和记号扣
针法缩写
- 圈: 钩织圈数
- 锁针: 起针链
- 环起: 环形起针
- 短针: 基础短针
- 中长针: 中长针
- 长针: 长针
- 长长针: 长长针
- 加针: 同一针内钩 2 针
- 减针: 两针并一针
- 引拔针: 引拔收针
- BLO: 只钩后半针
- FLO: 只钩前半针
逐步图解
手臂
- 手臂 x2, 开始 用 肤色. 环起, 6 短针 [6]
- (2 短针, 加针) x2 [8]
- 圈 3-4: 8 短针
- 第 5: 换成 pink, BLO, (3 短针, 加针) x2 [10]
- 第 6: 10 短针
- 圈 7-8: 换成 orange, 10 短针
- 圈 9-10: 换成 pink, 10 短针
- 圈 11-12: 换成 orange, 10 短针
- 圈 13-14: 换成 pink, 10 短针
- 圈 15-16: 换成 orange, 10 短针. 收线。 Add pipe cleaner only if desired and safe for the final use.
腿和身体
- 腿 x2, 开始 深棕色. 环起, 6 短针 [6]
- 6 加针 [12]
- (1 短针, 加针) x6 [18]
- 用 yellow, 钩织 18 引拔针 in BLO as a decorative half 圈.
- 第 4: BLO, 6 短针, 3 减针, 6 短针 [15]
- 圈 5-10: 15 短针
- 第 11: FLO, 15 短针
- 连接 indigo blue to the back loops from 圈 10: 15 短针. Then 钩织 (3 短针, 减针) x3 [12].
- 圈 13-18: 12 短针. 完成 only one leg. On the second leg, 钩织 3 锁针 and 连接 to continue the 身体.
- 身体 R19: 11 短针 on one leg, 3 短针 on 锁针, 12 短针 on other leg, 3 短针 on 锁针 [30]
- 第 20: (4 短针, 加针) x6 [36]
- 圈 21-27: shape the waist 用 two side increases, then 减针 to 30 针.
- 第 28: (4 短针, 减针) x5 [25]; then 换成 pink and 钩织 25 引拔针 in BLO.
- 圈 29-36: alternate pink and orange stripes, decreasing to 16 针.
- 第 37: 连接 the 压平的 手臂 to the 身体, keeping 16 针 a圈.
- 第 38: (2 短针, 减针) x4 [12]; 换成 肤色 for neck 圈 39-41, ending 用 8 针.
头部、头发和耳朵
- 头部 R1: FLO, 8 加针 [16]
- 加针 each 圈 to 24, 32, 40, 48, 54 and 60 针.
- 圈 8-17: 60 短针. 放置 the 8 mm 安全眼 在之间 圈 13 and 14, 10 针 apart.
- 减针 from 圈 18 to 圈 26 until 6 针 remain. 收线。
- Hair: in dark blue, 环起, 8 短针; 8 加针; (1 短针, 加针) x8; (2 短针, 加针) x8 [32].
- Strands 1-22: 26 锁针, then 1 短针 and 24 中长针.
- Strands 23-25: 32 锁针, then 1 短针 and 30 中长针. Leave 7 针 un钩织ed and 缝合 the longer strands to the side.
- 耳朵 x2: 环起, 5 短针; 5 加针 [10]. 留长线用于缝合。 缝合 to the 两侧 of the 头部.
雨衣、帽子、包和萤火虫
- 雨衣: 用 yellow, 25 锁针, then 24 短针. 钩织 the armhole 行 用 6-锁针 openings and increases to 28 针.
- Continue the coat 用 28, 32, 36 and 40 针 行 as in the original shaping, keeping the 边缘s even.
- 钩织 短针 a圈 the coat 边缘 and sleeves. Sleeves: 连接 yellow to the un钩织ed armhole 针, 钩织 14 to 16 针 for 11 圈.
- 帽子: 连接 线 at the marked 针; 加针 from 30 to 50 针 and 钩织 15 圈 at 50 针.
- For the hood extension, 钩织 18 针, 加针 to 20 and then 22 针, and continue until the hood has enough depth.
- 包: 用 light b行n, 9 锁针, 8 短针; 钩织 14 行, shape flap, 钩针 a圈 the rectangle, 对折 in thirds and 缝合.
- 萤火虫: blue base of 9 锁针 用 引拔针, 短针, 中长针 and 长针; add pink wings on both 两侧 and 缝合 or glue to the hair.
缝合前提示
- 缝合前先用珠针固定头发和帽子,脸部会更平衡。
- 腿、脖子和头部分次填充,避免结块。
- 如果玩偶给儿童使用,建议不要加入内部铁丝。
常见问题
Coraline 适合新手吗?
它有很多小部件和换色,更适合已经掌握基础针法的钩织者。
可以换其他线材吗?
可以,但尺寸会改变。钩针要足够小,让针目紧密。
头发怎样更整齐?
先把所有发束固定好,再缝合,较长的发束放到一侧。
可以不用铁丝吗?
可以。不使用铁丝会让玩偶更柔软,也更适合儿童。
署名与说明
原设计署名:@calypso.boutiquee。
开始前:这个 amigurumi 的实用材料
开始钩织前先查看毛线、眼睛、填充棉和配件,避免做到一半才缺材料。
- 棉线开始前先选择相近颜色。查看选项
- 钩针合适尺寸能让针目更紧实。查看选项
- 填充棉柔软填充让造型更稳定。查看选项
- 记号扣帮助记录圈数和加针位置。查看选项
- 缝合针用于缝合部件和藏线。查看选项
- 珠针缝合前固定位置很方便。查看选项
链接会打开与每种材料相关的 Amazon 搜索。

发表评论