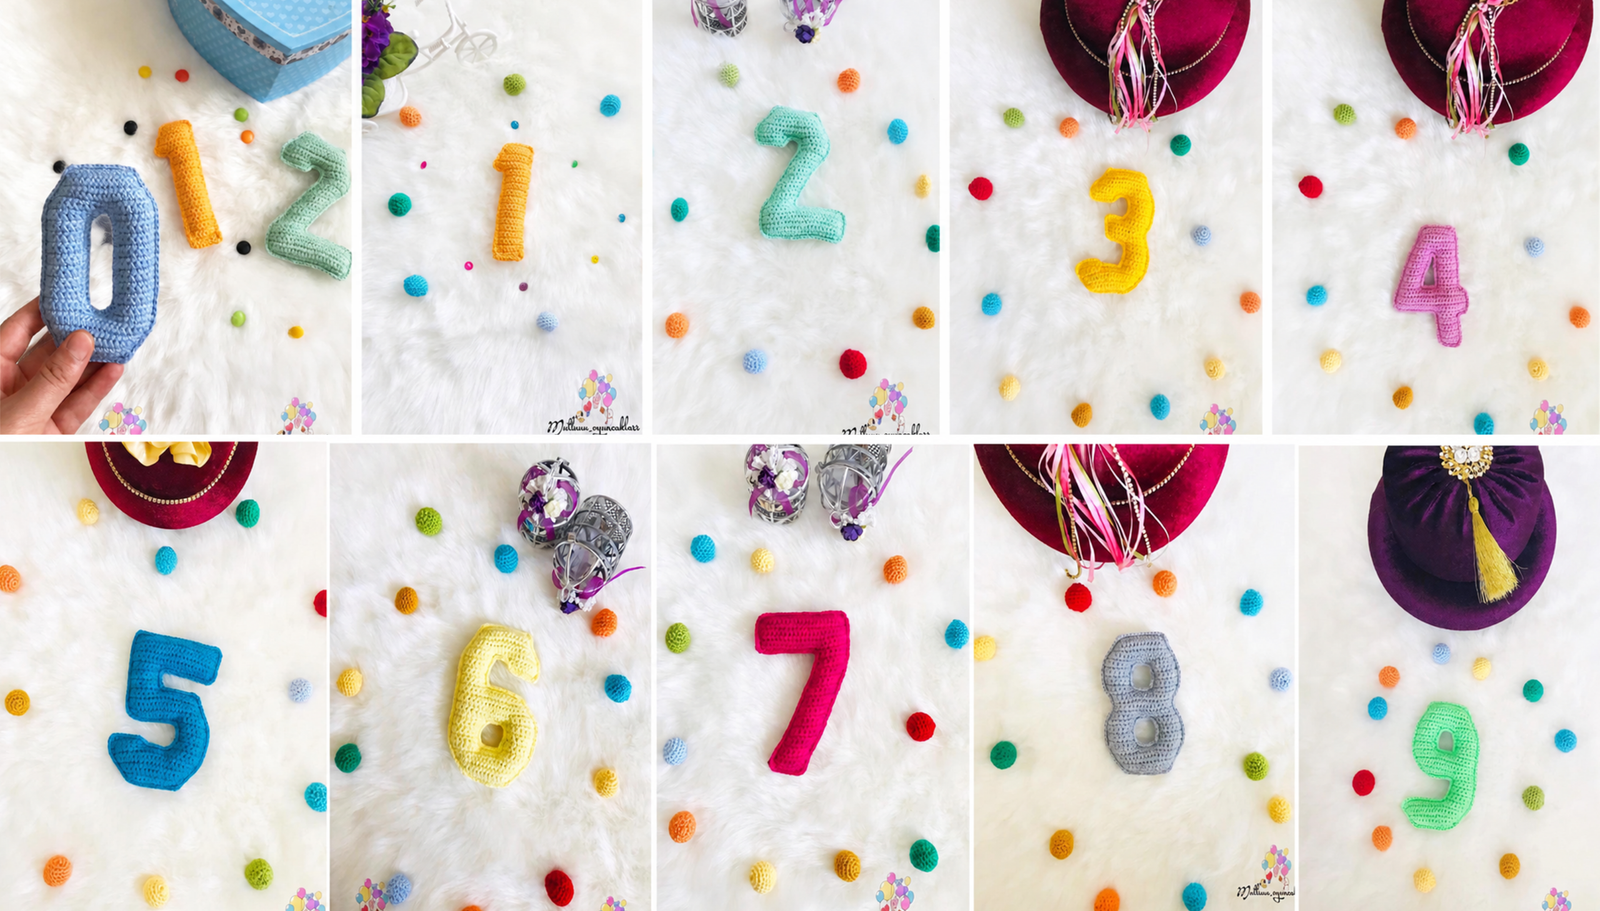
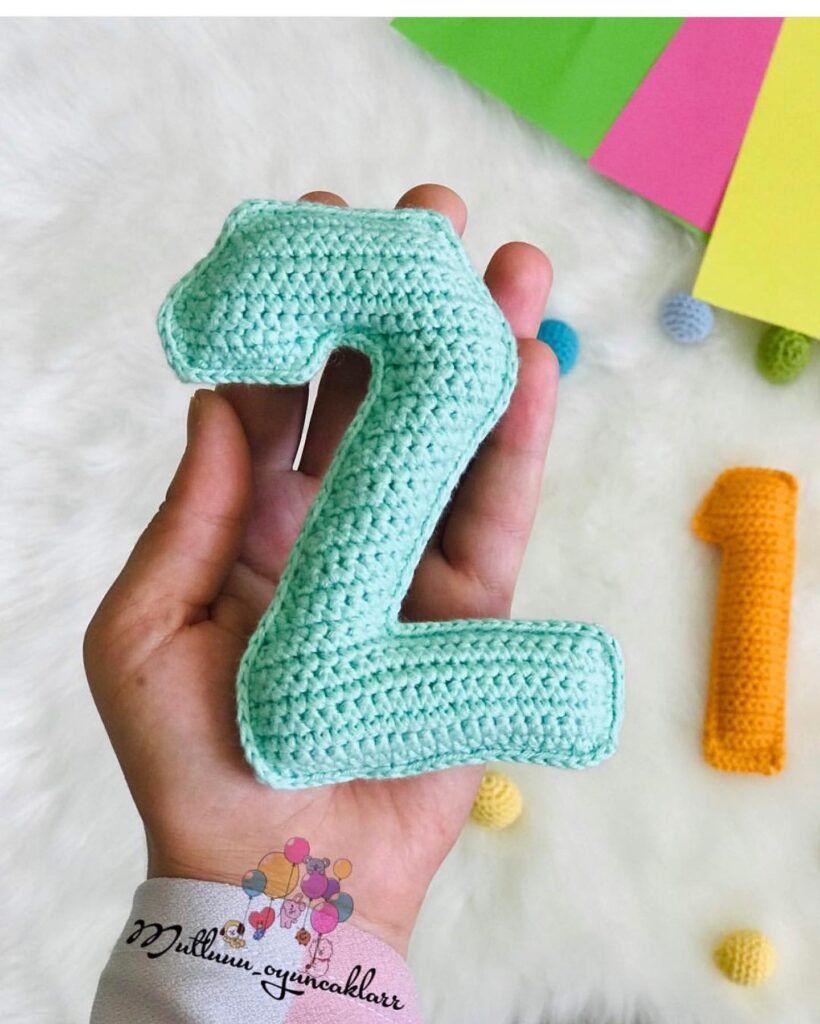
Tejer números amigurumi es una idea preciosa para crear un muñeco tejido didáctico, suave y lleno de color. Este juguete amigurumi del 0 al 9 es perfecto para que los niños aprendan jugando, para decorar cumpleaños, preparar guirnaldas infantiles o hacer regalos personalizados con mucho amor. En este patrón encontrarás el paso a paso completo para tejer cada número a crochet, con sus piezas, uniones y detalles de armado.
Materiales
- Hilo Gazzal Baby Cotton o Gazzal Baby Cotton XL.
- Aguja de crochet de 2.50 mm.
Publicidad / enlace de afiliada. En calidad de Afiliado de Amazon, obtengo ingresos por las compras adscritas que cumplen los requisitos aplicables.
- Relleno tipo vellón siliconado.
- Aguja lanera.
- Tijera.
- Marcadores de punto, opcional.
- Alfileres, opcional, para enfrentar las piezas antes de unir.
Antes de empezar: materiales útiles para este amigurumi
Revisá hilos, ojos, relleno y accesorios antes de tejer, así no te quedás a mitad del proyecto.
- Hilo de algodónElegí colores similares antes de empezar.Ver opciones
- Aguja de crochetLa medida correcta ayuda a que el punto quede firme.Ver opciones
- Relleno para amigurumiRelleno suave para dar forma sin deformar.Ver opciones
- Marcadores de puntoMuy útiles para no perder vueltas ni aumentos.Ver opciones
- AlfileresAyudan a presentar las piezas antes de coser.Ver opciones
- Aguja laneraClave para coser piezas y esconder hebras.Ver opciones
Los enlaces abren búsquedas de Amazon relacionadas con cada material.
Si tienes dudas sobre las lanas o herramientas, consulta nuestra guía completa de materiales para amigurumi.
Abreviaturas
- V: Vuelta.
- Cad: Cadena.
- Am: Anillo mágico.
- Pb: Punto bajo.
- Pm: Punto medio.
- Pd: Punto deslizado.
- Pa: Punto alto.
- Pma: Punto medio alto.
- Aum: Aumento.
- Dis: Disminución.
- BLO: solo hebra trasera.
- FLO: solo hebra delantera.
Puedes repasar todas las técnicas en nuestra guía de abreviaturas a crochet en español.
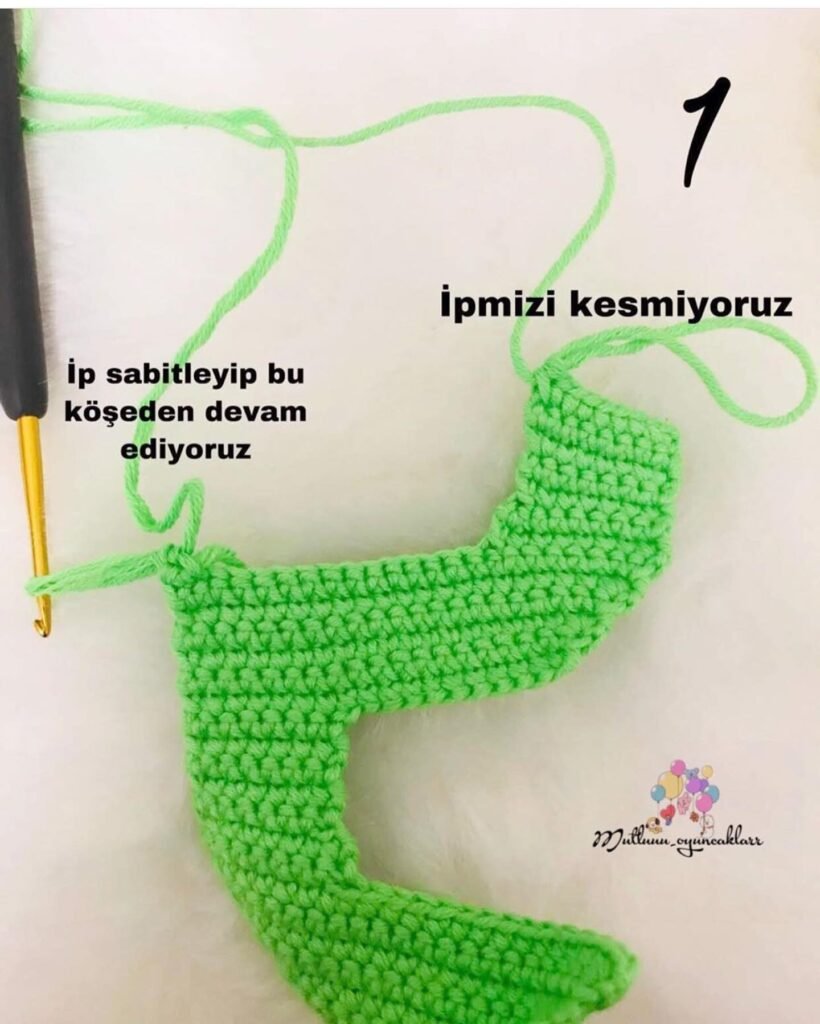
Número 0 en crochet / amigurumi
Este número se trabaja en dos piezas iguales. Luego se unen los bordes y se rellena.
Pieza principal
Hacer 14 Cad.
VUELTA 1: Comenzando desde la segunda cadena desde la aguja, hacer 13 Pb, 1 Cad, girar.
VUELTA 2: 1 Aum, 11 Pb, 1 Aum = 15 Pb, 1 Cad, girar.
VUELTA 3: 1 Aum, 13 Pb, 1 Aum = 17 Pb, 1 Cad, girar.
VUELTA 4: 1 Aum, 15 Pb, 1 Aum = 19 Pb, 1 Cad, girar.
VUELTA 5: 1 Aum, 17 Pb, 1 Aum = 21 Pb, 1 Cad, girar.
VUELTA 6: 1 Aum, 19 Pb, 1 Aum = 23 Pb, 1 Cad, girar.
VUELTA 7: 23 Pb, 1 Cad, girar.
VUELTA 8: 8 Pb, 1 Dis, 1 Cad, girar.
VUELTA 9: 1 Dis, 7 Pb, 1 Cad, girar.
VUELTA 10: 8 Pb, 1 Cad.
VUELTAS 11 a 23: 8 Pb, 1 Cad, girar.
VUELTA 24: 7 Pb, 1 Aum = 9 Pb.
Cortar la hebra.
Segundo lateral del número 0
Unir el hilo en el borde contrario de la pieza.
VUELTA 1: 8 Pb, 1 Dis, 1 Cad, girar.
VUELTA 2: 1 Dis, 7 Pb, 1 Cad, girar.
VUELTA 3: 8 Pb, 1 Cad, girar.
VUELTAS 4 a 16: 8 Pb, 1 Cad, girar.
VUELTA 17: 7 Pb, 1 Aum, 1 Cad, girar.
Cortar la hebra.
Unión de las dos piezas del número 0
Tejer dos piezas iguales del número 0.
Para unirlas, comenzar sujetando el hilo en la zona inicial donde se cortó la hebra.
VUELTA 1: 8 Pb, 1 Aum, 3 Cad, 1 Aum, 8 Pb, 1 Cad, girar = 23 Pb.
VUELTA 2: 23 Pb, 1 Cad, girar.
VUELTA 3: 1 Dis, 19 Pb, 1 Dis, 1 Cad, girar = 21 Pb.
VUELTA 4: 1 Dis, 17 Pb, 1 Dis, 1 Cad, girar = 19 Pb.
VUELTA 5: 1 Dis, 15 Pb, 1 Dis, 1 Cad, girar = 17 Pb.
VUELTA 6: 1 Dis, 13 Pb, 1 Dis, 1 Cad, girar = 15 Pb.
VUELTA 7: 1 Dis, 11 Pb, 1 Dis, 1 Cad, girar = 13 Pb.
VUELTA 8: 13 Pb. Terminar.
Para unir las dos piezas, comenzar primero por la parte central del número 0. Después unir los bordes exteriores. Ir rellenando con vellón a medida que se cierran los lados, para que el número conserve la forma y quede bien mullido.
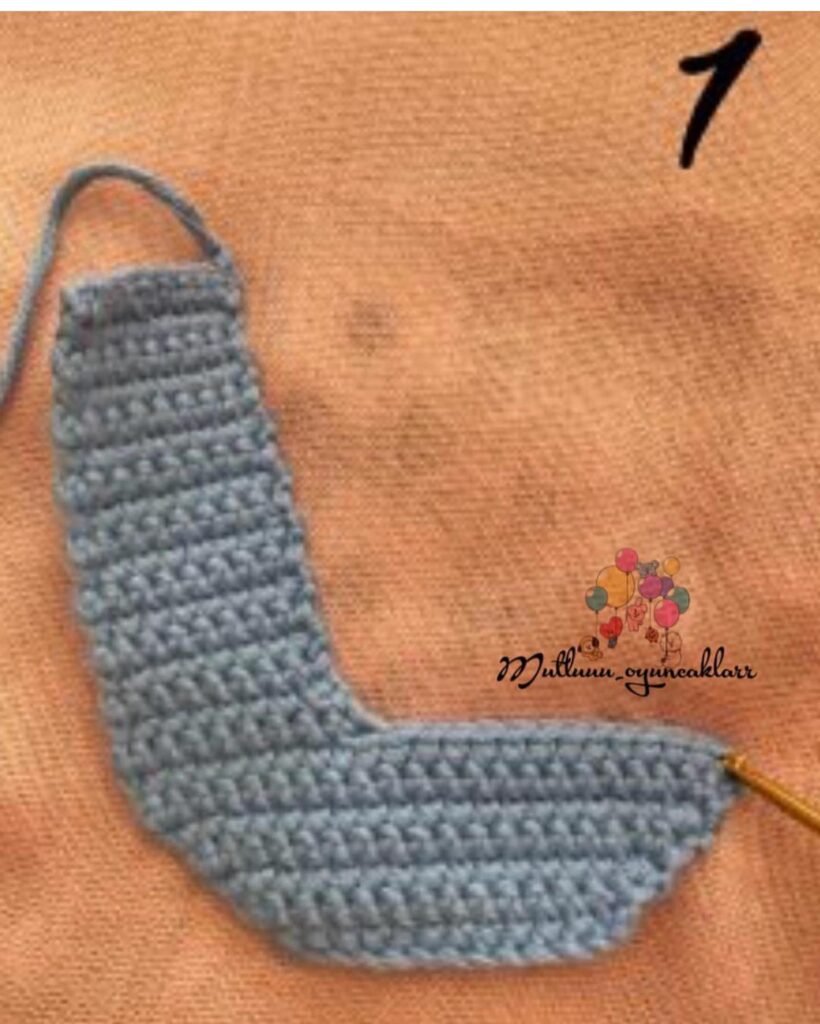
Número 1 en crochet / amigurumi
Hacer 2 piezas iguales.
Base
VUELTA 1: Hacer 9 Cad.
VUELTA 2: Comenzando en la 2.ª cadena desde la aguja, tejer 8 Pb, 1 Cad, girar.
VUELTAS 3 a 25: Tejer 8 Pb. Al terminar cada vuelta, hacer 1 Cad y girar.
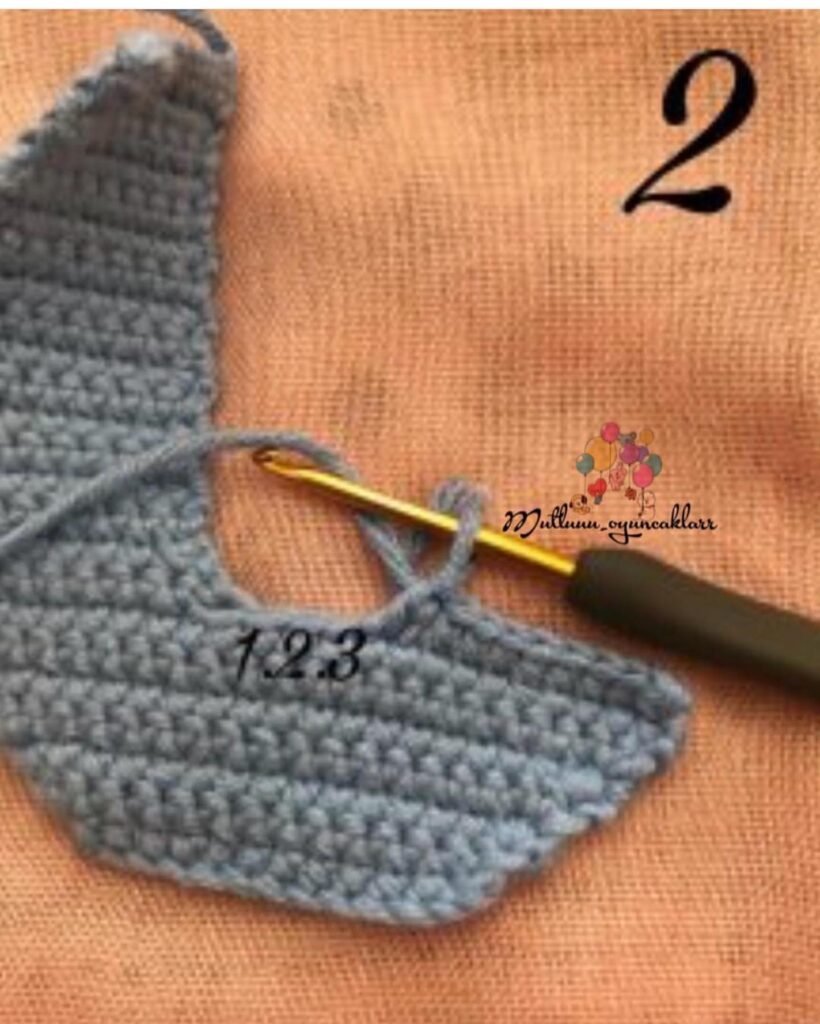
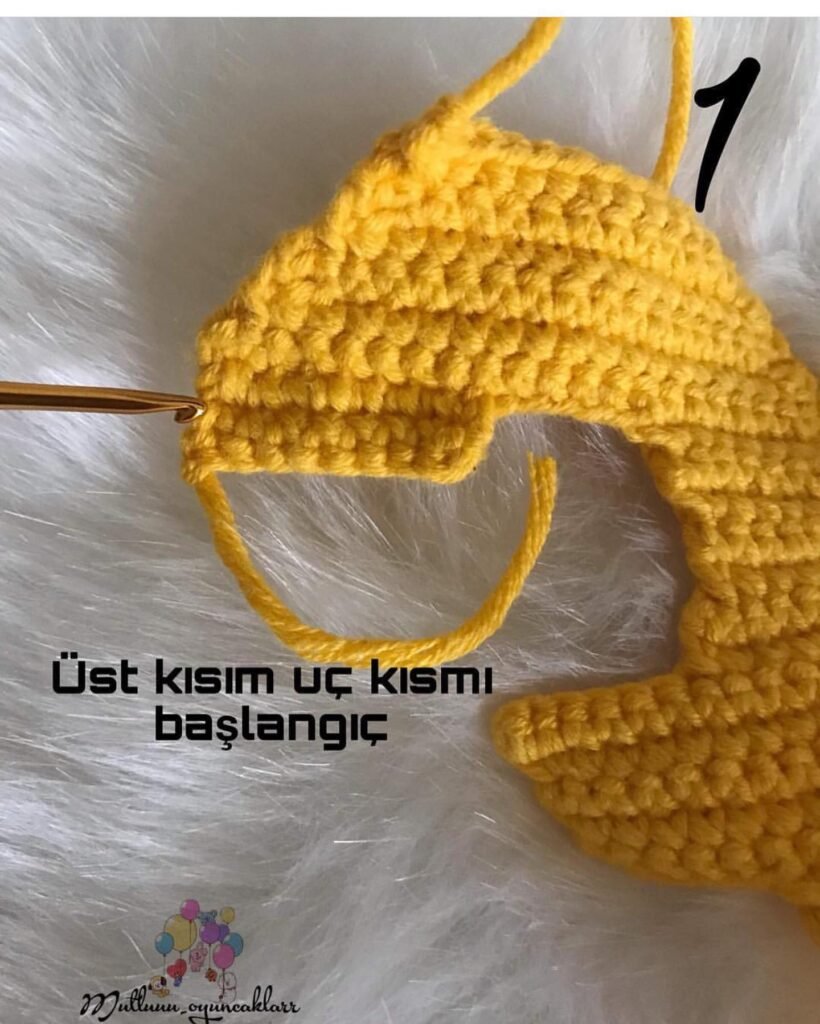
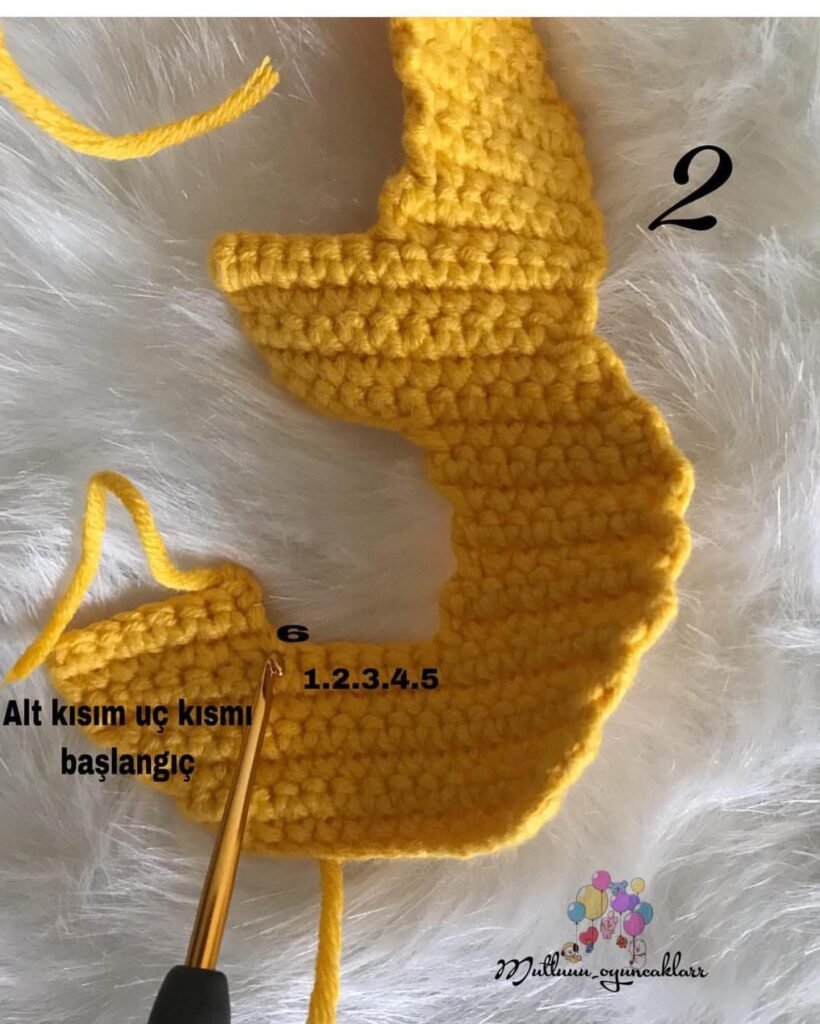
Parte superior del número 1
VUELTA 26: Tejer 8 Pb, 5 Cad, girar, 4 Pb sobre las cadenas, 8 Pb = 12 Pb.
VUELTA 27: 10 Pb, 1 Dis, 1 Cad, girar = 11 Pb.
VUELTA 28: 1 Dis, 9 Pb = 10 Pb.
VUELTA 29: 10 Pb, 1 Cad, girar.
VUELTA 30: 1 Dis, 8 Pb = 9 Pb.
VUELTA 31: 1 Dis, 7 Pb = 8 Pb.
VUELTA 32: 8 Pb.
Para pasar a la vuelta siguiente, hacer 1 Cad y girar. Como el número está formado por 2 piezas, hay que unir los bordes enfrentando ambas partes con Pb. A medida que vayas uniendo, conviene ir colocando el relleno de a poco para que quede mejor armado.
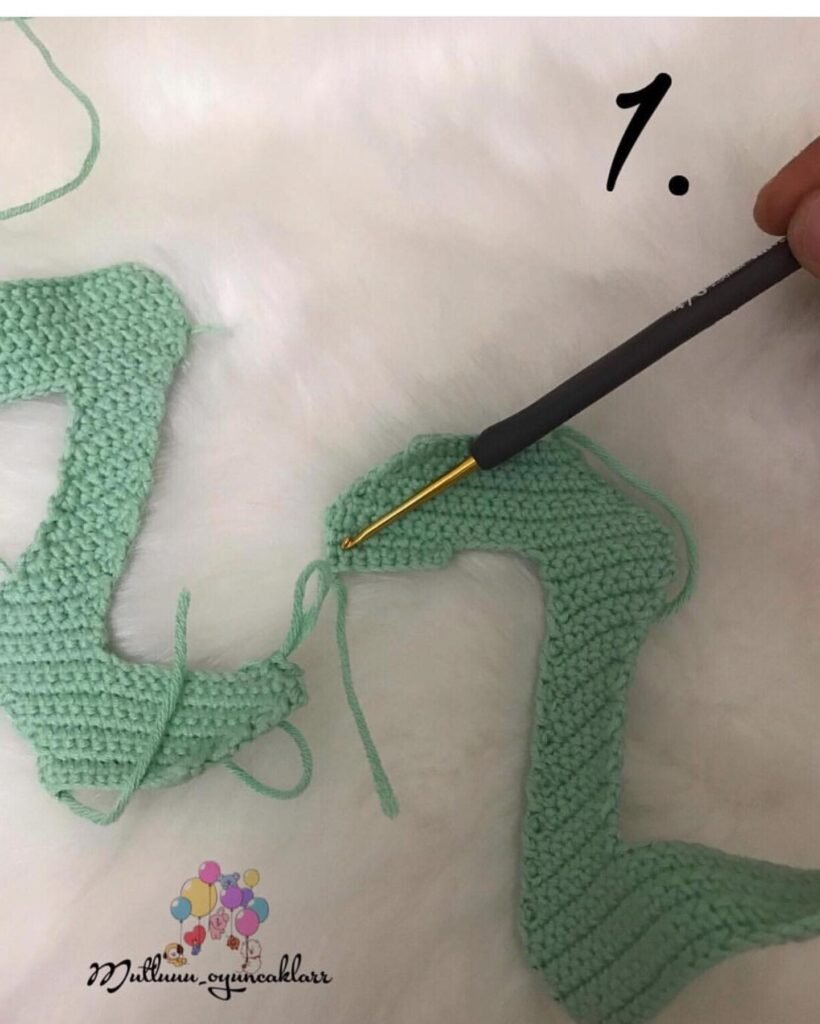
Número 2 en crochet / amigurumi
Hacer 2 piezas iguales.
Hacer 24 Cad.
VUELTA 1: Desde la 2.ª cadena desde la aguja, tejer 23 Pb.
VUELTAS 2 a 7: 23 Pb, 1 Cad, girar.
VUELTA 8: 1 Dis, 7 Pb, 1 Cad, girar.
VUELTA 9: 1 Aum, 5 Pb, 1 Dis, 1 Cad, girar.
VUELTA 10: 1 Dis, 5 Pb, 1 Aum, 1 Cad, girar.
VUELTA 11: 1 Aum, 5 Pb, 1 Dis, 1 Cad, girar.
VUELTA 12: 1 Dis, 5 Pb, 1 Aum, 1 Cad, girar.
VUELTA 13: 1 Aum, 5 Pb, 1 Dis, 1 Cad, girar.
VUELTA 14: 1 Dis, 5 Pb, 1 Aum, 1 Cad, girar.
VUELTA 15: 1 Aum, 5 Pb, 1 Dis, 1 Cad, girar.
VUELTA 16: 1 Dis, 5 Pb, 1 Aum, 1 Cad, girar.
VUELTA 17: 1 Aum, 5 Pb, 1 Dis, 1 Cad, girar.
VUELTA 18: 1 Dis, 5 Pb, 1 Aum, 1 Cad, girar.
VUELTA 19: 1 Aum, 5 Pb, 1 Dis, 1 Cad, girar.
VUELTA 20: 1 Dis, 5 Pb, 1 Aum, 1 Cad, girar.
VUELTA 21: 1 Aum, 5 Pb, 1 Dis, 1 Cad, girar.
VUELTA 22: 1 Dis, 5 Pb, 1 Aum, 1 Cad, girar.
En estas vueltas, hacer las disminuciones sobre las disminuciones de la vuelta anterior y los aumentos sobre los aumentos. Al final de cada vuelta deben quedar siempre 8 Pb. Se tejen 14 vueltas de esta forma.
VUELTAS 23 a 24: 8 Pb, 1 Cad, girar.
VUELTA 25: 7 Pb, 1 Aum, 15 Cad, girar.
VUELTA 26: Desde la 2.ª cadena desde la aguja, tejer 14 Pb sobre las cadenas. Luego tejer 9 Pb sobre la base = 23 Pb.
VUELTA 27: 1 Dis, 19 Pb, 1 Dis, 1 Cad, girar = 21 Pb.
VUELTA 28: 1 Dis, 17 Pb, 1 Dis, 1 Cad, girar = 19 Pb.
VUELTA 29: 1 Dis, 15 Pb, 1 Dis, 1 Cad, girar = 17 Pb.
VUELTA 30: 1 Dis, 13 Pb, 1 Dis, 1 Cad, girar = 15 Pb.
VUELTA 31: 1 Dis, 11 Pb, 1 Dis, 1 Cad, girar = 13 Pb.
VUELTA 32: 13 Pb.
En la parte de la punta, hacer 2 vueltas de 8 Pb, 1 Cad y girar, y terminar. Para unir, enfrentar las dos piezas y unirlas con Pb por todo el contorno. En las esquinas, hacer 1 Aum para que el tejido no quede tirante y la forma del número quede más prolija.
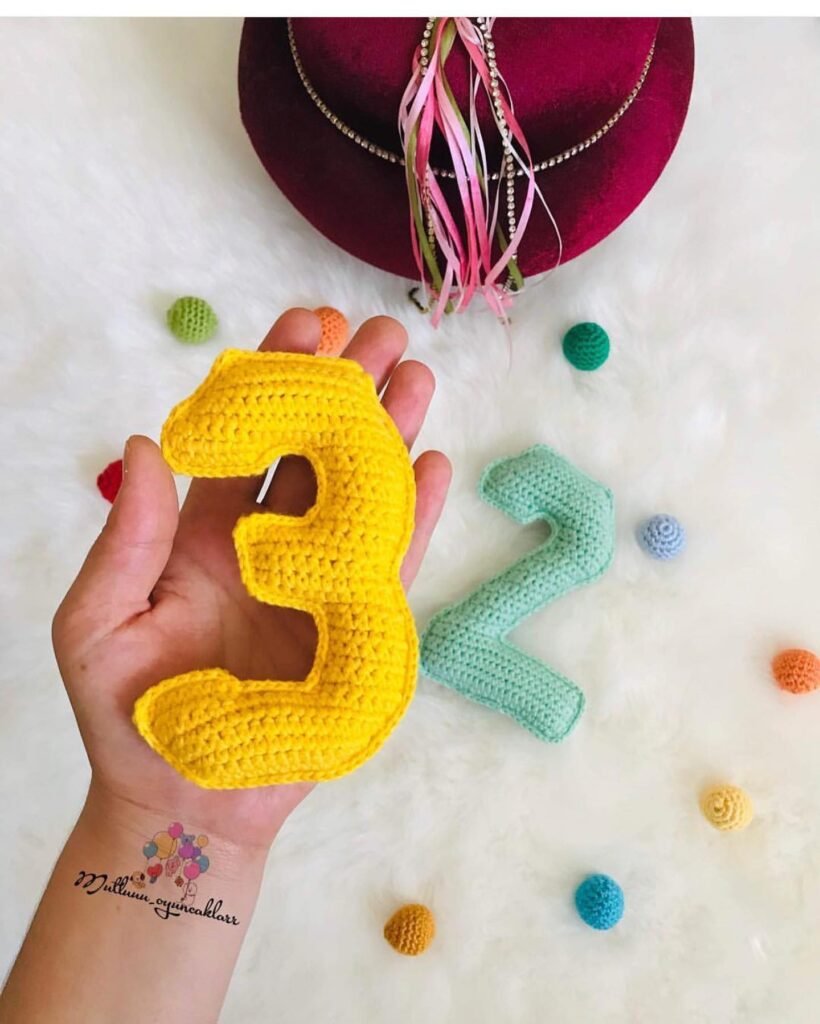
Número 3 en crochet / amigurumi
Hacer 2 piezas iguales. Luego unir los bordes de ambas piezas con Pb.
Hacer 14 Cad.
VUELTA 1: 13 Pb, 1 Cad, girar.
VUELTA 2: 1 Aum, 11 Pb, 1 Aum = 15 Pb, 1 Cad, girar.
VUELTA 3: 1 Aum, 13 Pb, 1 Aum = 17 Pb, 1 Cad, girar.
VUELTA 4: 1 Aum, 15 Pb, 1 Aum = 19 Pb, 1 Cad, girar.
VUELTA 5: 1 Aum, 17 Pb, 1 Aum = 21 Pb, 1 Cad, girar.
VUELTA 6: 1 Aum, 21 Pb, 1 Aum = 23 Pb, 1 Cad, girar.
VUELTA 7: 7 Pb, 1 Dis, 1 Cad, girar.
VUELTA 8: 8 Pb, 1 Cad, girar.
VUELTA 9: 6 Pb, 1 Dis, 1 Cad, girar.
VUELTA 10: 7 Pb, 1 Cad, girar.
VUELTA 11: 6 Pb, 1 Aum = 8 Pb, 1 Cad, girar.
VUELTA 12: 8 Pb, 1 Cad, girar.
VUELTA 13: 1 Dis, 5 Pb, 1 Aum, 7 Cad, girar.
VUELTA 14: Desde la 2.ª cadena desde la aguja, tejer 6 Pb sobre las cadenas, luego 6 Pb sobre la base, 1 Dis = 13 Pb, 1 Cad, girar.
VUELTA 15: 1 Dis, 11 Pb = 12 Pb, 1 Cad, girar.
VUELTA 16: 10 Pb, 1 Dis = 11 Pb, 1 Cad, girar.
VUELTA 17: 1 Aum, 9 Pb, 1 Aum = 13 Pb, 1 Cad, girar.
VUELTA 18: 1 Aum, 12 Pb = 14 Pb. Cortar la hebra.
VUELTA 19: Unir nuevamente el hilo y tejer 1 Aum, 5 Pb, 1 Dis = 8 Pb, 1 Cad, girar.
VUELTA 20: 8 Pb, 1 Cad, girar.
VUELTA 21: 6 Pb, 1 Dis, 1 Cad, girar.
VUELTA 22: 7 Pb, 1 Cad, girar.
VUELTA 23: 6 Pb, 1 Aum, 1 Cad, girar.
VUELTA 24: 8 Pb, 1 Cad, girar.
VUELTA 25: 7 Pb, 1 Aum, 15 Cad, girar.
VUELTA 26: 1 Dis sobre la cadena, 12 Pb sobre las cadenas, 7 Pb, 1 Dis = 21 Pb.
VUELTA 27: 1 Dis, 17 Pb, 1 Dis = 19 Pb, 1 Cad, girar.
VUELTA 28: 1 Dis, 15 Pb, 1 Dis = 17 Pb, 1 Cad, girar.
VUELTA 29: 1 Dis, 13 Pb, 1 Dis = 15 Pb, 1 Cad, girar.
VUELTA 30: 1 Dis, 11 Pb, 1 Dis = 13 Pb, 1 Cad, girar.
VUELTA 31: 13 Pb. Terminar.
Terminación de las puntas del número 3
En las puntas de la parte superior:
VUELTA 1: 7 Pb, 1 Dis = 8 Pb.
VUELTA 2: 8 Pb. Terminar.
Para la punta inferior, desde la parte interna del tejido saltar 5 Pb y sujetar el hilo en el 6.º Pb.
VUELTA 1: 1 Dis, 7 Pb = 8 Pb.
VUELTA 2: 8 Pb. Terminar.
Unir los bordes de las 2 piezas con Pb, rellenando de a poco mientras se cierra.
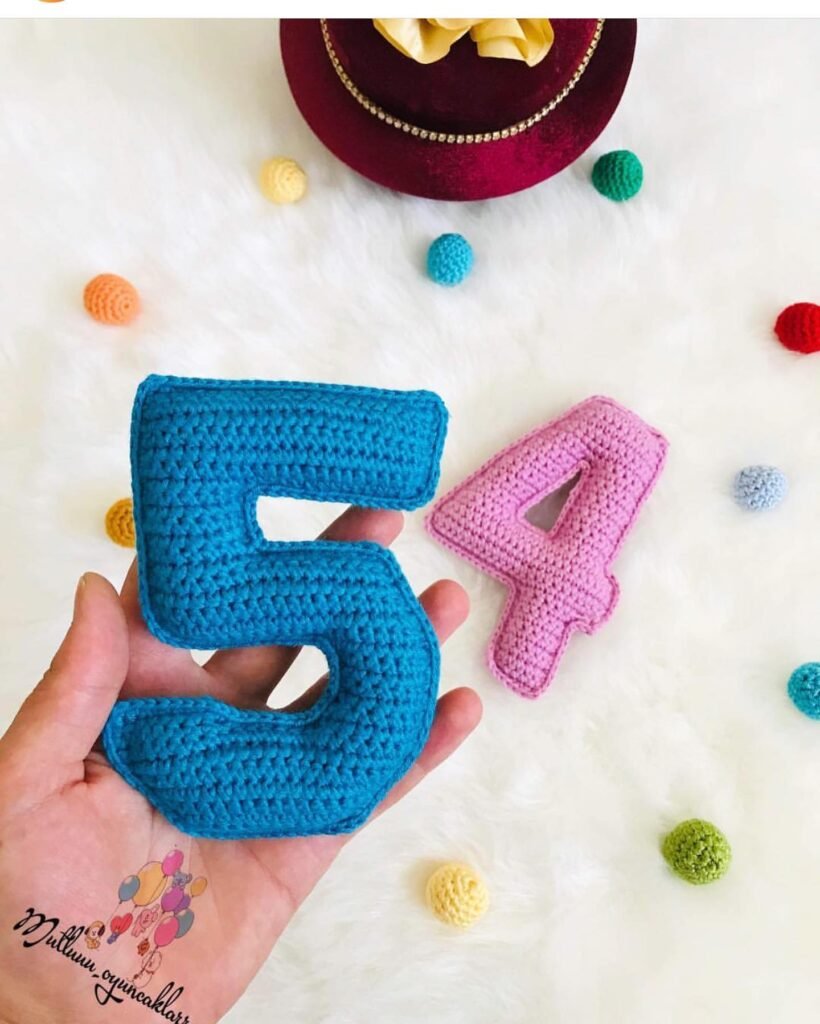
Número 4 en crochet / amigurumi
Comenzamos por la parte superior.
Hacer 12 Cad.
VUELTA 1: 11 Pb, 1 Cad, girar.
VUELTA 2: 1 Aum, 10 Pb = 12 Pb, 1 Cad, girar.
VUELTA 3: 12 Pb, 1 Cad, girar.
VUELTA 4: 1 Aum, 11 Pb = 13 Pb, 1 Cad, girar.
VUELTA 5: 13 Pb, 1 Cad, girar.
VUELTA 6: 1 Aum, 12 Pb = 14 Pb, 1 Cad, girar.
VUELTA 7: 13 Pb, 1 Aum = 15 Pb, 1 Cad, girar.
VUELTA 8: 7 Pb, 1 Cad, girar. Acá se trabaja la parte izquierda.
VUELTA 9: 1 Dis, 4 Pb, 1 Aum = 7 Pb, 1 Cad, girar.
VUELTA 10: 7 Pb, 1 Cad, girar.
VUELTA 11: 1 Dis, 4 Pb, 1 Aum = 7 Pb, 1 Cad, girar.
VUELTA 12: 7 Pb, 1 Cad, girar.
VUELTA 13: 1 Dis, 4 Pb, 1 Aum = 7 Pb, 1 Cad, girar.
VUELTA 14: 7 Pb, 1 Cad, girar.
VUELTA 15: 1 Dis, 4 Pb, 1 Aum = 7 Pb, 1 Cad, girar.
VUELTA 16: 7 Pb, 1 Cad, girar.
VUELTA 17: 1 Dis, 4 Pb, 1 Aum = 7 Pb, 1 Cad, girar.
VUELTA 18: 7 Pb, hacer 6 Cad. No cortar la hebra; más adelante se continúa con este mismo hilo.
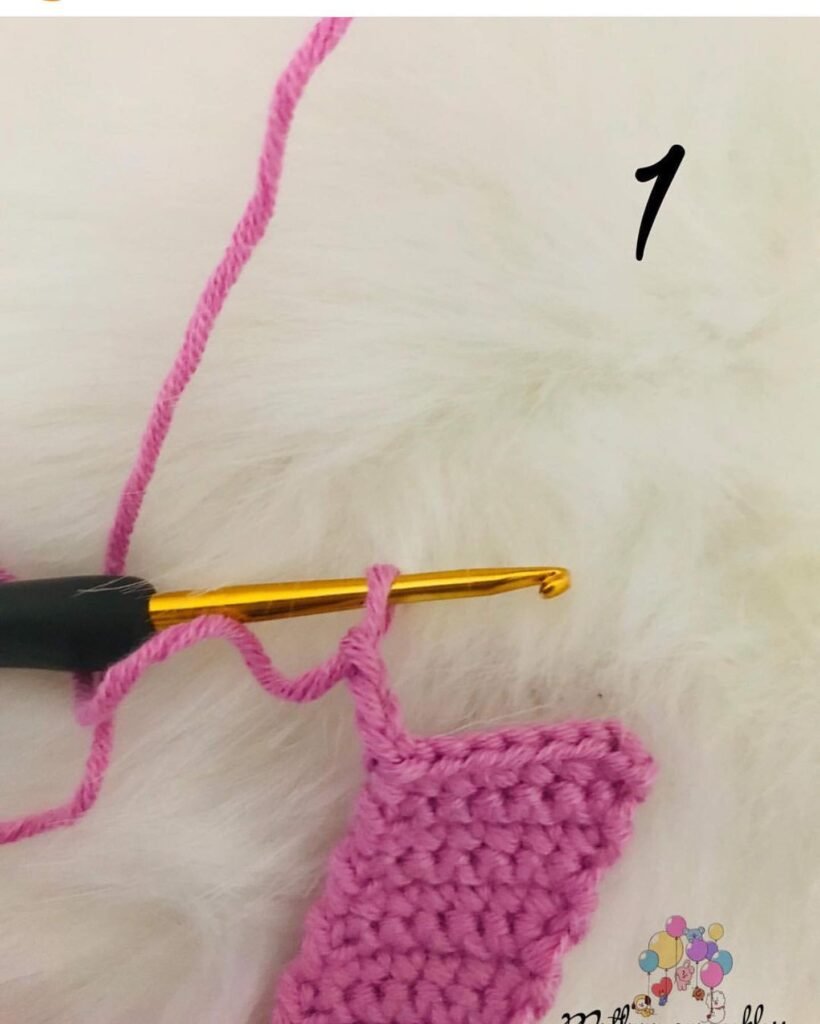
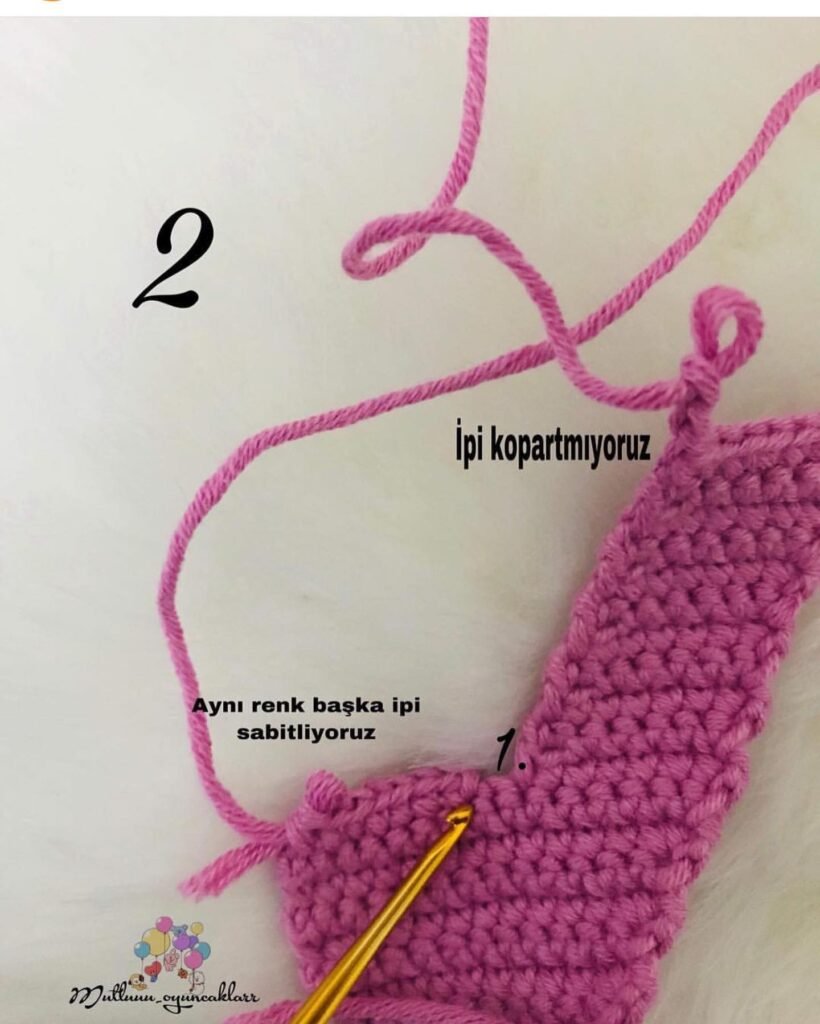
Tomar otra hebra del mismo color y sujetarla en la parte interna del lado derecho. Saltar 1 Pb y comenzar desde el 2.º Pb.
VUELTA 1: 7 Pb, 1 Cad, girar.
VUELTAS 2 a 9: 7 Pb, 1 Cad, girar. Cortar esta segunda hebra.
Continuar con la hebra que no habíamos cortado. Ya teníamos hechas 6 Cad. Unir con el borde contrario y tejer 7 Pb. Luego hacer 4 Cad.
VUELTA 3: 3 Pb sobre las cadenas, 19 Pb, 1 Aum = 24 Pb, 1 Cad, girar.
VUELTA 4: 24 Pb.
VUELTA 5: 23 Pb, 1 Aum = 25 Pb, 1 Cad, girar.
VUELTAS 6 a 8: 25 Pb, 1 Cad, girar.
VUELTA 9: 3 Pd, 7 Pb, 1 Cad, girar.
VUELTAS 10 a 18: 7 Pb, 1 Cad, girar.
Para unir las piezas, comenzar primero por la parte interna haciendo Pb. Luego unir los bordes exteriores, rellenando de a poco mientras se cierra.
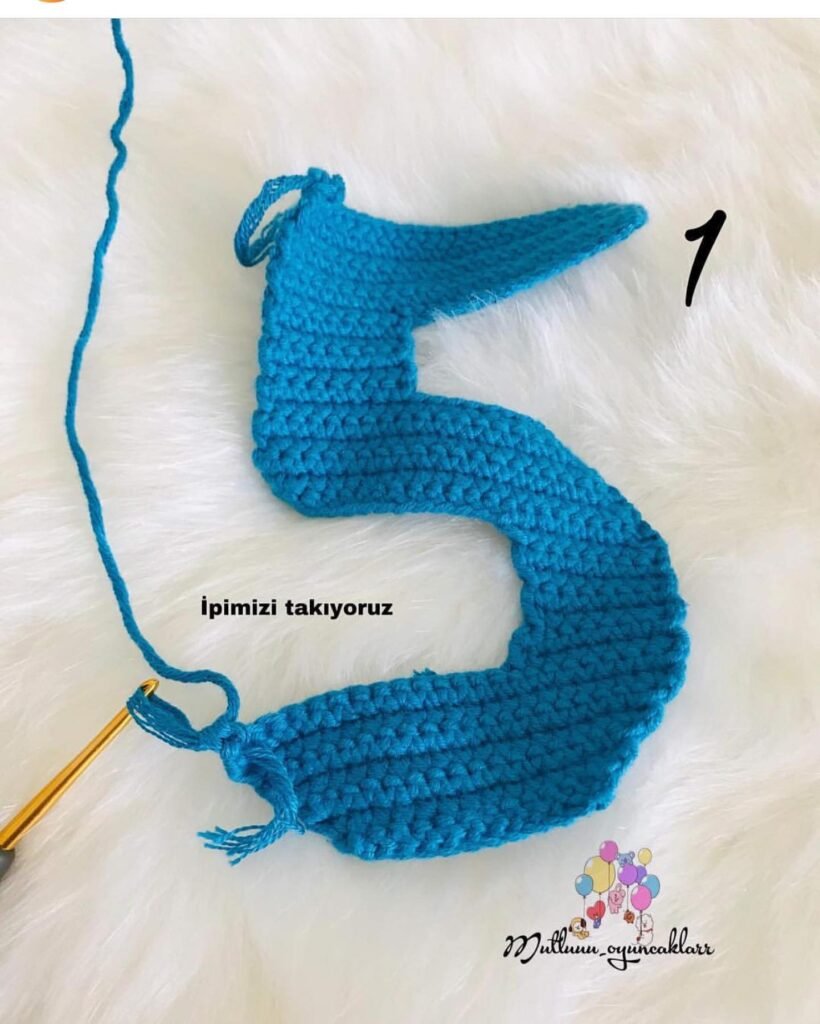
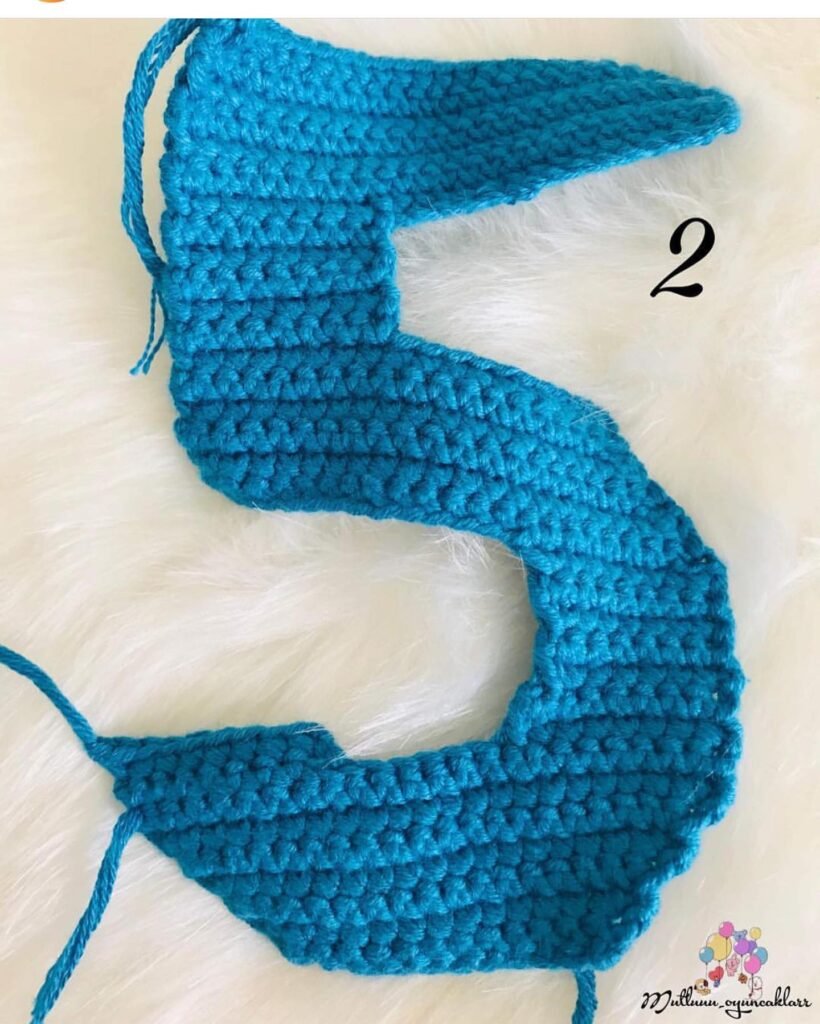
Número 5 en crochet / amigurumi
Hacer 2 piezas iguales.
Hacer 14 Cad.
VUELTA 1: 13 Pb, 1 Cad, girar.
VUELTA 2: 1 Aum, 11 Pb, 1 Aum = 15 Pb, 1 Cad, girar.
VUELTA 3: 1 Aum, 13 Pb, 1 Aum = 17 Pb, 1 Cad, girar.
VUELTA 4: 1 Aum, 15 Pb, 1 Aum = 19 Pb, 1 Cad, girar.
VUELTA 5: 1 Aum, 17 Pb, 1 Aum = 21 Pb, 1 Cad, girar.
VUELTA 6: 1 Aum, 19 Pb, 1 Aum = 23 Pb, 1 Cad, girar.
VUELTA 7: 23 Pb, 1 Cad, girar.
VUELTA 8: 7 Pb, 1 Dis = 8 Pb, 1 Cad, girar.
VUELTA 9: 8 Pb, 1 Cad, girar.
VUELTA 10: 6 Pb, 1 Dis = 7 Pb, 1 Cad, girar.
VUELTA 11: 7 Pb, 1 Cad, girar.
VUELTA 12: 6 Pb, 1 Aum = 8 Pb, 1 Cad, girar.
VUELTA 13: 8 Pb, 1 Cad, girar.
VUELTA 14: 7 Pb, 1 Aum, 15 Cad.
VUELTA 15: 14 Pb sobre las cadenas, 7 Pb, 1 Dis = 22 Pb, 1 Cad, girar.
VUELTA 16: 1 Dis, 20 Pb = 21 Pb, 1 Cad, girar.
VUELTA 17: 19 Pb, 1 Dis = 20 Pb, 1 Cad, girar.
VUELTA 18: 1 Dis, 18 Pb = 19 Pb, 1 Cad, girar.
VUELTA 19: 17 Pb, 1 Dis = 18 Pb, 1 Cad, girar.
VUELTA 20: 18 Pb, 1 Cad, girar.
VUELTA 21: 8 Pb, 1 Cad, girar.
VUELTAS 22 a 24: 8 Pb, 1 Cad, girar.
VUELTA 25: 8 Pb, 16 Cad.
VUELTA 26: 15 Pb sobre las cadenas, 8 Pb = 23 Pb, 1 Cad, girar.
VUELTAS 27 a 32: 23 Pb. Terminar.
Punta inferior del número 5
La punta se hace en el extremo inferior del número.
VUELTA 1: 7 Pb, 1 Dis = 8 Pb.
VUELTA 2: 8 Pb. Cortar la hebra.
Unir las dos piezas por los bordes con Pb, rellenando de a poco mientras se cierra.
Número 6 en crochet / amigurumi
Hacer 2 piezas iguales.
Hacer 14 Cad.
VUELTA 1: 13 Pb, 1 Cad, girar.
VUELTA 2: 1 Aum, 11 Pb, 1 Aum = 15 Pb, 1 Cad, girar.
VUELTA 3: 1 Aum, 13 Pb, 1 Aum = 17 Pb, 1 Cad, girar.
VUELTA 4: 1 Aum, 15 Pb, 1 Aum = 19 Pb, 1 Cad, girar.
VUELTA 5: 1 Aum, 17 Pb, 1 Aum = 21 Pb, 1 Cad, girar.
VUELTA 6: 1 Aum, 19 Pb, 1 Aum = 23 Pb, 1 Cad, girar.
VUELTA 7: 7 Pb, 1 Dis = 8 Pb, 1 Cad, girar.
VUELTA 8: 8 Pb, 1 Cad, girar.
VUELTA 9: 6 Pb, 1 Dis = 7 Pb, 1 Cad, girar.
VUELTA 10: 7 Pb, 1 Cad, girar.
VUELTA 11: 6 Pb, 1 Aum = 8 Pb, 1 Cad, girar.
VUELTA 12: 8 Pb, 1 Cad, girar.
VUELTA 13: 7 Pb, 1 Aum. No cortar la hebra. Sujetar otra hebra del mismo color del lado derecho.
Parte lateral con nueva hebra
VUELTA 1: 7 Pb, 1 Dis = 8 Pb, 1 Cad, girar.
VUELTA 2: 8 Pb, 1 Cad, girar.
VUELTA 3: 6 Pb, 1 Dis = 7 Pb, 1 Cad, girar.
VUELTA 4: 7 Pb, 1 Cad, girar.
VUELTA 5: 6 Pb, 1 Aum = 8 Pb, 1 Cad, girar.
VUELTA 6: 8 Pb, 1 Cad, girar. Cortar esta hebra.
Continuación con la hebra que no cortamos
Continuar con la hebra que quedó sin cortar.
VUELTA 1: Hacer 5 Cad, unir con el extremo donde se cortó la otra hebra, tejer 1 Aum, 7 Pb = 23 Pb, 1 Cad, girar.
VUELTA 2: 21 Pb, 1 Dis = 22 Pb, 1 Cad, girar.
VUELTA 3: 1 Dis, 20 Pb = 21 Pb, 1 Cad, girar.
VUELTA 4: 19 Pb, 1 Dis = 20 Pb, 1 Cad, girar.
VUELTA 5: 1 Dis, 18 Pb = 19 Pb, 1 Cad, girar.
VUELTA 6: 17 Pb, 1 Dis = 18 Pb, 1 Cad, girar.
VUELTA 7: 1 Dis, 16 Pb = 17 Pb, 1 Cad, girar.
VUELTA 8: 7 Pb, 1 Cad, girar.
VUELTAS 9 a 11: 7 Pb, 1 Cad, girar.
VUELTA 12: 6 Pb, 1 Aum = 8 Pb, 1 Cad, girar.
VUELTA 13: 8 Pb.
VUELTA 14: 7 Pb, 1 Aum, 15 Cad.
VUELTA 15: 1 Dis, 12 Pb sobre las cadenas, 7 Pb, 1 Dis, 1 Cad, girar.
VUELTA 16: 1 Dis, 17 Pb, 1 Dis = 19 Pb, 1 Cad, girar.
VUELTA 17: 1 Dis, 15 Pb, 1 Dis = 17 Pb, 1 Cad, girar.
VUELTA 18: 1 Dis, 13 Pb, 1 Dis = 15 Pb, 1 Cad, girar.
VUELTA 19: 1 Dis, 11 Pb, 1 Dis = 13 Pb, 1 Cad, girar.
VUELTA 20: 13 Pb. Terminar.
Punta del número 6
VUELTA 1: 7 Pb, 1 Aum = 8 Pb.
VUELTA 2: 8 Pb. Cortar la hebra.
Para unir, empezar primero por la parte redonda central. Después unir los bordes exteriores con Pb, rellenando de a poco mientras se cierra.
Número 7 en crochet / amigurumi
Hacer 2 piezas iguales.
Hacer 24 Cad.
VUELTA 1: Desde la 2.ª cadena desde la aguja, tejer 23 Pb.
VUELTAS 2 a 7: 23 Pb, 1 Cad, girar. Repetir hasta completar la vuelta 7.
VUELTA 8: 8 Pb, 1 Cad, girar.
VUELTA 9: 1 Aum, 5 Pb, 1 Dis, 1 Cad, girar.
VUELTA 10: 8 Pb, 1 Cad, girar.
VUELTA 11: 1 Aum, 5 Pb, 1 Dis, 1 Cad, girar.
VUELTA 12: 8 Pb, 1 Cad, girar.
VUELTA 13: 1 Aum, 5 Pb, 1 Dis, 1 Cad, girar.
VUELTA 14: 1 Dis, 5 Pb, 1 Aum, 1 Cad, girar.
VUELTA 15: 8 Pb, 1 Cad, girar.
VUELTA 16: 1 Dis, 5 Pb, 1 Aum, 1 Cad, girar.
VUELTA 17: 1 Aum, 5 Pb, 1 Dis, 1 Cad, girar.
VUELTA 18: 8 Pb, 1 Cad, girar.
VUELTA 19: 1 Aum, 5 Pb, 1 Dis, 1 Cad, girar.
VUELTA 20: 1 Dis, 5 Pb, 1 Aum, 1 Cad, girar.
VUELTA 21: 8 Pb, 1 Cad, girar.
VUELTA 22: 1 Dis, 5 Pb, 1 Aum, 1 Cad, girar.
VUELTA 23: 1 Aum, 5 Pb, 1 Dis, 1 Cad, girar.
VUELTA 24: 8 Pb, 1 Cad, girar.
VUELTA 25: 1 Aum, 5 Pb, 1 Dis, 1 Cad, girar.
VUELTA 26: 1 Dis, 5 Pb, 1 Aum, 1 Cad, girar.
VUELTA 27: 8 Pb, 1 Cad, girar.
VUELTA 28: 1 Dis, 5 Pb, 1 Aum, 1 Cad, girar.
VUELTA 29: 1 Aum, 5 Pb, 1 Dis, 1 Cad, girar.
VUELTA 30: 8 Pb, 1 Cad, girar.
VUELTA 31: 1 Aum, 5 Pb, 1 Dis, 1 Cad, girar.
VUELTA 32: 8 Pb. Terminar.
Colocar las 2 piezas una sobre la otra y unir todo el contorno con Pb, rellenando de a poco mientras se cierra.
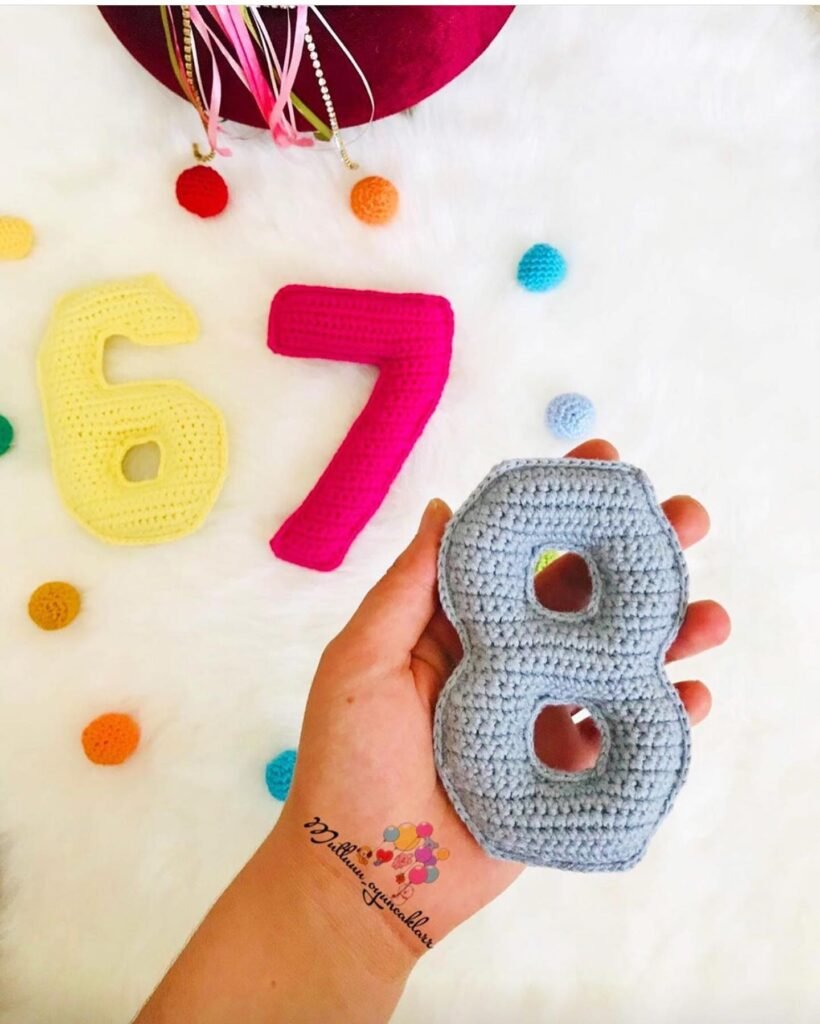
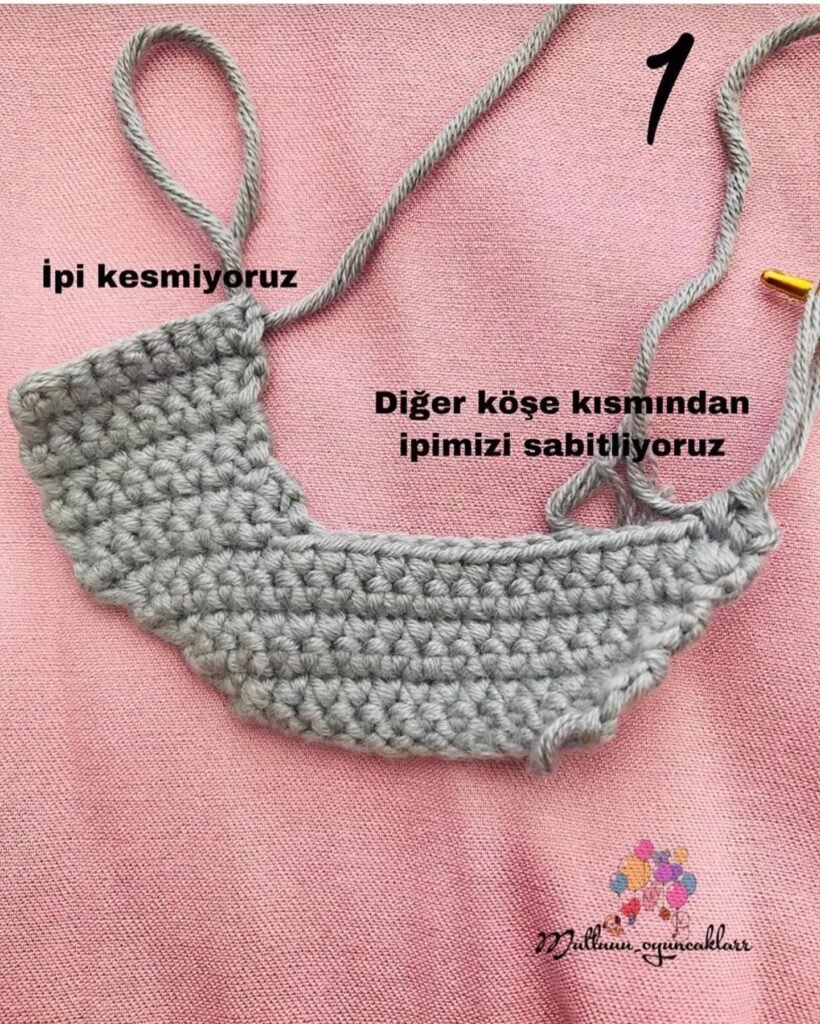
Número 8 en crochet / amigurumi
Hacer 2 piezas iguales.
Hacer 14 Cad.
VUELTA 1: 13 Pb, 1 Cad, girar.
VUELTA 2: 1 Aum, 11 Pb, 1 Aum = 15 Pb, 1 Cad, girar.
VUELTA 3: 1 Aum, 13 Pb, 1 Aum = 17 Pb, 1 Cad, girar.
VUELTA 4: 1 Aum, 15 Pb, 1 Aum = 19 Pb, 1 Cad, girar.
VUELTA 5: 1 Aum, 17 Pb, 1 Aum = 21 Pb, 1 Cad, girar.
VUELTA 6: 1 Aum, 19 Pb, 1 Aum = 23 Pb, 1 Cad, girar.
VUELTA 7: 7 Pb, 1 Dis = 8 Pb, 1 Cad, girar.
VUELTA 8: 8 Pb, 1 Cad, girar.
VUELTA 9: 6 Pb, 1 Dis = 7 Pb, 1 Cad, girar.
VUELTA 10: 7 Pb, 1 Cad, girar.
VUELTA 11: 6 Pb, 1 Aum = 8 Pb, 1 Cad, girar.
VUELTA 12: 8 Pb, 1 Cad, girar.
VUELTA 13: 1 Dis, 5 Pb, 1 Aum = 8 Pb. No cortar la hebra. Sujetar otra hebra del mismo color en la esquina opuesta.
Esquina opuesta inferior
Con la nueva hebra:
VUELTA 1: 7 Pb, 1 Dis = 8 Pb, 1 Cad, girar.
VUELTA 2: 8 Pb, 1 Cad, girar.
VUELTA 3: 6 Pb, 1 Dis = 7 Pb, 1 Cad, girar.
VUELTA 4: 7 Pb, 1 Cad, girar.
VUELTA 5: 6 Pb, 1 Aum = 8 Pb, 1 Cad, girar.
VUELTA 6: 8 Pb. Cortar esta hebra.
Continuación con la hebra que no cortamos
VUELTA 14: Después del aumento de la vuelta 13, hacer 5 Cad y unir al otro extremo.
VUELTA 15: 1 Aum, 5 Pb, 1 Dis = 8 Pb, 1 Cad, girar.
VUELTA 16: 1 Dis, 17 Pb, 1 Dis = 19 Pb, 1 Cad, girar.
VUELTA 17: 1 Dis, 15 Pb, 1 Dis = 17 Pb, 1 Cad, girar.
VUELTA 18: 1 Dis, 13 Pb, 1 Dis = 15 Pb, 1 Cad, girar.
VUELTA 19: 1 Aum, 13 Pb, 1 Aum = 17 Pb, 1 Cad, girar.
VUELTA 20: 1 Aum, 15 Pb, 1 Aum = 19 Pb, 1 Cad, girar.
VUELTA 21: 1 Aum, 17 Pb, 1 Aum = 21 Pb, 1 Cad, girar.
Ahora pasamos a la parte superior del número 8. Se trabaja igual que la parte inferior: primero una esquina y después la otra.
VUELTA 22: 1 Aum, 5 Pb, 1 Dis = 8 Pb, 1 Cad, girar.
VUELTA 23: 8 Pb, 1 Cad, girar.
VUELTA 24: 6 Pb, 1 Dis = 7 Pb, 1 Cad, girar.
VUELTA 25: 7 Pb, 1 Cad, girar.
VUELTA 26: 6 Pb, 1 Aum = 8 Pb, 1 Cad, girar.
VUELTA 27: 8 Pb, 1 Cad, girar.
VUELTA 28: 7 Pb, 1 Aum = 9 Pb. No cortar la hebra. Como en la parte inferior, vamos a tejer la esquina opuesta.
Esquina opuesta superior
Con otra hebra del mismo color:
VUELTA 1: 1 Aum, 5 Pb, 1 Dis = 8 Pb, 1 Cad, girar.
VUELTA 2: 8 Pb, 1 Cad, girar.
VUELTA 3: 6 Pb, 1 Dis = 7 Pb, 1 Cad, girar.
VUELTA 4: 7 Pb, 1 Cad, girar.
VUELTA 5: 6 Pb, 1 Aum = 8 Pb, 1 Cad, girar.
VUELTA 6: 8 Pb, 1 Cad, girar. Cortar esta hebra.
Cierre superior del número 8
Continuar con la hebra que no habíamos cortado.
VUELTA 29: Hacer 5 Cad, 1 Aum, 7 Pb, 1 Cad, girar.
VUELTA 30: 1 Dis, 19 Pb, 1 Dis = 21 Pb, 1 Cad, girar.
VUELTA 31: 1 Dis, 17 Pb, 1 Dis = 19 Pb, 1 Cad, girar.
VUELTA 32: 1 Dis, 15 Pb, 1 Dis = 17 Pb, 1 Cad, girar.
VUELTA 33: 1 Dis, 13 Pb, 1 Dis = 15 Pb, 1 Cad, girar.
VUELTA 34: 1 Dis, 11 Pb, 1 Dis = 13 Pb, 1 Cad, girar.
VUELTA 35: 13 Pb. Terminar.
Para unir las dos piezas, comenzar primero por las partes centrales redondas del número 8. Después unir todo el contorno exterior con Pb, rellenando de a poco mientras se cierra.
Número 9 en crochet / amigurumi
Hacer 2 piezas iguales.
Hacer 14 Cad.
VUELTA 1: 13 Pb, 1 Cad, girar.
VUELTA 2: 1 Aum, 11 Pb, 1 Aum = 15 Pb, 1 Cad, girar.
VUELTA 3: 1 Aum, 13 Pb, 1 Aum = 17 Pb, 1 Cad, girar.
VUELTA 4: 1 Aum, 15 Pb, 1 Aum = 19 Pb, 1 Cad, girar.
VUELTA 5: 1 Aum, 17 Pb, 1 Aum = 21 Pb, 1 Cad, girar.
VUELTA 6: 1 Aum, 19 Pb, 1 Aum = 23 Pb, 1 Cad, girar.
VUELTA 7: 7 Pb, 1 Dis = 8 Pb, 1 Cad, girar.
VUELTA 8: 8 Pb, 1 Cad, girar.
VUELTA 9: 6 Pb, 1 Dis = 7 Pb, 1 Cad, girar.
VUELTAS 10 a 12: 7 Pb, 1 Cad, girar.
VUELTA 13: 7 Pb, 11 Cad, girar.
VUELTA 14: 1 Aum, 16 Pb = 18 Pb, 1 Cad, girar.
VUELTA 15: 17 Pb, 1 Aum = 19 Pb, 1 Cad, girar.
VUELTA 16: 1 Aum, 18 Pb = 20 Pb, 1 Cad, girar.
VUELTA 17: 19 Pb, 1 Aum = 21 Pb, 1 Cad, girar.
VUELTA 18: 1 Aum, 20 Pb = 22 Pb, 1 Cad, girar.
VUELTA 19: 21 Pb, 1 Aum = 23 Pb, 1 Cad, girar.
VUELTA 20: 7 Pb, 1 Dis = 8 Pb, 1 Cad, girar.
VUELTA 21: 8 Pb, 1 Cad, girar.
VUELTA 22: 6 Pb, 1 Dis = 7 Pb, 1 Cad, girar.
VUELTA 23: 7 Pb, 1 Cad, girar.
VUELTA 24: 6 Pb, 1 Aum = 8 Pb, 1 Cad, girar.
VUELTA 25: 8 Pb, 1 Cad, girar.
VUELTA 26: 7 Pb, 1 Aum = 9 Pb. No cortar la hebra. Sujetar otra hebra desde la esquina opuesta.
Esquina opuesta del número 9
VUELTA 1: 7 Pb, 1 Dis = 8 Pb, 1 Cad, girar.
VUELTA 2: 8 Pb, 1 Cad, girar.
VUELTA 3: 6 Pb, 1 Dis = 7 Pb, 1 Cad, girar.
VUELTA 4: 7 Pb, 1 Cad, girar.
VUELTA 5: 6 Pb, 1 Aum = 8 Pb, 1 Cad, girar.
VUELTA 6: 8 Pb, 1 Cad, girar. Cortar esta hebra.
Cierre superior del número 9
Continuar con la hebra que no habíamos cortado.
VUELTA 27: Después del aumento de la vuelta 26, hacer 5 Cad y unir las dos esquinas haciendo 1 Aum. Tejer 7 Pb = 8 Pb, 1 Cad, girar. Entre las dos esquinas deben quedar 5 Pb.
VUELTA 28: 1 Dis, 19 Pb, 1 Dis = 21 Pb, 1 Cad, girar.
VUELTA 29: 1 Dis, 17 Pb, 1 Dis = 19 Pb, 1 Cad, girar.
VUELTA 30: 1 Dis, 15 Pb, 1 Dis = 17 Pb, 1 Cad, girar.
VUELTA 31: 1 Dis, 13 Pb, 1 Dis = 15 Pb, 1 Cad, girar.
VUELTA 32: 1 Dis, 11 Pb, 1 Dis = 13 Pb, 1 Cad, girar.
VUELTA 33: 13 Pb. Terminar.
Para unir las dos piezas, comenzar primero por la parte central del número. Después unir el contorno exterior con Pb, rellenando de a poco mientras se cierra.
Consejos para tejer números amigurumi prolijos
Cuando tejo números amigurumi, lo que más me ayuda es presentar las dos piezas una sobre otra antes de unirlas. Si las acomodo con alfileres o marcadores, puedo controlar mejor que los bordes coincidan y que la forma del número no se tuerza mientras cierro.
También recomiendo rellenar de a poco. En estos números no conviene esperar al final para colocar todo el vellón, porque algunas curvas y esquinas quedan angostas. Lo ideal es ir rellenando mientras se une el contorno, empujando el vellón con la parte trasera de la aguja o con un palito fino. Así el número queda con volumen, pero sin bultos exagerados.
En las esquinas, sobre todo en números como el 2, el 3, el 5, el 6, el 8 y el 9, conviene no ajustar demasiado el punto bajo de unión. Si el borde queda tirante, la forma se deforma. Yo prefiero tejer esa unión con una tensión un poquito más suave y revisar la silueta del número cada pocos centímetros.
Para convertirlos en juguetes didácticos, se pueden usar colores diferentes para cada número y hacerlos bien blanditos. También quedan preciosos como decoración de cumpleaños, guirnaldas, nombres con números de edad o como set educativo para aprender a contar.
¿Te animaste a tejerlo? Déjame un comentario o compártelo en redes usando #PatronesAmigurumi para que lo vea.
Créditos del diseño original
Este patrón pertenece a la cuenta @mutluuu_oyuncaklarr, que comparte trabajos y diseños de amigurumi con números tejidos a crochet. Muchas gracias a su creadora por este hermoso trabajo y por inspirar a tantas tejedoras a crear juguetes didácticos hechos a mano.
🔖 Aviso: Este patrón es un diseño original de @mutluuu_oyuncaklarr y se comparte aquí traducido al español únicamente con fines educativos y de difusión. Todo el crédito corresponde a su creadora.
Guía práctica para tejer números amigurumi a crochet
¿Cómo se hacen los números a crochet para cumpleaños?
Para hacer números a crochet para cumpleaños, necesitas tejer dos piezas iguales de cada cifra siguiendo un patrón de puntos bajos. Una vez terminadas las piezas, únelas por los bordes con más puntos bajos y rellénalas con vellón siliconado para que tengan cuerpo y suavidad, creando un adorno ideal para decoraciones personalizadas y eventos infantiles.
¿Qué materiales se necesitan para tejer números amigurumi?
Los materiales esenciales para tejer números amigurumi incluyen hilo de algodón de alta calidad, una aguja de crochet de dos coma cinco milímetros y relleno de vellón siliconado. También es recomendable contar con una aguja lanera para realizar los remates finales, tijeras y marcadores de puntos que faciliten el seguimiento de cada vuelta durante el proceso creativo y didáctico.
¿Cuál es la mejor forma de unir y rellenar las cifras tejidas?
La unión de las piezas del número se realiza enfrentando ambas caras tejidas y conectándolas mediante puntos bajos por todo el contorno exterior. Es fundamental introducir el relleno de forma gradual mientras cierras los bordes para asegurar que el vellón se distribuya uniformemente y el número mantenga su forma original sin presentar deformaciones o espacios vacíos incómodos.
¿Por qué los números amigurumi son ideales para el aprendizaje infantil?
Los números tejidos son excelentes herramientas didácticas porque permiten que los niños aprendan matemáticas básicas a través del juego sensorial. Al ser suaves, coloridos y fáciles de manipular, estos juguetes amigurumi fomentan el reconocimiento visual de las cifras y proporcionan una experiencia de aprendizaje táctil segura que estimula el desarrollo cognitivo de los más pequeños de casa.
¿Se pueden personalizar los números tejidos para hacer regalos?
Es totalmente posible personalizar los números amigurumi eligiendo colores vibrantes o hilos con texturas especiales que se adapten al gusto del destinatario final. Estas piezas tejidas a mano funcionan de maravilla como regalos para recién nacidos, guirnaldas infantiles o incluso como accesorios decorativos en sesiones de fotos, aportando siempre un toque artesanal, cariñoso y único.
Deja una respuesta